




Struggling with audio or sound issues on your Windows PC right before a meeting or while trying to watch a video can be very frustrating. Take a breath. Nine times out of ten the problem isn’t a broken system; either it’s sending audio to the wrong place, an app has been muted, or the audio driver is corrupted. This guide provides step-by-step instructions on how to troubleshoot and fix sound not working on Windows 10 and Windows 11, so you can quickly restore audio regardless of your OS version.
Go through the troubleshooting steps in order, test your sound after each try, and move down the list until the problem is fixed. The order is important. Free, reversible checks come first, driver changes next, and restore points at last. If you skip ahead, you might end up reinstalling drivers for a sound that was only muted in the mixer.
How We Tested
- Walked through on both versions. All menu paths were followed on Windows 11 and Windows 10. Where the two differ, you get both routes side by side.
- Verified against Microsoft’s own documentation. The fix order follows Microsoft Support’s audio guidance and is cross-checked against the Windows release health pages for known sound bugs. Where we add our own judgment, such as checking the mixer before touching drivers, we say why.
- Checked against real setups. Onboard Realtek audio, laptop speakers, HDMI monitors, USB headsets, and Bluetooth headphones, which cover most of the “my sound stopped” cases people run into.
- Safe by design. No registry edits, third-party driver updaters, or paid tools are involved. Every risky step is written with a warning and a way back.
- Edited and reviewed. Written by our tech team, fact-checked line by line, and last reviewed in October 2026. When Microsoft moves a setting, we update the steps.
Which Windows version are you on?
Press Windows Key + R, type winver and press Enter. Windows 11 shows a build number of 22000 or higher. A centered Start button is another giveaway. Run commands like mmsys.cpl, services.msc and devmgmt.msc work similarly on both, so they are often the fastest way to troubleshoot.
In this guide
Why is My Sound Not Working? Match the Symptom
Almost every case lands in one of five buckets: the wrong output device, a muted level somewhere in the chain, a disabled device, a stalled audio service, or a bad driver. Find your symptom in this table to go straight to the right fix.
| Symptom | Possible Cause | Fixes to try |
|---|---|---|
| No sound on the computer | Wrong output, muted channel, disabled device | Steps 1 to 5 |
| Sound plays from a monitor, TV or the wrong speakers | Windows made HDMI or DisplayPort the default device | Step 5 |
| Volume is very low at full slider | Mixer levels, enhancements, format, driver | Steps 4, 6, 7, 10 |
| Volume not working on a laptop | Fn-key mode, stuck audio service, hotkey utility | Laptop volume fix |
| Crackling, popping or distorted audio | Enhancements, format, audio service, driver | Steps 6, 7, 8, 10 |
| “No audio output device is installed”, or the device vanished | Driver missing, disabled or not loading | Missing device fix |
| One app has no sound, everything else works | App volume or a per-app output device | App audio fix |
| Headphones show “Connected” but remain silent | Output selection, Bluetooth profile, drivers | Bluetooth fix |
| Microphone records won’t work | Privacy permissions, wrong input device | Microphone fix |
| Sound died right after a Windows update | Driver conflict or a known Windows bug | After-update fix |
How to Fix Sound Not Working on Windows 10 and 11
Step 1Run the Windows Audio Troubleshooter
Estimated Time: About 1 minute. Risk: None.
Windows built-in troubleshooter scans your system drivers, services, and device settings to fix specific issues without damaging or affecting anything else. That makes it the best place to start when troubleshooting a PC.
- Right-click the speaker icon in the taskbar and select Troubleshoot sound problems.
- Select the device with the audio problem and follow the prompts.
Windows 11
- Open Settings > System > Sound, scroll to Advanced, and select Troubleshoot common sound problems. Choose Output devices for playback or Input devices for a microphone.
- Or go to Settings > System > Troubleshoot > Other troubleshooters and click Run next to Playing Audio.

Windows 10
- Open Settings > Update & Security > Troubleshoot > Additional troubleshooters.
- Select Playing Audio, then Run the troubleshooter.

If the troubleshooter won’t open, Microsoft also offers an audio troubleshooter in the Get Help app.
Step 2Check Your Speaker Output
Estimated Time: About 30 seconds. Risk: None.
Windows sends sound to exactly one output at a time. A monitor, a TV, a virtual device or yesterday’s Bluetooth speaker can steal that job, leaving you with a perfectly healthy PC playing audio to something you aren’t listening to.
Windows 11
- Select the Speaker/Volume icon on the taskbar.
- Click the small arrow beside the volume slider (Manage audio devices). The tooltip will display Select a sound output.
- Select your physical speakers or headphones from the playback list.

Windows 10
- Left-click the Speaker icon in the taskbar.
- Click the device label directly above the volume slider.
- Choose the speakers or headphones you want to use for system audio from the list.

Then play something and listen.
Step 3Check Your Audio Hardware and Volume Controls
Estimated Time: About 2 minutes. Risk: None.
Hardware slips are the most overlooked cause, and no driver fix can help a loose plug.
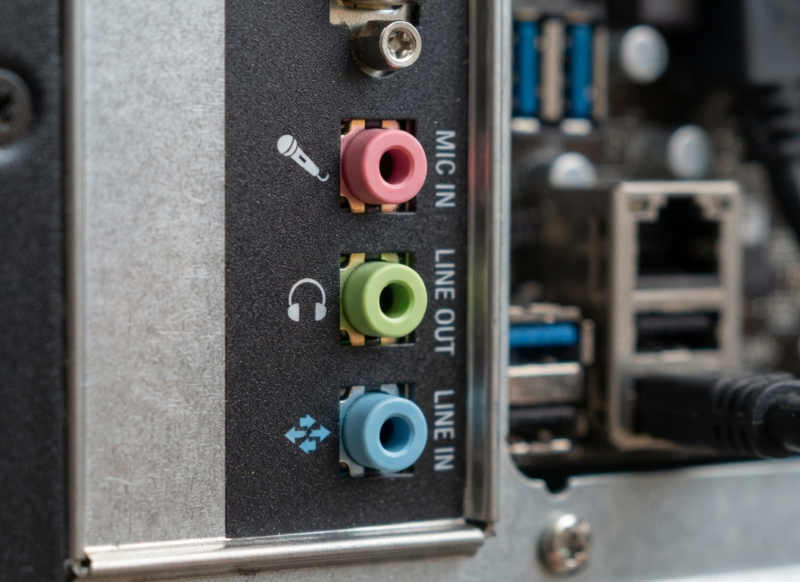
- Reseat every speaker and headphone cable, and confirm powered speakers are switched on. Unplug the audio connector and press it back in firmly. A 3.5 mm jack that’s just a millimeter loose inside its port can short out channels or drop stereo sound down to a single ear.
- Match each plug to the right jack. On many desktops green is output and pink is microphone input. On surround setups with several 3.5 mm jacks, try the likely outputs one at a time if the labels are unclear. Connect stereo speakers to the Lime Green 3.5 mm jack (Front-Out/Line-Out). The Pink port accepts analog microphone input, and Light Blue is Line In.
- Raise every volume control in the chain: the speaker’s own knob, an inline headset remote, the keyboard mute key, and the volume inside the app you’re using.
- Move USB speakers/headset to a different USB port.
- Unplug wired headphones. Some systems silence the speakers while a headset is connected.

Using a laptop and the volume keys won’t work? Skip to Volume not working on a laptop.
Step 4Inspect the Volume Mixer and Verify the Device is Enabled
Estimated Time: About 2 minutes. Risk: None.
Wondering why your volume is not working even though the main slider moves? Windows keeps separate levels for the system for every app and device. Any one of them can be set to zero while the others seem fine, and a device can also likely be switched off.
Check Muted Controls:
Windows 11
- Right-click the speaker icon and select Open Volume mixer.
- Under Apps, see if any app has a muted speaker icon or a slider at zero, then click the icon or drag the slider up.

Windows 10
- Right-click the speaker icon and select Open Volume Mixer.
- Check each slider and the small speaker button under it. A red circle means that channel is muted. Click it to unmute.

Confirm the device is switched on:
- Press Windows Key + R, type mmsys.cpl, and press Enter.
- On the Playback tab (outputs) or the Recording tab (inputs), select your device and choose Properties.
- Next to Device usage, make sure Use this device (enable) is selected.

Step 5Set the Default Audio Device
Estimated Time: About 1 minute. Risk: None.
USB and HDMI audio often have to be chosen by hand. A common sound issue happens when an external monitor with no speakers is mistakenly set as the default output; because the monitor cannot play sound, the audio signal is sent to a device incapable of playback.
Windows 11
- Open Settings > System > Sound.
- In the Output menu, select your audio device that will also be the default from then on.
Windows 10
- Open Settings > System > Sound.
- Under Choose your output device, open the dropdown and select the speakers or headphones you’re using.
Set the System Default and Communication Endpoints:
Windows distinguishes between your Default Playback Device (used by games, music players, and web browsers) and your Default Communication Device (used by Microsoft Teams, Zoom, Discord, and VoIP tools). If an old or unplugged headset remains as the communication default, you may experience silent voice calls even while system audio plays fine.
- Press Windows Key + R, type
mmsys.cpland press Enter. - In the Playback tab, click your intended primary speakers or headphones once.
- Click the Set Default button.
- Right-click the same device and select both Set as Default Device and Set as Default Communication Device. A green checkmark will confirm the assignment.
- Switch to the Recording tab and repeat the same step for your main microphone.
- Click Apply, then OK.

Step 6Turn Off Audio Enhancements and Exclusive Mode
Estimated Time: About 1 minute. Risk: None, fully reversible.
Enhancements are software effects applied over your sound, like virtual surround, bass boost, and room calibration. They rely on the audio driver, and when the two disagree, you’ll face silence, low volume, or distortion. Disabling these effects clears up common popping and dropouts without affecting overall clarity.
Disable Enhancements:
Windows 11
- Open Settings > System > Sound.
- Click your active output device under Output to open its Properties.
- Scroll to Audio enhancements and set it to Off from the dropdown.
- Click Advanced (or open More sound settings), double-click your device, go to the Advanced tab, and uncheck both boxes under Exclusive Mode.
- Click Apply to save settings.
- Test the sound.

Windows 10
- Run mmsys.cpl, select your device on the Playback tab and choose Properties.
- Open the Enhancements tab and tick Disable all enhancements. Some drivers word it as Disable all sound effects.
- Switch to the Advanced tab and under Exclusive Mode, uncheck:
- Allow applications to take exclusive control of this device
- Give exclusive mode applications priority
- Select Apply, then OK.

Step 7Try a Different Audio Format
Estimated Time: About 3 minutes. Risk: None.
The default format sets the sample rate and bit depth Windows uses to communicate with your device. When the hardware doesn’t handle the pair, playback gets quiet or distorted. Cycling through the options is the quickest way to find one it can accept.
Windows 11
- Open Settings > System > Sound and select your playback device.
- Under Output settings, open the Format dropdown.
- Change the format to 24-bit, 48000 Hz (Studio Quality) or 16-bit, 44100 Hz (CD Quality).
- Click the Test button beside it to verify a clean chime sound.

Windows 10
- Go to Settings > System > Sound > Device properties > Additional device properties.
- Open the Advanced tab.
- Under Default Format, open the dropdown and select 24-bit, 48000 Hz (Studio Quality) or 16-bit, 44100 Hz (CD Quality).
- Click the Test button. If you hear the chimes fine, click Apply and OK.

Step 8Restart Windows Audio Service
Estimated Time: About 2 minutes. Risk: Low.
Windows relies on two core background services to manage sound routing: Windows Audio (Audiosrv) and Windows Audio Endpoint Builder (AudioEndpointBuilder). If either process hits an unhandled exception or hangs, the entire system can face sound issues.
- Press Windows Key + R, type services.msc, and press Enter, or type services in the Windows search bar.
- Scroll down and find Windows Audio. Right-click it and choose Restart. When prompted to restart dependent services, click Yes.
- Find Windows Audio Endpoint Builder directly below it, right-click, and select Restart.

Step 9Install Windows Updates and Restart
Estimated Time: 10 to 30 minutes. Risk: Low.
Pending Windows Updates mostly supply missing files and patch audio problems. Many changes only take effect after the PC reboots, so the restart is part of the fix.
Windows 11
- Open Settings > Windows Update, select Check for updates, and install any pending quality patches.
- Click Advanced options > Optional updates > Driver updates. If an audio or sound driver update is listed, check it and click Download & install.
- Perform a cold restart: Click Start > Power, hold the Shift key, and click Restart.

Windows 10
- Go to Settings > Update & Security > Windows Update and select Check for updates.
- If you see a link that says View optional updates, click it, expand Driver updates, and check any audio packages.
- Perform a cold restart: Hold down the Shift key and click Start > Power > Restart to clear hybrid hibernation files.
Step 10Update the Audio Driver
Estimated Time: About 5 minutes. Risk: Low.
The driver is the translator between Windows and sound hardware. An outdated or corrupted one is behind a big share of silent, quiet, and crackling PCs, which is why three of the remaining steps are about drivers.
- Press Windows Key + X and select Device Manager.
- Expand Sound, video and game controllers.
- Right-click your sound device (speakers, headphones or the sound card), select Update driver, then Search automatically for drivers.
- Follow the prompts and restart if asked.
If there’s a new driver to install, go to the support site for your PC or sound card, download the audio driver for your exact model and Windows version, install it, and restart. Official manufacturer packages usually beat Windows updates because they include special tuning for the hardware.
Step 11Reinstall the Sound Driver
Estimated Time: About 5 minutes. Risk: Medium. Download the manufacturer’s driver first.
An update can’t repair a driver whose files are damaged, but removing it and letting Windows install a clean copy can.
- In Device Manager, expand Sound, video and game controllers.
- Right-click your sound device and select Uninstall device.
- Check Attempt to remove the driver for this device, then select Uninstall.
- Save your work and restart from Start > Power > Restart. Windows will reinstall the driver on startup.
Step 12Force the Microsoft Generic Audio Driver
Estimated Time: About 3 minutes. Risk: Low.
If proprietary vendor software (like Nahimic, Waves MaxxAudio, or Dolby Atmos) conflicts with your audio, switching to Microsoft’s native Universal Audio Architecture (UAA) inbox driver will bypass that software layer and recover clear stereo sound.
On both Windows 10 & 11:
- Open Device Manager (press Win + X > Device Manager).
- Expand Sound, video and game controllers.
- Right-click your sound device and select Update driver > Browse my computer for drivers > Let me pick from a list of available drivers on my computer.
- Select High Definition Audio Device (Microsoft generic driver) instead of the OEM-branded name, and click Next.
- Click Yes on the warning prompt, finish installation, and restart.

Special case: IDT High Definition Audio CODEC. Some systems list this entry, and it is a known troublemaker. Right-click it, use the same Let me pick choice, and choose High Definition Audio Device. Plenty of PCs don’t have this codec at all, and that’s normal.
Step 13Roll Back the Driver or Restore the PC
Estimated Time: 5 to 20 minutes. Risk: Medium for System Restore.
Use this when the computer sound worked until a recent update or driver install. Going back to the last good state beats debugging forward.
Roll back the driver:
- In Device Manager, expand Sound, video and game controllers.
- Right-click your sound device and select Properties.
- Open the Driver tab and select Roll Back Driver.
- Choose Yes when prompted, then test the sound.
A greyed-out button means Windows kept no earlier driver to return to. In that case, try a restore point.
Restore from a system restore point:
- Type Create a restore point in the taskbar search and open it.
- Select System Restore and pick a point dated before the sound stopped working.
- Follow the prompts. The PC will restart during the process.
Windows normally creates a restore point when it installs updates, so one should exist if System Protection was switched on. Apps installed after that date may need to be reinstalled.
Fixes for Different Audio Problems in Windows
Missing or Undetected Audio Output Device
The signs: a red X on the speaker icon, a message saying No audio output device is installed, greyed-out options on the Sound page, or speakers missing from the Output list. It usually means the driver is missing, disabled, or failing to load, often after an update or a driver change.
- Open Device Manager and expand Sound, video and game controllers. If your device shows a down arrow or a warning triangle, right-click it and select Enable device.
- If nothing is listed, select View > Show hidden devices, then Action > Scan for hardware changes.
- Look for an Other devices or Unknown device entry. That is usually the sound chip waiting for a driver.
- Right-click any suspicious entry, open Properties, and read Device status on the General tab. An error code there can be checked in Microsoft’s list of Device Manager error codes.
- Install the driver from your PC brand as described in Step 10 and restart, then run the troubleshooter again (Step 1) if the device still hasn’t appeared.
One App Has No Sound While Others Work
When system sounds and web browsers play normal, but a specific program like a game, media player, or Discord has no audio, Windows has probably routed that program to an inactive audio endpoint. Start the app playing sound first, because the volume mixer only lists apps that are using audio.
Windows 11
- Open Settings > System > Sound > Volume mixer and find the app under Apps.
- Check that it isn’t muted and that its slider is raised.
- Expand the app’s entry and confirm its output device matches the one you’re listening on.
Windows 10
- Open Settings > System > Sound, scroll to Advanced sound options, and select App volume and device preferences.
- Check the app’s volume slider, and make sure its Output device is set to Default or to the device you’re listening on.
Then look inside the app. Browser tabs, video-call tools and games all have their own mute buttons and device menus. Still silent after closing and reopening it? Work through Step 8 and Step 10.
Bluetooth Connected But No Sound
A “Connected” label only proves the pairing worked. It says nothing about where Windows is sending sound, so start with routing and work toward drivers.
- Select the Bluetooth device as your output (Step 2) and confirm it’s unmuted.
- Run mmsys.cpl and look at the Playback tab. Many headsets appear twice: once as Stereo and once as Hands-Free. Set the Stereo entry as default. If Windows keeps flipping to Hands-Free (a low-quality call mode), right-click it and choose Disable, and turn it back on when you need the headphone mic.
- Turn Bluetooth off, wait about 10 seconds and turn it back on. On Windows 11, that’s in Settings > Bluetooth & devices. On Windows 10, it’s in Settings > Devices > Bluetooth & other devices.
- If the device is shown but won’t connect, choose Remove device and pair it again from scratch.
- Open Services and confirm Bluetooth Support Service is running with Startup type set to Automatic. Restart it along with the two services from Step 8.
- In Device Manager, expand Bluetooth, right-click your adapter, and select Update driver. Run Windows Update afterwards.
- As a last resort, uninstall the Bluetooth adapter from Device Manager and restart so Windows installs a fresh Bluetooth driver.
Fix Microphone Problems
Microphone problems in Windows are almost always caused by system privacy toggles blocking input, rather than physical hardware failures. Playback and recording share the same audio services and drivers, so Steps 1, 8 and 10 apply here as well. Two settings are unique to microphones, including Windows privacy permissions and the selected input device.
Windows 11
- Open Settings > Privacy & security > Microphone.
- Turn on Microphone access and Let apps access your microphone, then switch on the toggle for the specific app that needs it.

Windows 10
- Open Settings > Privacy > Microphone.
- Make sure microphone access is on for the device, turn on Allow apps to access your microphone, and enable the specific app below.
Then open Settings > System > Sound, pick the right device under Input, and speak while watching the input level. If the bar moves, Windows can hear you and the problem is within the application.

Fix Volume Not Working On a Laptop
Laptops add a few failure points that desktops don’t have, like keyboard shortcuts, manufacturer utilities, and a headphone jack that can lie about what’s plugged in.
- Test the slider, not the keys. Click the speaker icon in the taskbar and drag the slider. If that works, only the keyboard shortcut has the fault.
- Check Fn Lock. Many laptops default the top row to F1–F12, so volume needs Fn held down. Press Fn + Esc (or the key with the padlock symbol) to flip it, or change “Action Keys Mode” in the BIOS.
- Reinstall the hotkey utility. Volume keys depend on a company package, such as HP Hotkey Support or Lenovo and ASUS hotkey drivers. Reinstall it from your laptop brand’s support page.
- Clear the headphone jack. If the notebook thinks headphones are plugged in, the speakers remain silent. Plug a headset in and out a few times, and gently clear lint from the jack.
- Restart the audio service and update the driver (Step 8 and Step 10). A stalled service can cause the volume slider to move without a change in loudness.
Fix Audio That Stops Working After Windows Update
If you find that your Windows 11 or Windows 10 sound is not working after a system update, follow these steps: check for additional Windows updates, update the drivers, roll back to a previous driver version, and restart the audio services. These procedures are detailed in Steps 8 through 13.
Three extra checks help here, because sometimes the update itself has the bug:
- Read the Device Manager message. Right-click the audio device, open Properties and read Device status. “This device cannot start (Code 10)” means Windows found the hardware, but its driver failed to start. Common triggers are a damaged/incompatible driver or an update bug. For USB headsets and sound cards, also try a different USB port.
- Check the known issues list. Microsoft publishes confirmed update problems, with status and workarounds, on the Windows release health pages. Search for “audio” or “sound”. If your problem is listed, no setting on your PC will cure it. Apply Microsoft’s workaround or wait for the fix.
- Switch outputs while you wait. Laptop speakers, a 3.5 mm jack, HDMI display audio or a Bluetooth headset can keep you working while a USB audio fault is pending.
Still nothing and you’re sure the update is to blame? You can remove it as a last resort.
Windows 11
- Open Settings > Windows Update > Update history and scroll to Uninstall updates.
Windows 10
- Open Settings > Update & Security > Windows Update > View update history and select Uninstall updates.
Delete the most recent update, then brieflt Pause updates so it does not reinstall at once.
Rule Out a Hardware Fault
When every software step fails, isolate the hardware so your next move is the right one.
- Test the speakers or headset on a phone or another computer. If they’re silent there too, the accessory is the problem.
- Try a different output on this PC, for example headphones in the jack or sound over HDMI. One working path and one dead narrow down the fault to a single port or cable.
- On a desktop, check the BIOS/UEFI for an onboard audio setting (often called HD Audio Controller) and make sure it’s enabled. A BIOS reset can disable it.
- If the sound device never shows up in Device Manager, even after Show hidden devices and Scan for hardware changes, and no unknown device is listed, the audio hardware or its firmware is the likely cause. Contact your PC maker, especially while the PC is under warranty.
- Open the Get Help app or visit Microsoft Support to talk to a person, and report Windows bugs through the Feedback Hub app so Microsoft can track them.
Frequently Asked Questions
Did this fix your issue?
Let us know. Your feedback helps other readers find the right solution.
Great! What solved it for you?
We read every response. Email is optional and never shared.
Sorry to hear that. What happened?
Leave your email and we will personally help you fix it.