

An OST (Offline Storage Table) is the file Outlook uses to store a synchronized local copy of everything in your mailbox, like emails, attachments, contacts, calendar items, and so on. Because it’s stored on your computer, crashes or other problems can corrupt it.
When Outlook can’t read the OST file, it throws random error messages, and the quick fix is to rebuild or recreate it. In this guide, we’ll show how to rebuild an OST file in Microsoft Outlook.
Reasons to Rebuild the OST File
Outlook’s data file can be temperamental, leading to unsent messages, empty folders, and persistent send/receive errors that disrupt your workflow.
- When the client cannot match the server’s copy, users see gaps like emails that should be there aren’t present.
- A stale mailbox, with items that won’t update, signals a broken sync chain.
- Frequent sync issues erupt during routine checks.
- Error codes appear every time the user forces a send/receive.
- In many cases, the OST itself gets corrupted and fails to read or write correctly.
Even without outright failures, Outlook becomes very slow, dragging open messages and search results into sluggishness that slows down productivity.
How to Find the OST File Location
You must know the location of your OST file before you proceed with the rebuilding process. This file is by default stored in the Outlook installation directory. But the exact location may vary depending on the Outlook and Windows edition installed.
Here’s how you can find the location of your OST file in Windows:
- Open the Outlook application.
- Go to File > Info.
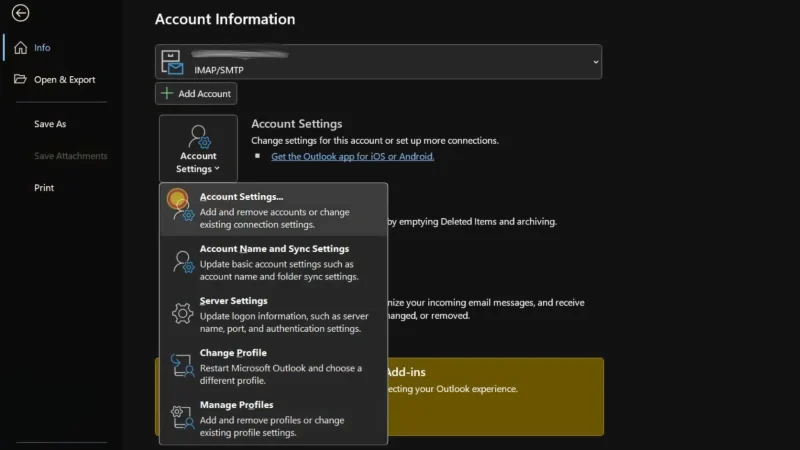
- Click Account Settings > Account Settings.
- Select the Data File tab and select your email account.
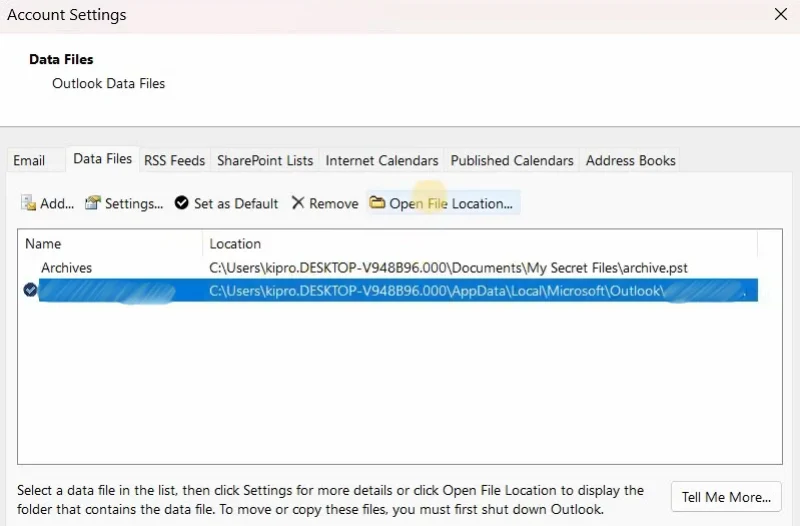
- Now, click Open File Location.
- This will open a File Explorer window and display the path of the OST file.
How to Rebuild the OST File in Outlook
After you’ve found the OST, follow one of these steps to rebuild it.
1. Delete or Rename the Existing OST File
This is one of the easiest approaches to rebuild the OST file. Let’s see how:
- First, exit Outlook completely.
- Go to the default location of the OST file.
- Find and select the file with
.ostextension. - Now, rename the OST file or copy it to another location and then delete it.
- Start your Outlook application.
- This will create a new OST and start syncing the mailbox items from the server.
2. Create a New Outlook Profile
When you create a new profile, it also automatically creates a new OST file. Follow these steps to set up a new profile in Outlook:
- Open Control Panel on the PC.
- Click on Mail.

- In the Mail Setup window, click Show Profiles.
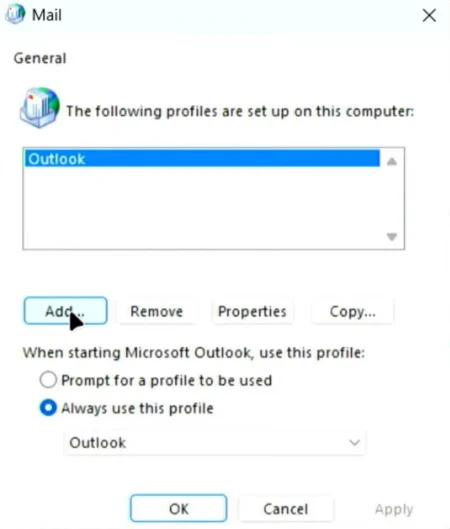
- Click Add.
- Enter a name for your new profile (e.g., “Outlook-New”), then click OK.
- You will be asked to enter your account details, such as:
- Your Name
- Email Address
- Password
- Follow the instructions to complete the process.
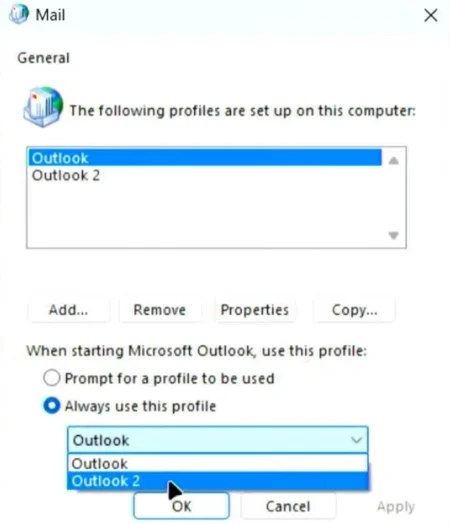
- Start Microsoft Outlook and select Always use this profile option.
- Choose your newly created profile from the dropdown.
- Click Apply > OK.
Now, Outlook will create a new OST file linked to the new profile. It will then download all mailbox data.
It’s crucial to verify the mailbox items once the new OST file is created, as some data that failed to synchronize with the mail server might be missing. Fortunately, you can easily recover these items with the help of an OST to PST converter tool like Stellar Converter for OST, which allows you to scan the backup OST file, search for missing content, and save it in PST file format, which can then be imported back into your Outlook profile.
Apart from PST, you can save the converted file data in different formats, including HTML, PDF, EML, RTF, MSG, etc. The tool is compatible with all versions of Outlook.


