

Every time you type a web address into your browser, an instant process happens in the background. Your device queries the Domain Name System, which acts as the Internet’s address book. It translates readable website names into the numeric IP addresses computers use to communicate. Your PC doesn’t know where that site lives when you enter a website name into the browser, and it needs to look up the related IP address first through a DNS server.
By default, your Windows PC or Mac uses the DNS server assigned by your internet service provider. But sticking with your ISP’s default is usually a bad idea. You’re under no obligation to use their servers and have full control to change the DNS service whenever you want.
Related: How to Fix Windows Update Error: Reasons for Update Stuck and Easy Solutions
Why You’d Want to Switch?
- Speed. Internet providers treat DNS as an afterthought, and their servers vary a lot in quality, with some slow and others overloaded. A dedicated third-party DNS service, like Google and Cloudflare, resolves addresses and offers much better uptime to make your web browsing snappy. These companies have built massive, globally distributed infrastructure primarily to answer DNS queries in no time.
- Security. Excellent external services can automatically intercept and block known malicious/spammy websites. If you accidentally click a phishing link, a security-focused DNS can stop the connection even before the page loads. Comodo SecureDNS, for example, maintains a real-time blocklist of harmful sites, and OpenDNS also takes a similar approach.
- Parental controls. OpenDNS Family Shield automatically filters adult content across your entire network. This DNS-level filtering applies to every device on your connection.
- Privacy. Your ISP can monitor and log your DNS queries. While they may not always act maliciously, if you prefer to keep your browsing habits private, choose an internet company that promises not to record what you do and surf on the web. Cloudflare says they don’t log IP addresses and backs it up with yearly transparency reports.
I prefer to use Google Public DNS on my own laptop, but I have tested some top providers, and they are all very trusted. First, we’ll see exactly how to switch the DNS server settings on your computer, and then talk about the DNS providers you can choose from. Since the menus vary across operating systems, I’ll show the steps to change the DNS server on Windows 11, Windows 10, and macOS.
How to Change DNS in Windows 11

- Open the Settings, select “Network & internet” from the sidebar, and then click “Advanced network settings”.
- You will see a list of your network adapters. Click the entry for your active connection, which is usually Ethernet or Wi-Fi. Next, choose “View additional properties”.
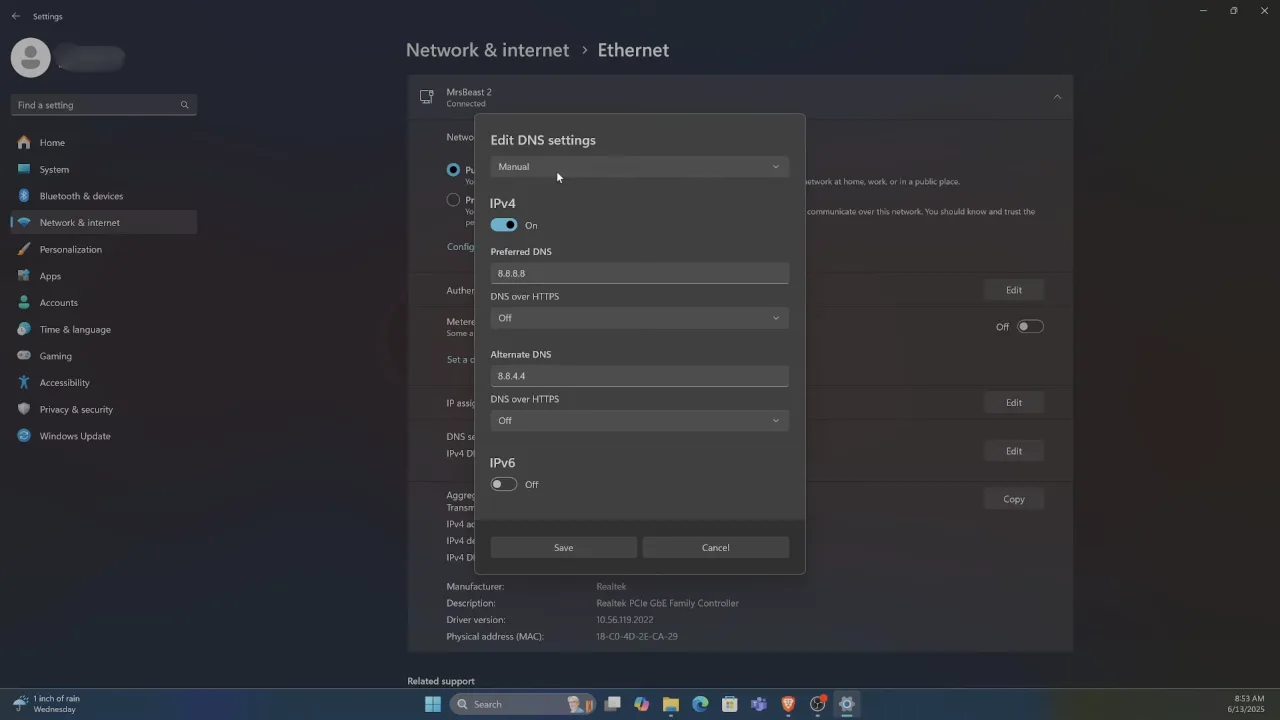
- Find the DNS server assignment section and click the Edit button next to it, which will open a small window. Click the dropdown menu at the top, change the setting from Automatic (DHCP) to Manual. Enable the IPv4 toggle, and you’ll see fields for a preferred and an alternate DNS server.
- The system uses the alternate address as a backup in case the preferred server is busy or down. Type the IP addresses from your chosen provider into the fields and click Save.
How to Change DNS in Windows 10
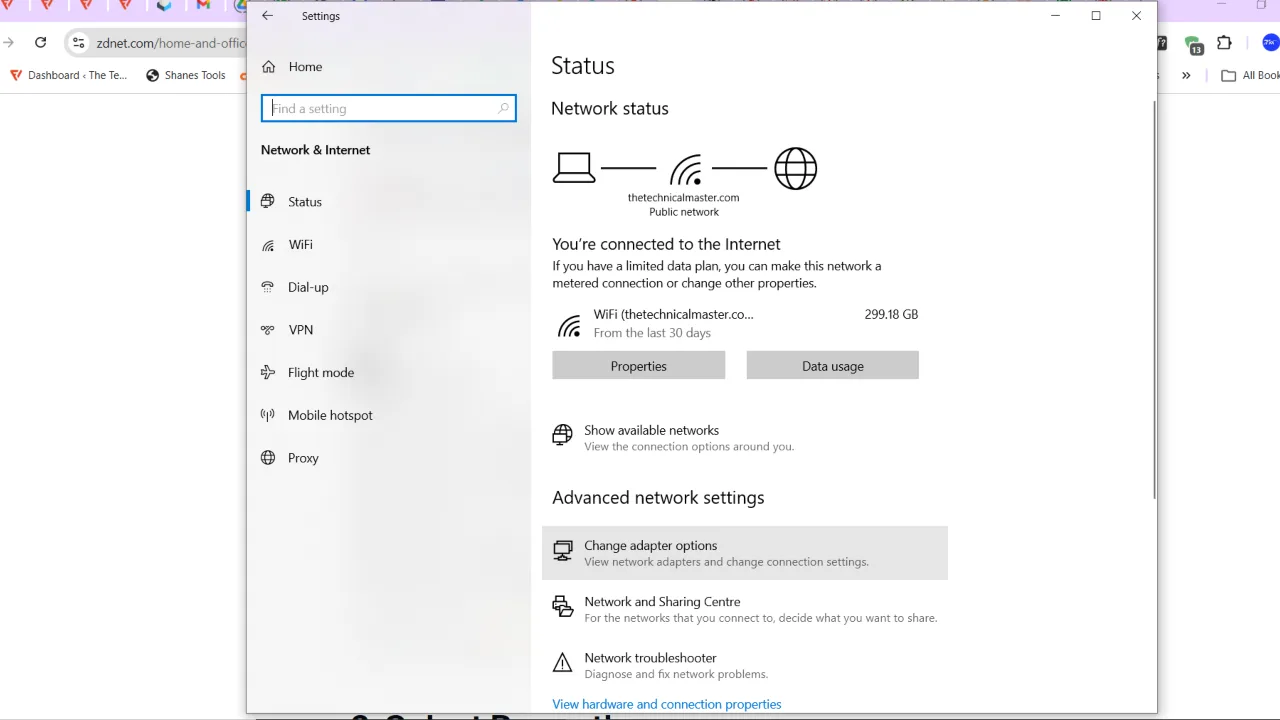
- Open Settings on Windows 10 and select Network & Internet. Scroll down the main status page until you find “Advanced network settings”, then click “Change adapter options”.
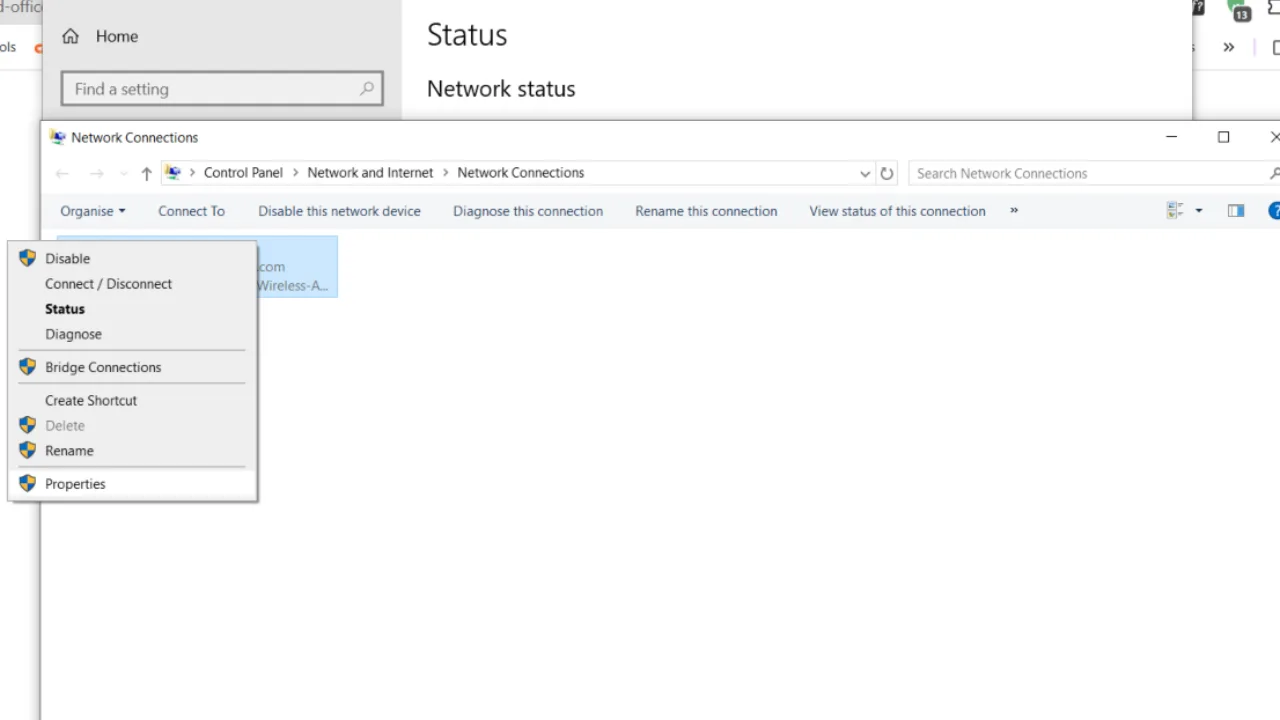
- A Control Panel window will open with all the current network connections. Right-click the icon for the active connection and choose Properties.
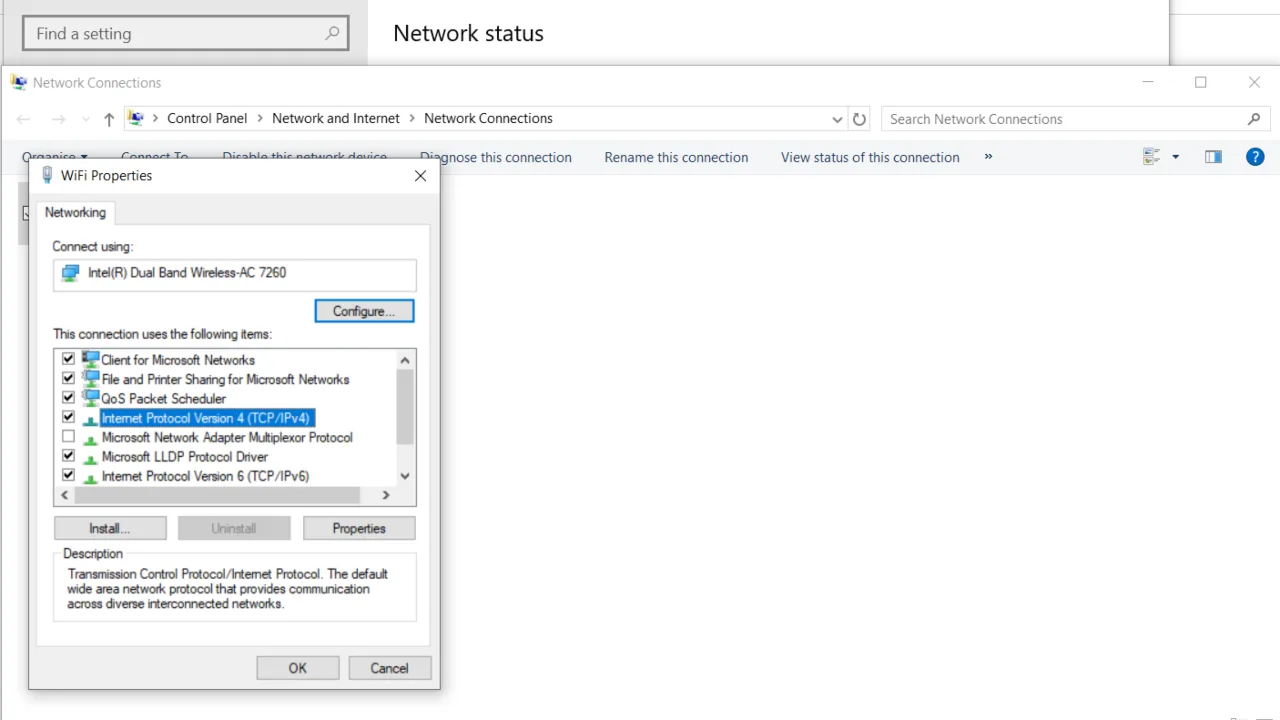
- Scroll through the list in the middle of the Properties window. Click once on Internet Protocol Version 4 (TCP/IPv4) to highlight it, then open its Properties.
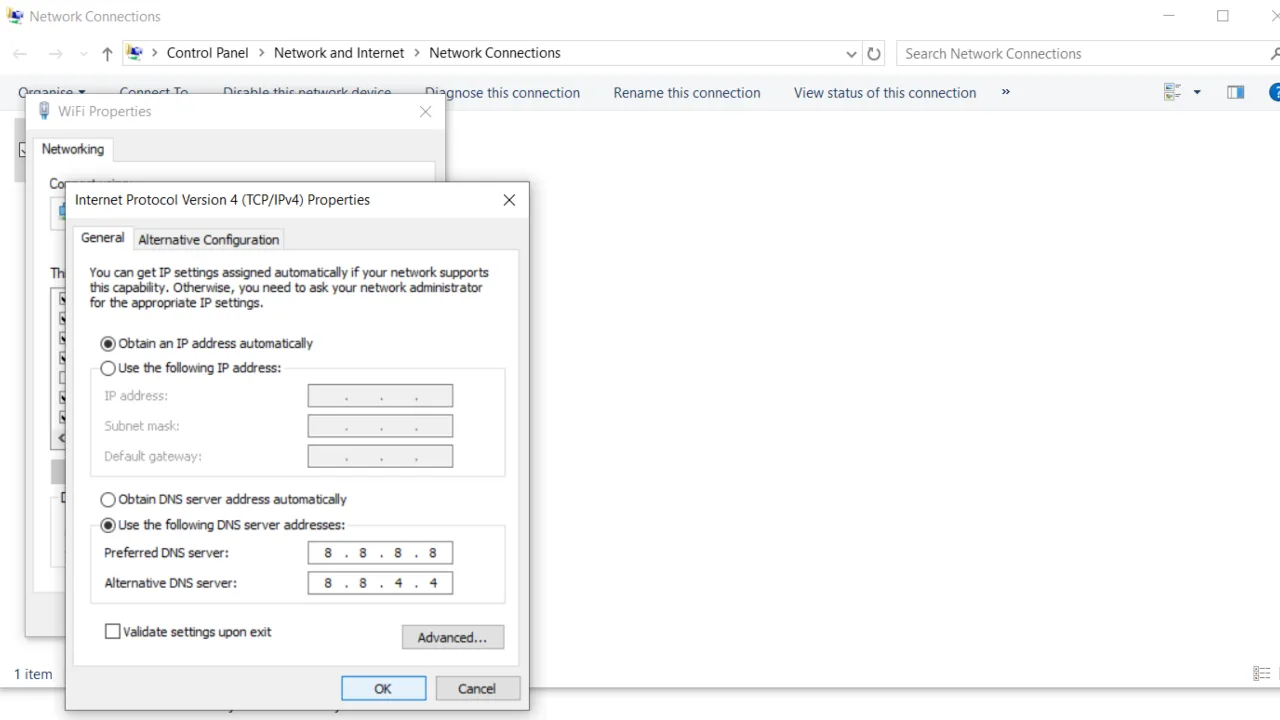
- In the new pop-up window, click the radio button next to “Use the following DNS server addresses” and enter your preferred and alternate IP addresses. Click OK, then close the window and exit the network settings.
Related: Windows 10 & 11 Search Bar Not Working: Reasons & Quick Fixes
How to Change DNS on a Mac
![]()
- On your MacBook, click the Apple icon in the top left corner of the screen and open System Settings. Click Network in the sidebar, then choose Wi-Fi or Ethernet based on how your Mac is connected to the internet.
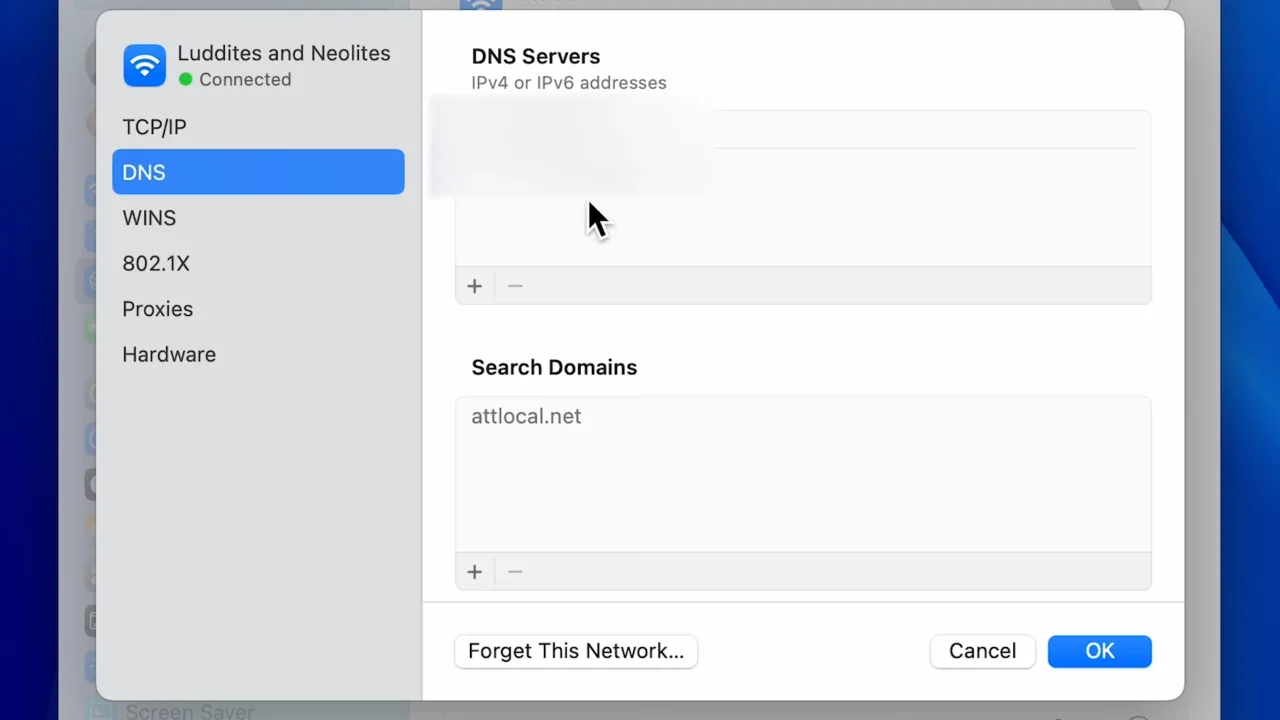
- Click Details next to your active network name. A new window will open with a sidebar; select DNS from the list.
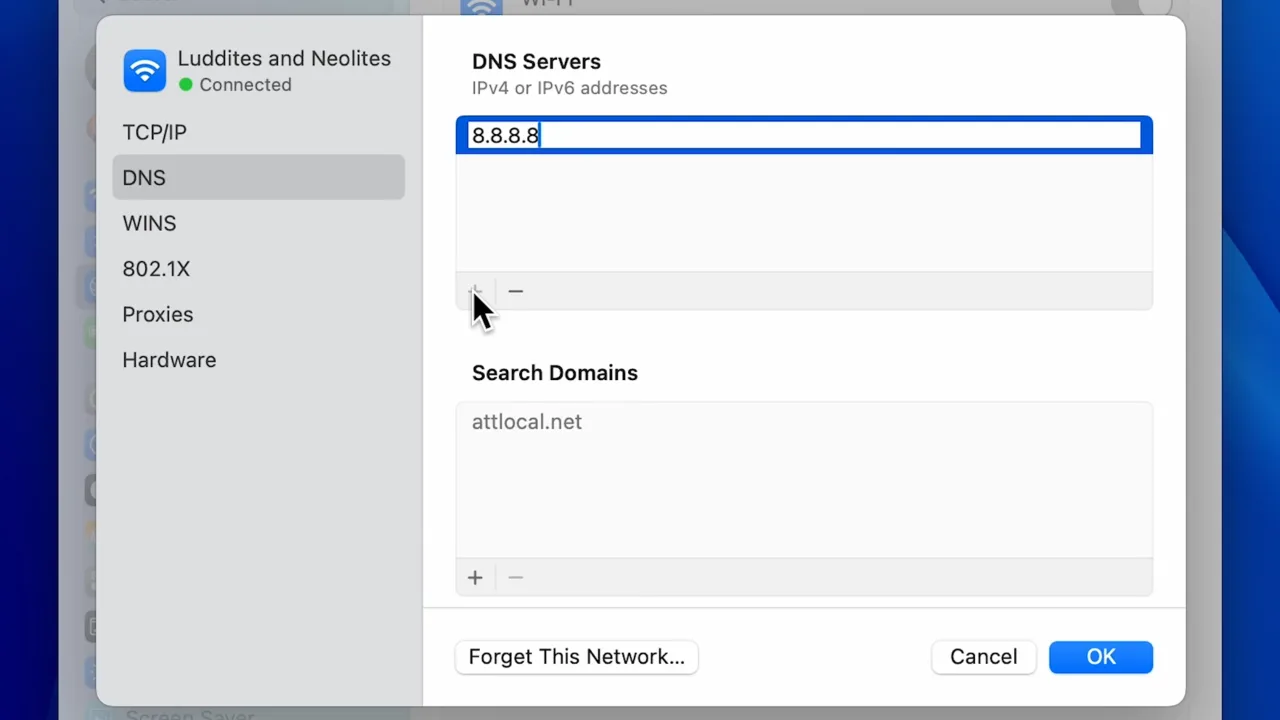
- You will see a specific section for DNS Servers. Click the small plus button underneath the list to add a new entry. Type in the preferred IP address and click anywhere outside the text box to lock it in. Click the plus button a second time to add the alternate address. Click OK to confirm the changes and close the settings.
Should You Use the Custom IPv6?
IPv4 addresses are almost gone. We ran out years ago, which is why everyone is slowly dragging toward IPv6. Since that new pool is highly infinite, you’ve probably seen options to add IPv6 DNS servers to your router or PC settings and wondered if it’s worth the trouble.
The short answer is that you usually do not need to use it. But if you want to cover your bases completely, you can update your IPv6 DNS settings. That said, plenty of ISPs still don’t fully support IPv6, so it’s optional. To check whether yours does, run a quick test at test-ipv6.com. If your provider is compatible, most big third-party DNS services offer IPv6 addresses.
Best Third-Party DNS Providers
Now that you know how to change your DNS settings, here are some highly recommended and reputable options to use:
Google Public DNS
Google Public DNS is one of the fastest resolvers on the web, which handles domain name translation extremely fast. Google engineers its servers to block spoofing attacks, where someone tries to hijack your connection and point you toward a fake site. The system verifies every response before it reaches your device.
Google Public DNS addresses:
IPv4: 8.8.8.8 and 8.8.4.4
IPv6: 2001:4860:4860::8888 and 2001:4860:4860::8844
Cloudflare DNS
Cloudflare prioritizes raw speed and user privacy. The company maintains a very fast global network. More importantly, Cloudflare promises never to log your IP address, which prevents the tracking tactics often used by ISPs.
Cloudflare DNS addresses:
IPv4: 1.1.1.1 and 1.0.0.1
IPv6: 2606:4700:4700::1111 and 2606:4700:4700::1001
OpenDNS
Cisco owns and operates OpenDNS. They offer two excellent free packages for home users. The standard OpenDNS Home tier provides great speed and basic web filtering. The OpenDNS Family Shield tier specifically blocks adult content at the network level, and makes it a great choice for homes with children.
OpenDNS Home addresses:
IPv4: 208.67.222.222 and 208.67.220.220
IPv6: 2620:119:35::35 and 2620:119:53::53
OpenDNS Family Shield addresses:
IPv4: 208.67.222.123 and 208.67.220.123
Related: How to Show Hidden Files on Mac
How to Change DNS at the Router Level
If you want to change the DNS settings for every device in your home — phones, tablets, smart TVs, everything — do it at the router instead of on individual computers. Log into your router’s admin interface (usually by typing 192.168.1.1 or 192.168.0.1 into your browser), find the network or internet setup section, and look for DNS settings. Change the option from automatic/ISP-assigned to manual, enter your preferred and alternate addresses, and apply the settings. Every device on that network will now use the new DNS servers.


