
")
Quick Shortcut: Press Command + Shift + Period (.) in any folder to toggle hidden files on or off immediately.
From Terminal: Use defaults write com.apple.finder AppleShowAllFiles TRUE for a permanent system-wide change. It forces Finder to always display hidden data, even after a system reboot.
Option + Go Menu: Hold Option while clicking the Go menu in Finder to reveal the hidden ~/Library folder.
Go to Folder tool: Jump directly to a specific invisible path without showing everything.
Third-party File Managers: Apps like Path Finder or Commander One display hidden files by default.
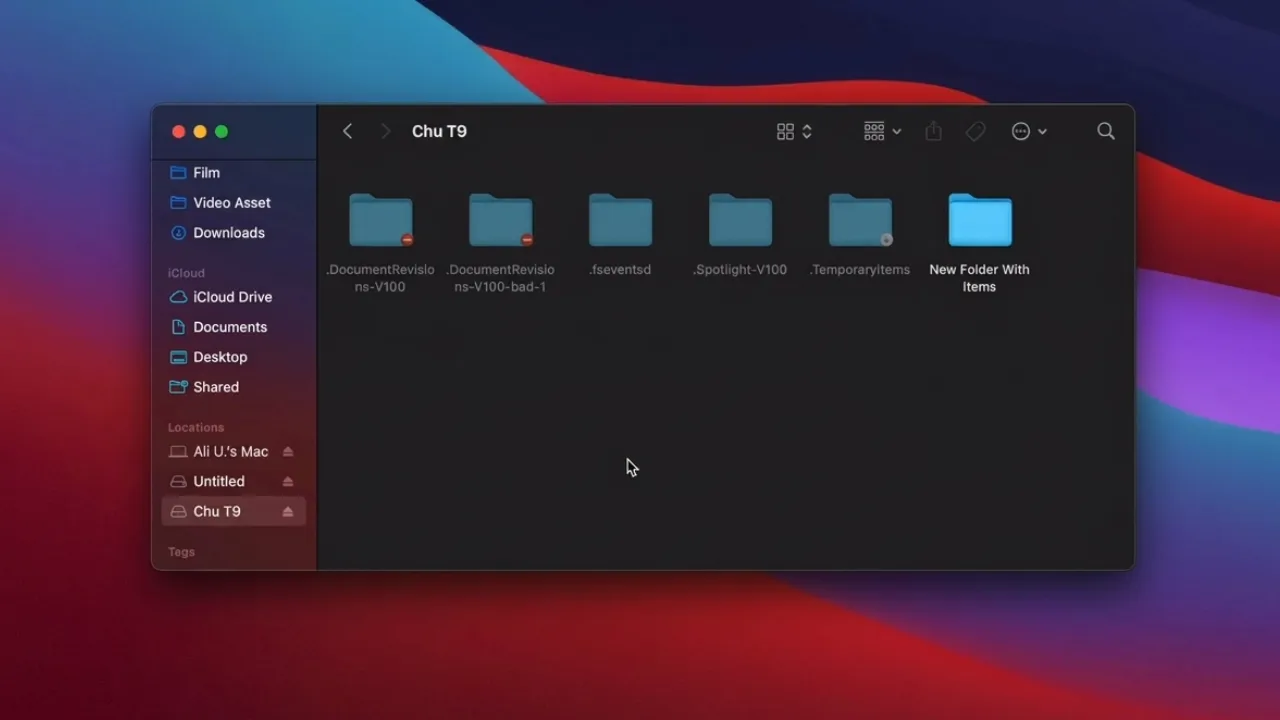
On Mac, Apple deliberately hides many files from users. Dot-files, system libraries, configuration files, and cache directories are all invisible in Finder by default to prevent accidental deletions that could crash your Mac environment. That’s fine for most people. But when you need to clear stubborn cache data, dig into the Library folder, modify application preferences, or troubleshoot software, you’ll hit a wall.
I’ve found four ways to show hidden files on a Mac, like a two-second keyboard shortcut to a Terminal command that makes them permanently visible. It’s easy to reveal this data once you know the exact native triggers in macOS.
What are Hidden Files and Why are they Invisible?
Mac’s hidden files fall into two categories. The first is the Unix convention: any file or folder whose name starts with a dot (.) is hidden automatically. The second is an macOS-specific attribute called the hidden flag. Apple uses this on certain system folders to keep them out of sight, even if their name doesn’t begin with a dot.
So why does Apple hide them? A few reasons:
- Protect system integrity. Files stored in
/System,/usr, and/privatedirectories are critical to the stability of macOS. If accidentally deleted or modified, it can seriously break things down on your computer. - Reduce clutter. Files like
.DS_Storeor.localizedare only for internal use, so displaying them in every Finder window would be noisy. - Security. It’s a right idea to keep configuration files containing sensitive paths or identifiers away from casual browsing.
Since macOS Sierra (2016), Apple has included a native keyboard shortcut to toggle hidden files in Finder. Before that, Terminal was the only built-in option. If you have a MacBook released in the last several years, the shortcut method I used to reveal my files, as mentioned below, is often all you need.
1. View Hidden Files on Mac via Finder
The easiest way to peek behind the curtain is to use this quick key combination. You do not need administrative privileges or advanced technical tools for it, and the process works across all modern macOS versions.
- Open Finder and find the Macintosh HD folder under Locations, or go to the specific folder you want to inspect.
- Press the keys Command + Shift+. (Period) at once.
All hidden files and folders will appear immediately as slightly transparent, grayed-out icons. You can interact with them exactly as you would with a normal file, like open, edit, or delete. Press the same keyboard shortcut to re-hide them.
This key combo also works in Open and Save dialog boxes within apps, handy when an app’s file picker needs you to visit a hidden path like ~/.config or ~/.ssh.
Mac can revert these settings after you quit Finder, and the change might not apply to every window you open. So, use the Terminal command shown in the next section to make hidden files stay permanently visible.
2. Use Terminal to Show All Hidden Files
Terminal gives you direct control over Finder’s preferences. There’s a command that writes a setting to force Finder to always display hidden files even after a restart. People who work with dotfiles or configuration settings often prefer this method.
- Press Command + Space, type “terminal”, and hit Enter to open it.
- Copy and paste the following command and press Enter:
defaults write com.apple.finder AppleShowAllFiles true - Now restart Finder with this line so the change takes effect:
killall Finder
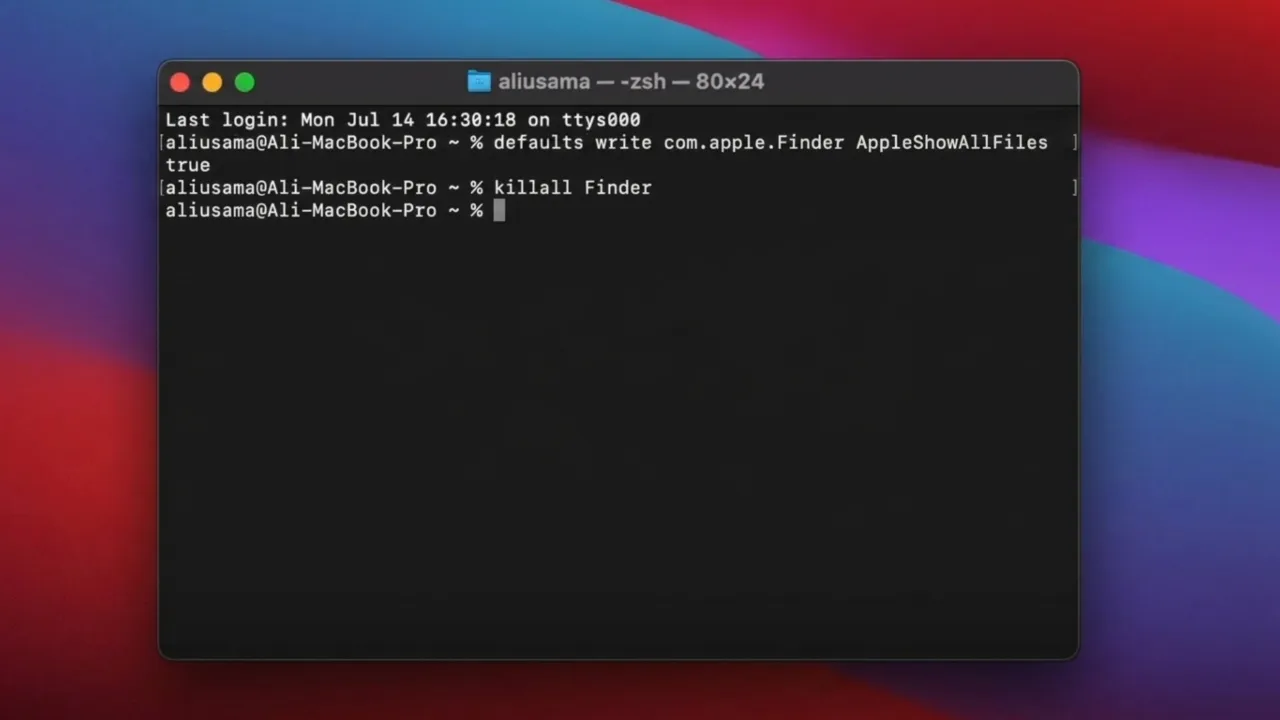
Desktop background and Finder windows will briefly quit and reappear. When the interface reloads, every hidden system file on your Mac will be completely visible across all folders.
Modifying, moving, or deleting files that start with a dot (like .git or .bash_profile) can break apps or disrupt system stability. Only edit or remove such files if you understand what their internal parameters do.
To reverse this setting and return your Apple notebook to its out-of-the-box factory state, open Terminal again and execute these two command lines in sequence to hide the files again:
defaults write com.apple.finder AppleShowAllFiles false
killall Finder
3. View Hidden Files in Library Folder
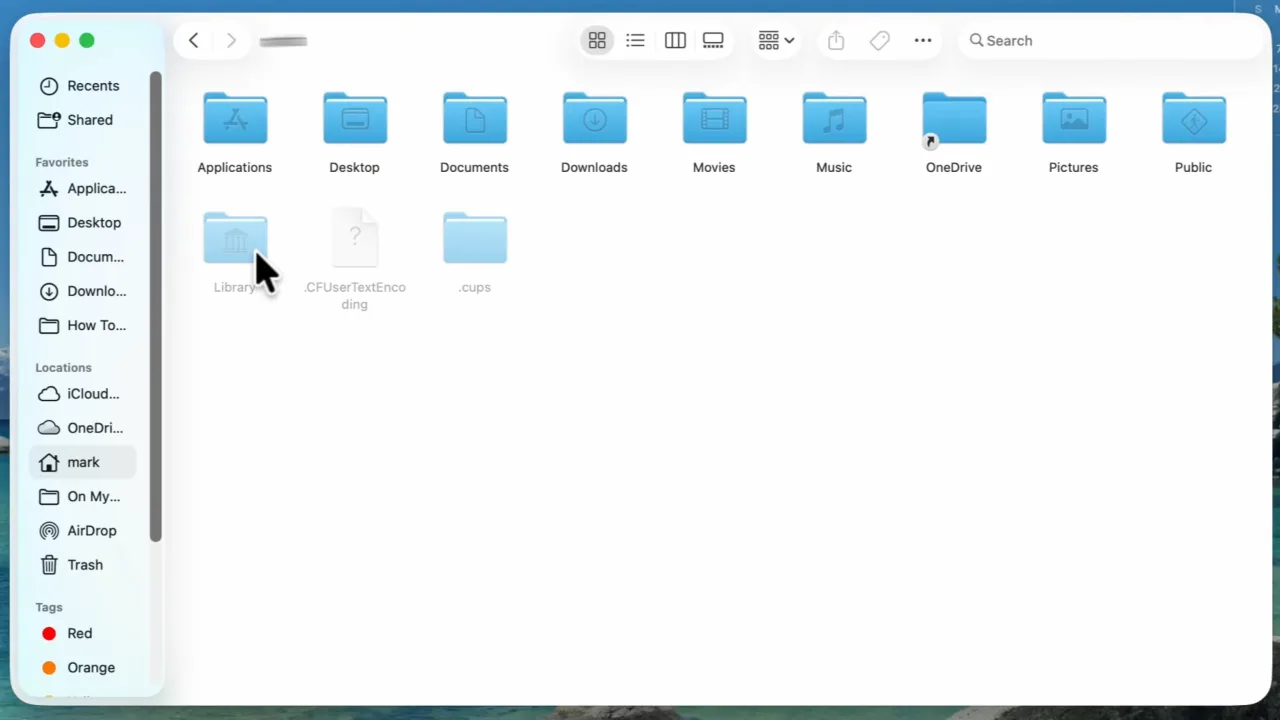
You usually don’t need to hunt through every hidden document or network file on your drive; you only want access to the user Library folder (~/Library). That’s where app preferences, game saves, and temporary caches are stored. Because of its importance, Apple separates the Library folder from global system files and completely masks it.
- Switch to Finder.
- Click Go in the top menu bar.
- Press and hold the Option key.
- The Library option will appear in the dropdown list between Home and Computer.
- Click the Library to open it.
When you’re in and out of this folder frequently, remove the hidden flag with this Terminal command:
chflags nohidden ~/LibraryThe Library folder will now be visible in the home directory like any normal directory. To hide it again:
chflags hidden ~/LibraryGo to a Specific Hidden Folder
Alternatively, you can use the “Go to Folder” tool to go directly to a hidden directory. Type in a path, Finder takes you there, and you never have to toggle main visibility settings at all.
- In Finder, click the Go menu in the top bar.
- Select Go to Folder… (or press Command+ Shift + G).
- A dialog box will display. Type the path like:
~/.sshor/usr/local/binor~/Library. - Press Return or click Go.
The ~ symbol is shorthand for home folder (e.g., /Users/yourname). So when you type ~/.zshrc , it will open the home directory at the config file location. Finder auto-completes paths as you input, which makes navigation much faster.
4. Use Third-Party File Managers
Try a third-party file manager if the shortcut for hidden files feels clunky. Most of these apps show them automatically or let you flip a switch in the settings.
| App | Shows Hidden Files | Free? | Notable For |
|---|---|---|---|
| Path Finder | ✓ Yes (always) | ✗ Paid | Dual-pane, Finder replacement |
| Commander One | ✓ Yes (toggle) | ✓ Free tier | Two-panel layout, archive support |
| ForkLift 4 | ✓ Yes (setting) | ✗ Paid | FTP/SFTP, cloud sync |
| Files | ✓ Yes (toggle) | ✓ Free | Lightweight, simple UI |
Ignore the extra software if you only check hidden files once in a while and use the Terminal or a keyboard shortcut. But if file management is part of your daily workflow, especially with servers, cloud sync, or development environments, a dedicated app is worth the money for the time it will save.
Common Hidden Files on Mac and What They Do
- ?
.DS_StoreDesktop Services Store — stores folder view settings like icon positions and sort order. Finder creates one in nearly every folder you open.
System
- ⚙️
.zshrc/.bash_profileShell configuration files. Store custom environment variables, Homebrew paths, and command aliases. Modifying these impacts how the Terminal session operates and executes commands.
Config
- ?
~/.ssh/Your SSH key pairs for authenticating with remote servers, GitHub, and cloud providers. Keep this folder’s permissions locked tight; never share files from here.
Security
- ?
~/Library/The most important hidden folder for everyday users. Holds application support data, preferences, caches, and saved application states for every app on your computer.
App Data
- ?
/private/etc/hostsControls local domain name resolution. Developers edit this to redirect domains during local development or to block certain sites at the network level.
Network
- ?️
/usr/local/Where Homebrew installs most command-line packages on Intel Macs. Contains
bin/,lib/, andetc/subdirectories for installed tools.Dev Tools
- ?
~/.gitconfigGlobal Git configuration, including name, email, default branch, editor preference, and any custom aliases. Available in the home directory and applies to every Git repo on your Mac.
Git
Caution
Folders like /System, /usr, /private, and /bin are protected by macOS’s System Integrity Protection (SIP). Even with admin access, their tweak is either blocked or dangerous. If macOS put something there, leave it alone.


