

- What is HEIC and Why Can’t Windows Open It?
- Install the Required Extensions (For Built-In Windows Methods)
- 1. Convert HEIC to JPG via Microsoft Paint
- 2. Convert HEIC to JPG from the Windows Photos App
- 3. Convert with a Free Online Tool
- 4. Batch Convert with IrfanView
- Install IrfanView and Its Plugins
- Bulk Convert HEIC to JPG
- 5. Convert with CopyTrans HEIC
- Change iPhone Settings to Prevent Future HEIC Conflicts
- ? Tip: Stop iPhone from Saving HEIC in the First Place
For a few files, open the image in the native Windows Photos app and save it as a JPG.
For large batches, download a free offline converter from the Microsoft Store to process multiple files locally.
Convert without installing anything using a free online converter like FreeConvert in your browser.
Batch convert hundreds of HEIC files at once using IrfanView (free).
Right-click to convert directly from File Explorer using CopyTrans HEIC (free for personal use).
Change iPhone’s camera transfer settings to Automatic, so files auto convert to JPG whenever you plug into a PC.
Apple’s High Efficiency Image Container (HEIC) format does an excellent job of saving storage space on iPhones, but opening these photos on a Windows PC frequently causes compatibility problems. Converting HEIC files to standard JPG format resolves the issue and ensures you can view, edit, and share these images across any platform.
Here’s exactly how to convert HEIC to JPG using built-in Windows features, local utilities, or free online tools.
What is HEIC and Why Can’t Windows Open It?
HEIC stands for High Efficiency Image Container. Apple made it the default iPhone camera format starting iOS 11 in 2017. HEIC files are roughly 40–50% smaller than JPEG at the same visual quality, and they support features JPEG lacks, like 16-bit color, transparency, Live Photos, and burst sequences stored in a single file.
Windows struggles with HEIC because it doesn’t include the HEVC codec by default. HEVC, the same H.265 compression used for 4K video, requires patent licensing fees. That’s why your iPhone images often show blank thumbnails or won’t open in Photos, Paint, or most other Windows apps.
iPhone automatically converts HEIC to JPEG when you share photos via iMessage, AirDrop to a non-Apple device, or email from the Photos app. They usually only remain in their original format when transferred via USB, exported to a specific folder, or moved to your computer using iTunes or Finder.
JPG or JPEG are just two names for the same format and have been the universal standard since the early 1990s. Every device, browser, social media platform, and image editor on the planet supports it. You might lose some storage capacity while storing it, but your photos will open anywhere.
Related: How to Turn Off Touchscreen on Windows 10 & 11
Install the Required Extensions (For Built-In Windows Methods)
Methods that use the Photos app or Paint require Windows to support the HEIC format at the system level. Two free extensions from the Microsoft Store should be installed for it.
- Open the Microsoft Store from the Start menu.
- Search for HEIF Image Extensions published by Microsoft Corporation, which is completely free. Click Get or Install.
- Now search for HEVC Video Extensions from Device Manufacturer by this exact complete name and click Get to install.
- Restart the PC if File Explorer continues to display blank thumbnails after the installation.
There are two different HEVC extensions in the Microsoft Store. The one called “HEVC Video Extensions” costs $0.99, while the other named “HEVC Video Extensions from Device Manufacturer” is similar but free. Always search for it, including “from Device Manufacturer” to find the right app. If your local store doesn’t show the extension in search, download it from this Store’s product page.
New Windows 11 PCs often have HEIF Image Extension pre-installed, but rarely include HEVC. On Windows 10, you must install both manually. To confirm, open Microsoft Store, click your profile icon, then Library to see if you have them.
1. Convert HEIC to JPG via Microsoft Paint
Microsoft Paint is a reliable native solution for converting HEIC files on Windows. Once you have installed the required extensions, Paint can open these images and let you re-save them in any supported format, including JPG.
- Right-click the HEIC file and select Open with > Paint. (If Paint isn’t in the list, click “Choose another app” and choose it there.)
- In Paint, click File in the top-left corner.
- Select Save as from the menu.
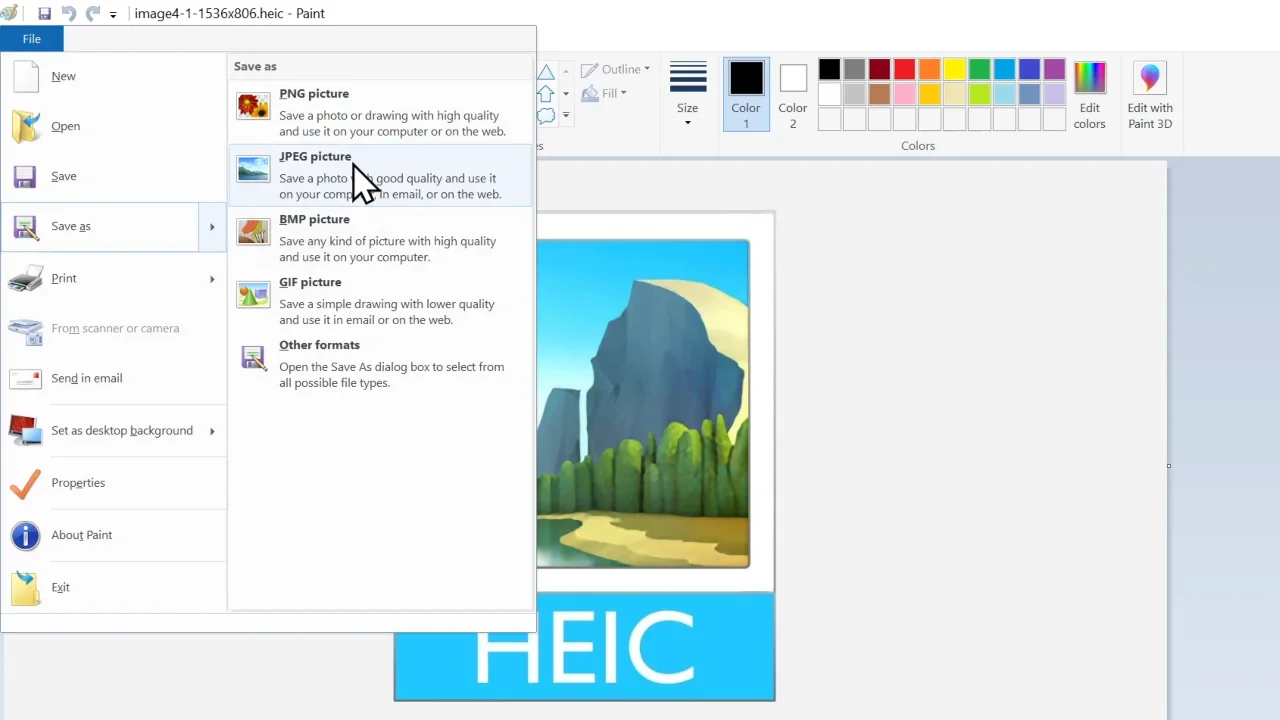
- Click the JPEG picture from the sub-menu.
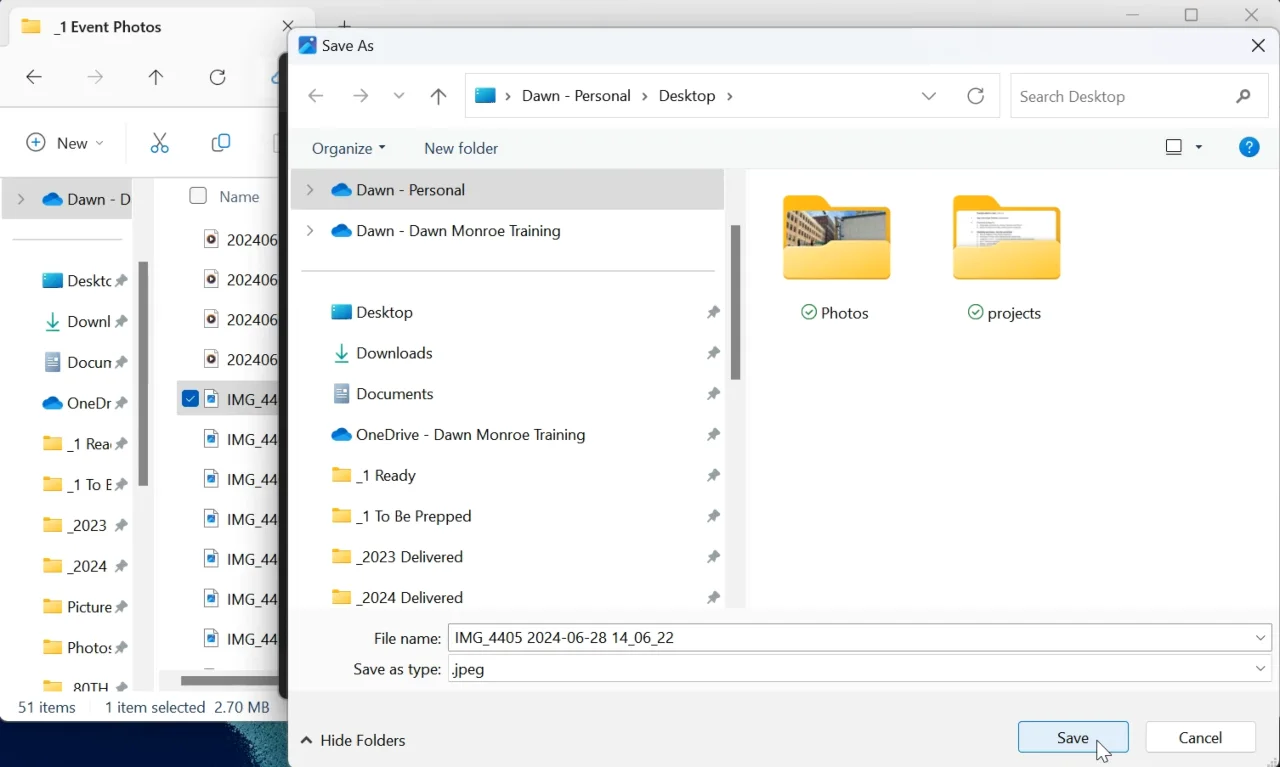
- Choose your save location, name the file, and click Save.
Paint saves JPGs at a fixed quality of roughly 75–80%. The files are smaller than the HEIC originals, but you’ll notice compression artifacts in smooth gradients and fine details. For portraits and prints, use the Windows Photos app or IrfanView. Unlike Paint, they let you set a higher quality level.
✓ Pros
- Always available on Windows
- Takes about 20 seconds per file
- No additional software needed
✗ Cons
- One file at a time only
- Fixed JPEG quality (~75–80%)
- Needs extensions pre-installed
2. Convert HEIC to JPG from the Windows Photos App
The Photos app provides a little more control over the output than Paint and is the default Windows option to convert one or two images.
- Right-click your HEIC image and select Open with > Photos.
- Once the image loads, click the three-dot menu (…) at the top-right of the toolbar.
- Select Save as.
- In the “Save as type” dropdown at the bottom of the dialog box, choose JPEG (*.jpg;*.jpeg;*.jpe;*.jfif).
- Pick a location to save the image, rename it if needed, and click Save.
Windows updates frequently change the Photos app layout. If Save as isn’t in the three-dot menu, look for it under File in the app’s menu bar, or right-click the picture. Windows 10 users might have to select Edit & Create > Edit > Save a copy, which automatically saves as JPG.
✓ Pros
- Native Windows tool
- Better quality than Paint’s output
- Free, no extra download
✗ Cons
- One file at a time
- Requires HEIF & HEVC extensions
3. Convert with a Free Online Tool
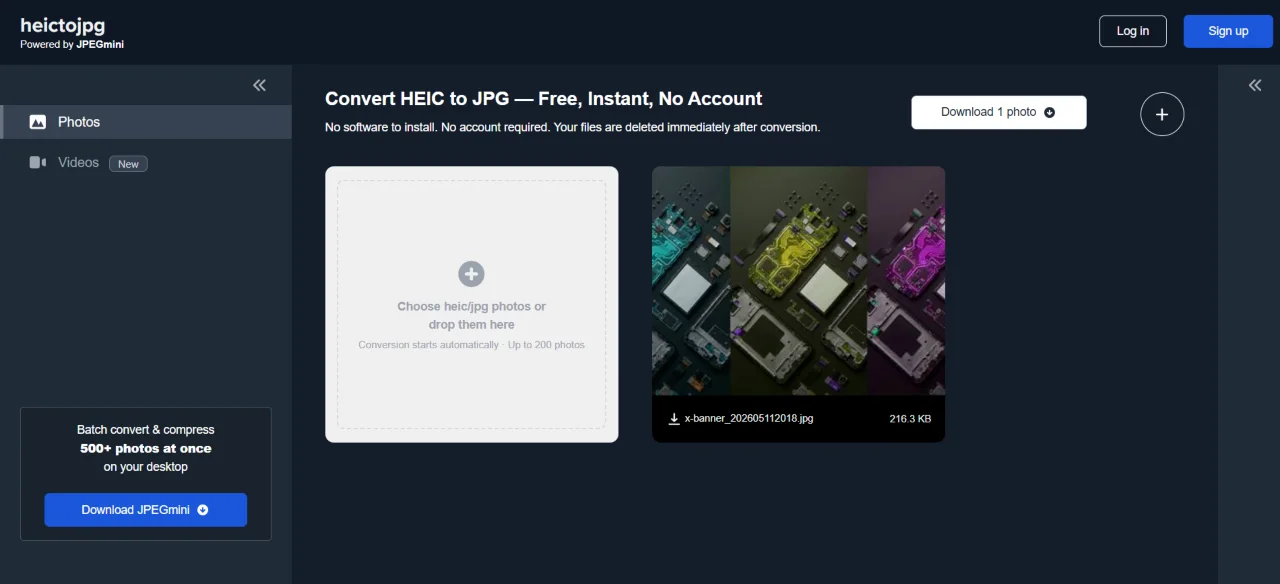
When working on a managed workstation where app installations are blocked, web converters provide an instant alternative. Portals like FreeConvert, HEIC.online, and heictojpg process files in no time through a browser interface.
- Open heictojpg.com in any browser.
- Click Choose Files or drag and drop. You can drop up to 200 files at once.
- The conversion starts automatically after upload.
Once done, click each image to download it individually. Or wait for the conversion to finish, then click the top-right “Download X Photos” button to get them all in a ZIP bundle.
Most online converters upload your files to their servers and delete them after a set period (usually 24 hours). That’s a major difference if you have sensitive personal photos. Heictojpg converts files locally in the browser using WebAssembly, so your images are never uploaded to a server.
✓ Pros
- Need no installation
- Works on any device
- Batch conversion supported
✗ Cons
- Needs an internet connection
- Most tools strip EXIF metadata
- Daily/size limits on free plans
Related: How to Factory Reset or Hard Reset an iPhone
4. Batch Convert with IrfanView
If you have a lot of iPhone photos to convert, I haven’t found anything better than IrfanView as the best free tool to get the HEIC to JPG conversions done. It’s been my go-to choice for years because I can easily batch-convert hundreds of files at once while keeping original EXIF data intact. It even allows you to tweak the quality settings exactly how you want.
Install IrfanView and Its Plugins
- First, visit irfanview.com and download the installer for your Windows. Most modern PCs require 64-bit.
- Next, download the All Plugins pack from this plugins page.
- Install IrfanView, then run the plugins installer. It will automatically find IrfanView’s location.
- You’ll also need the HEIF Image Extensions from the Microsoft Store installed (see the prerequisite step above), as IrfanView uses the system-level HEIC codec.
Bulk Convert HEIC to JPG
- Open IrfanView.
- Click File in the top menu bar, then select Batch Conversion/Rename… (keyboard shortcut:
B). - In the top-right panel, open the folder that contains HEIC files. Press Ctrl+A to select all images to convert, or click individual ones while holding
Ctrl, then click Add. - In the Output format dropdown, select JPG – JPG/JPEG Format.
- Click the Options button next to the output format. Set the JPEG quality to 90–95% for the best balance of quality and file size. Check “Keep original date/time” to preserve timestamps.
- Set the Output directory at the bottom to wherever you want the converted JPGs to save.
- Click Start Batch. The application will process all selected files and show a progress log.

For most photos, you’ll want your JPG quality set to 90-95% to get the output quality pretty much like the original, but with reduced file sizes. Setting quality to 100% creates unnecessarily large images without a visible difference to the human eye.
✓ Pros
- Converts hundreds of files at once
- Adjustable JPEG quality
- Preserves EXIF / date metadata
- Free for personal use
✗ Cons
- Requires installation + plugins
- Interface looks dated or complex
- Needs HEIF/HEVC extensions
5. Convert with CopyTrans HEIC
CopyTrans HEIC makes things very easy by adding a “Convert to JPEG” option to the Windows right-click context menu. Since it doesn’t rely on the Microsoft Store, it’s a perfect workaround to avoid those official HEIC/HEVC extensions.
- Download CopyTrans HEIC and run the installer. Give it administrative privileges when prompted.
- Once installed, go to your HEIC files in File Explorer. You can select a single file or hold Ctrl and click to select multiple pictures.
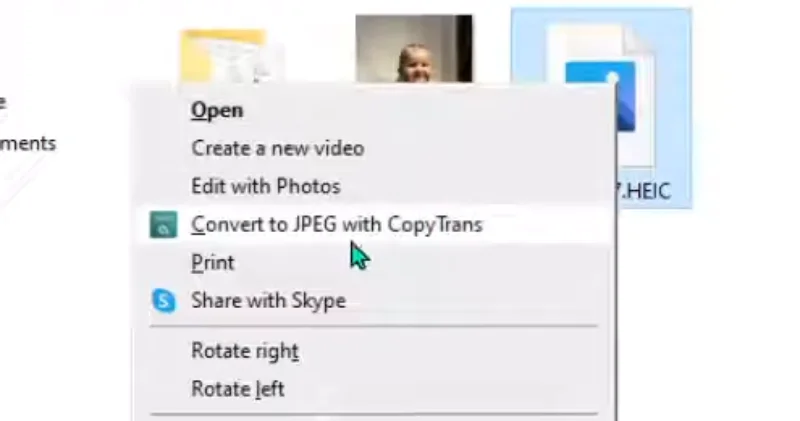
- Right-click the selected file(s) and choose “Convert to JPEG with CopyTrans” from the context menu.
- The converted files will appear in the same folder as the originals, having the same filenames but with the .jpg extension.
CopyTrans HEIC is free for personal use and compatible with Windows 7, 8, 10, and 11. It also adds HEIC thumbnail support in File Explorer as a side benefit, so you’ll see proper image previews without the Microsoft Store extensions.
✓ Pros
- Fastest workflow
- Works without extensions
- Supports Windows 7 and 8 too
- Converts multiple files at once
✗ Cons
- Requires admin rights to install
- No quality control settings
- Not free for commercial use
Change iPhone Settings to Prevent Future HEIC Conflicts
Instead of converting files after moving them to your computer, you can set your iPhone to automatically change HEIC to JPG when you transfer them over USB
- Open the Settings app on iPhone.
- Scroll down and select Photos.
- Move all the way down to the section labeled Transfer to Mac or PC.
- Tap to check Automatic instead of Keep Originals.
Now, whenever you plug your phone into a Windows PC via a USB cable and copy images over, iOS will translate the files to JPGs on the fly, eliminating the need for post-processing conversions.
Related: How to Fix Wi-Fi Connection Issues in Windows 10 & 11
? Tip: Stop iPhone from Saving HEIC in the First Place
If you regularly transfer photos from your iPhone to a Windows PC and keep facing this HEIC problem, there’s a simple fix. Tell your phone to shoot in JPG instead.
On your iPhone, go to Settings > Camera > Formats and switch from High Efficiency to Most Compatible. That’s it. New photos will now be saved as JPG.
However, this standard format uses roughly twice the space of HEIC images, so a 128 GB iPhone stores about as many HEIC photos as a 256 GB device does JPGs. Since you probably already back up to iCloud or a computer, the extra on-device storage is a small price to pay to avoid compatibility headaches.


