- Hard Reset vs. Factory Reset
- Things to Do Before Factory Reset
- 1. iCloud Backup
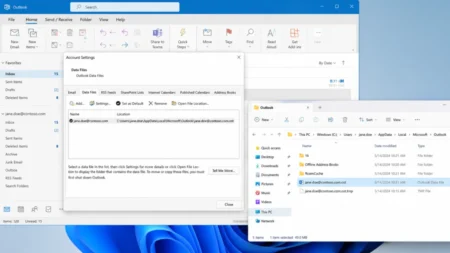
- 2. Backup to Mac (macOS Catalina or later)
- 3. Backup to Windows PC
- How to Hard Reset Your iPhone
- How to Factory Reset iPhone via Settings
- How to Reset iPhone Without a Passcode via Recovery Mode
- Step 1: Power Off Your iPhone
- Step 2: Put Your Device in Recovery Mode
- Step 3: Restore via Your Computer
- Step 4: Set Up Your iPhone
- How to Erase Your iPhone Remotely via iCloud
- Restore Your iPhone After a Factory Reset
- 1. Restore from a Previous Backup
- 2. Set Up as New iPhone
- Frequently Asked Questions
- Does a factory reset change the iOS version?
- Will a factory reset remove my cellular carrier lock?
- Do I need a specific battery level to reset my iPhone?
- Can a reset improve battery life or fix a sluggish iPhone?
- Last verified: iOS 26.5
- Applies to: iPhone 11, iPhone SE (2nd generation), and all later models for iOS 26; old models (iPhone 6s–iPhone X) still receive security-only updates on earlier iOS branches.
To sell, trade, or fix deep software issues, you will occasionally need to reset your iPhone. If bad luck falls and your Apple device freezes, becomes unresponsive, or gets stuck on a black screen, a hard reset should be your first course of action before you decide to contact Apple Support or visit an Apple Store.
A hard reset is a force restart done by pressing the volume up button, then the volume down, followed by the side button. That’s separate from a factory reset, which erases all information, including iCloud sessions, backups, and activation lock, performed in the Settings app via Erase All Content and Settings.
In this guide, we’ll provide step-by-step instructions to perform a hard restore or factory reset on an iPhone, including solutions for locked or stuck devices in recovery mode.
Hard Reset vs. Factory Reset
These two terms are frequently confused, potentially leading to unnecessary loss of data.
| Hard Reset (Force Restart) | Factory Reset (Erase All Content) | |
|---|---|---|
| What it does | Forcibly reboots the device | Wipes all data and settings |
| Data lost? | None | Everything, unless backed up |
| When to use | Frozen screen, app lockup, glitch | Selling, giving away, and regular issues |
| How it’s done | Hardware buttons | Settings app, iTunes/Finder, or iCloud |
| Passcode required? | No | Yes (or Recovery Mode) |
Things to Do Before Factory Reset
Just so you know, a factory reset is irreversible. Once started, you can’t recover any removed unsaved data. So, take this step seriously; it only takes a few minutes and will protect all personal and important stuff.
Skip this section only if you are intentionally wiping a device you no longer use and have no data to save.
1. iCloud Backup
- Connect your iPhone to Wi-Fi.
- Click Settings > Your Name > iCloud > iCloud Backup.
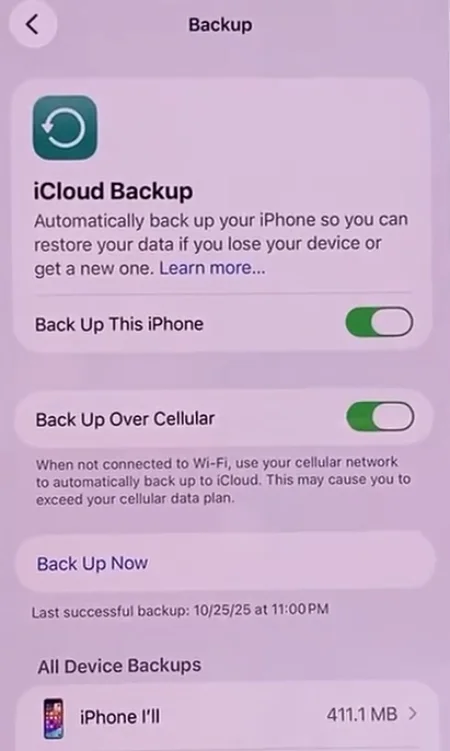
- Tap Back Up Now.
- Wait for the process to complete. Once done, the screen will show the date and time of the last successful backup beneath the button.
2. Backup to Mac (macOS Catalina or later)
- Connect your iPhone to the Mac with a USB or USB-C cable.
- Unlock it and tap Trust if prompted.
- Open Finder and select your iPhone from the sidebar under Locations.
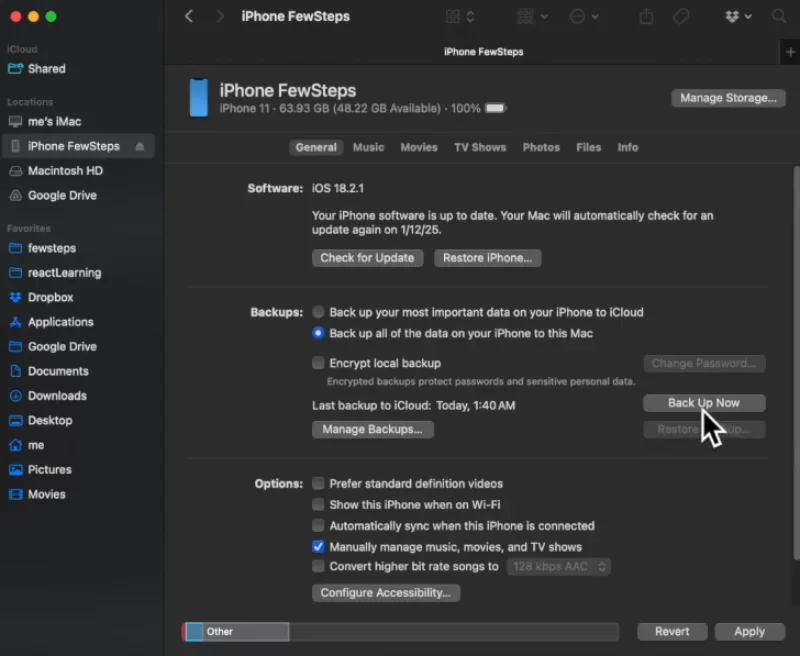
- In the General tab, check Back up all of the data on your iPhone to this Mac.
- To include passwords and Health data, check Encrypt local backup and set a password you will remember.
- Click Back Up Now and wait for the timestamp to update before disconnecting.
3. Backup to Windows PC
- Download and install the latest version of iTunes or the Apple Devices app from the Microsoft Store.
- Connect your iPhone to a PC with a USB cable, unlock it, and tap Trust.
- Open iTunes or Apple Devices, then click the small iPhone icon in the top-left corner.
- Under Backups, select This Computer.
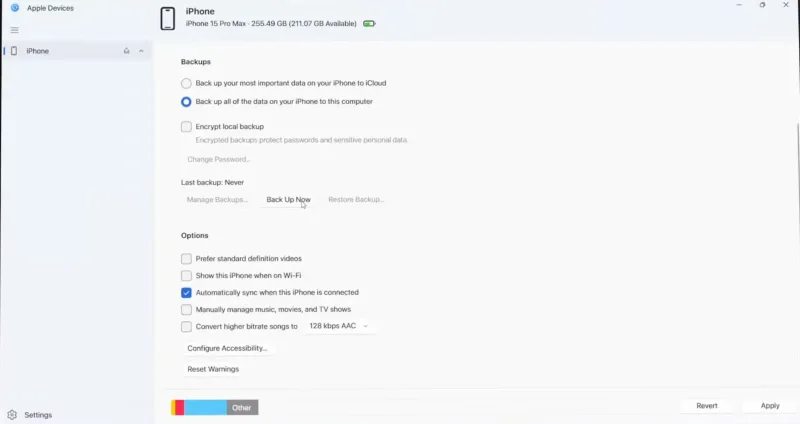
- Click Back Up Now.
- Wait until the backup is complete, then disconnect.
If you have a paired Apple Watch, it will back up automatically through your iPhone backup.
Review these checks in order before proceeding with the reset:
Back up via iCloud or your computer (above).
Go to Settings > [Your Name] > Find My and turn off Find My iPhone (requires Apple ID password).
Go to Settings > [Your Name] and scroll down to Sign Out to remove your Apple ID.
If selling or giving away the device, check our guide to unpair the Apple Watch from your iPhone.
If you use iMessage and plan to switch to a non-Apple device, deregister your number on Apple’s website.
Skipping the Apple ID sign-out step will leave Activation Lock enabled, which prevents anyone, including yourself, from setting up the device if you or someone tries to restore it later.
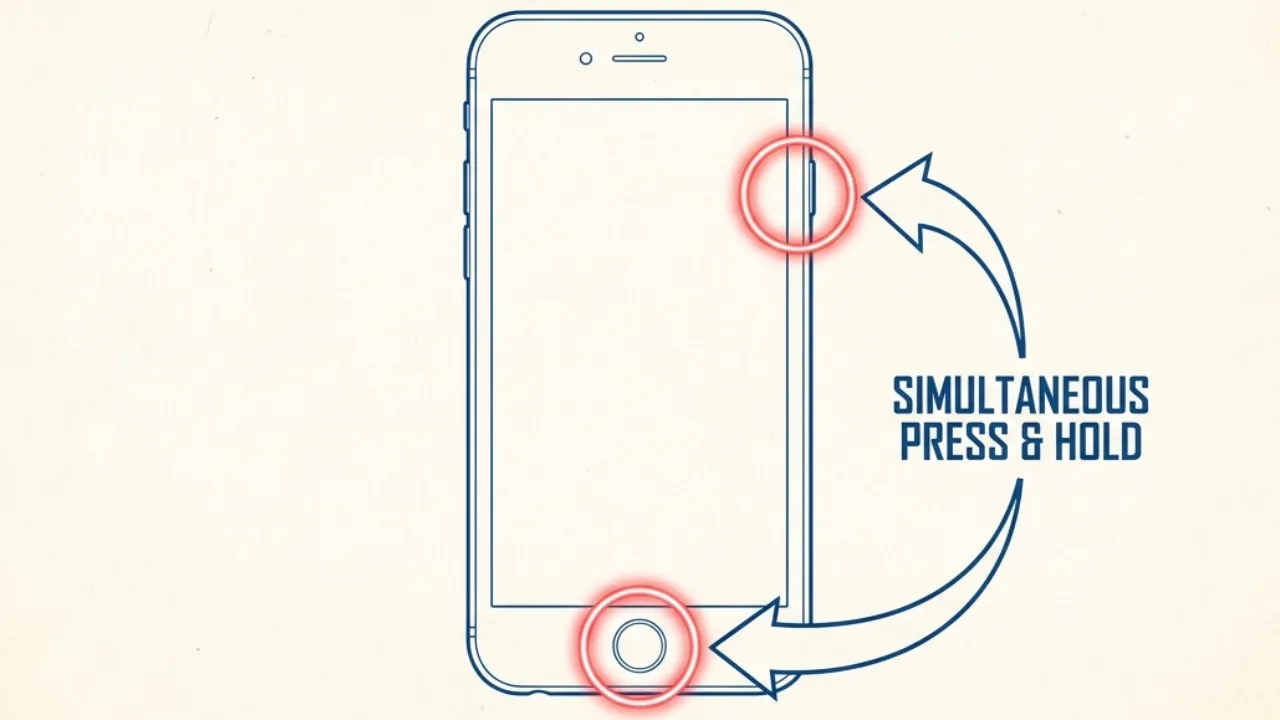
How to Hard Reset Your iPhone
A hard reset, or force restart, is the first recommended step if your iPhone is frozen, unresponsive, or stuck on a black or white screen. This process doesn’t remove any data, and it doesn’t require a passcode.
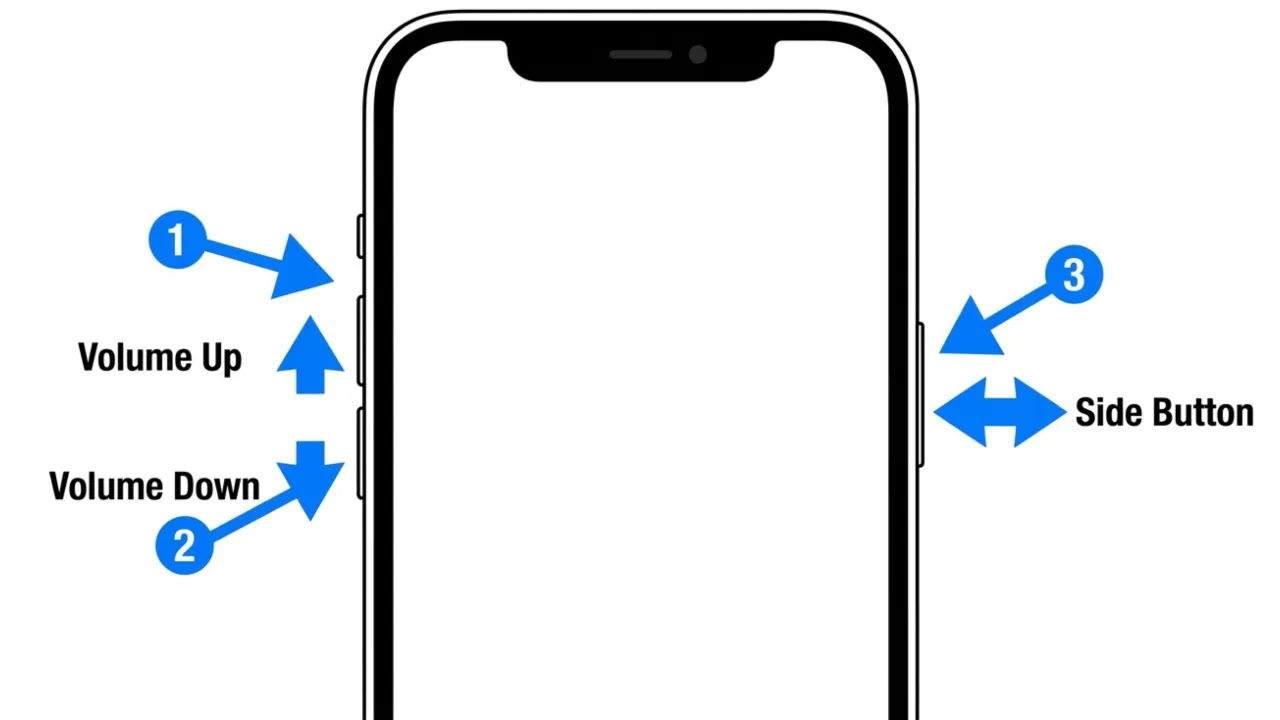
iPhone 8, iPhone SE (2nd and 3rd gen), and all later models with Face ID:
- Press and quickly release the Volume Up button.
- Press and quickly release the Volume Down button.
- Press and hold the Side button until the Apple logo appears, then release.
The phone will normally reboot. If the screen stays black for more than 30 seconds, confirm the battery is not completely drained; plug in the charger and try again after a few minutes.
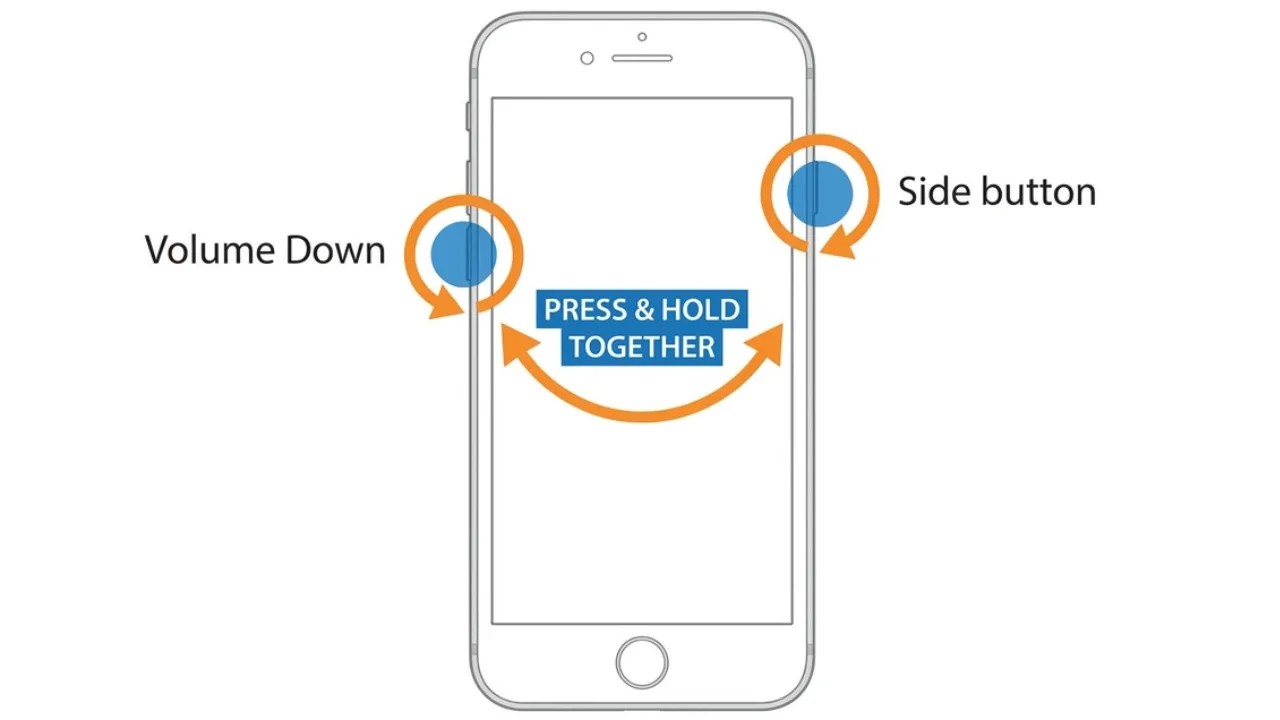
iPhone 7 and iPhone 7 Plus:
- Press and hold the Volume Down and Side buttons simultaneously.
- Hold until the Apple logo appears, then release them.
iPhone 6s, iPhone SE (1st gen), and earlier:
- Press and hold both Home and Top (or Side) buttons at once.
- Hold until the classic Apple logo shows, then release both buttons.
If the force restart does not fix the problem and the device remains unusable, move to a factory reset using one of the methods below.
How to Factory Reset iPhone via Settings
This is the simplest method to clean wipe your device directly from your iPhone’s settings and works on all models running iOS 15 or later.
- Open the Settings app.
- Tap General.
- Scroll to the bottom and tap Transfer or Reset iPhone.
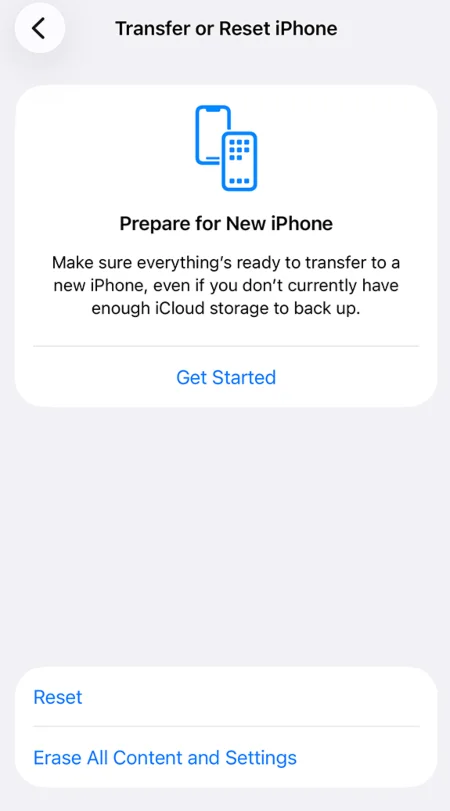
- Tap Erase All Content and Settings.
- Tap Continue.
- If a prompt appears, select whether you want to back up your data or erase it immediately.
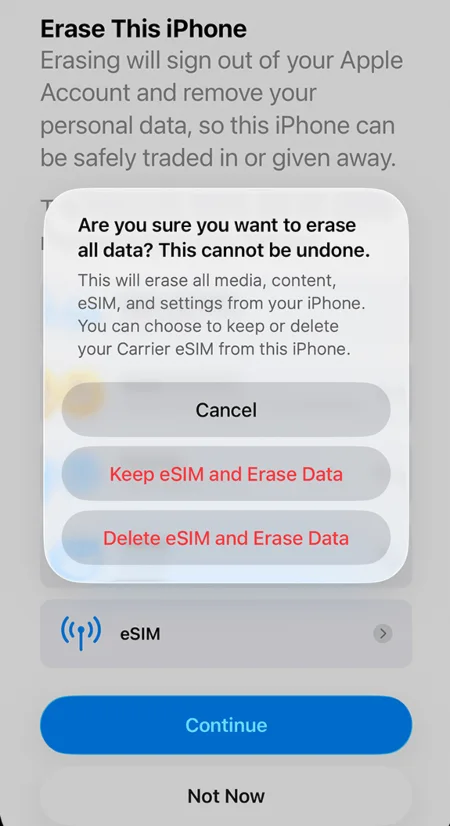
- If you have an active cellular plan, you will see a prompt with these options: Keep eSIM and Erase Data, and Delete eSIM and Erase Data.
- Tip: Erase your eSIM if changing carriers, or keep it to use the same carrier on this device.
- Enter your passcode and Apple ID password if requested to turn off Find My and Activation Lock.
The device will restart and display the Hello setup screen within a few minutes. All data, apps, accounts, and settings will be gone. The process is complete.
How to Reset iPhone Without a Passcode via Recovery Mode
Use Recovery Mode if any of the following apply:
- You have forgotten your passcode.
- iPhone is stuck on the Apple logo or a setup screen.
- Your computer fails to recognize the device.
- You purchased a second-hand iPhone that’s still linked to a previous Apple ID, and the seller has removed the account remotely.
Step 1: Power Off Your iPhone
- iPhone 8 and later: Press and hold the Side + Volume Down buttons together until the power-off slider appears. Drag it to the right to power off.
- iPhone 7 and 7 Plus: Press and hold the Side button until the power-off slider appears. Drag it to the right.
- iPhone 6s and earlier: Press and hold the Side (or Top) button until the power-off slider appears, then drag it to the right to shut down.
Wait until the screen turns completely black before moving to the next step.
Step 2: Put Your Device in Recovery Mode
To trigger the recovery interface, you will need your computer cable handy.
- Connect the cable to your Mac or PC, but do not plug it into the iPhone yet.
- On iPhone 8 and all new models with Face ID, press and hold the Side button.
- While still holding it, plug the cable into the iPhone.
- Do not release the Side button. Keep holding it even when the Apple logo appears.
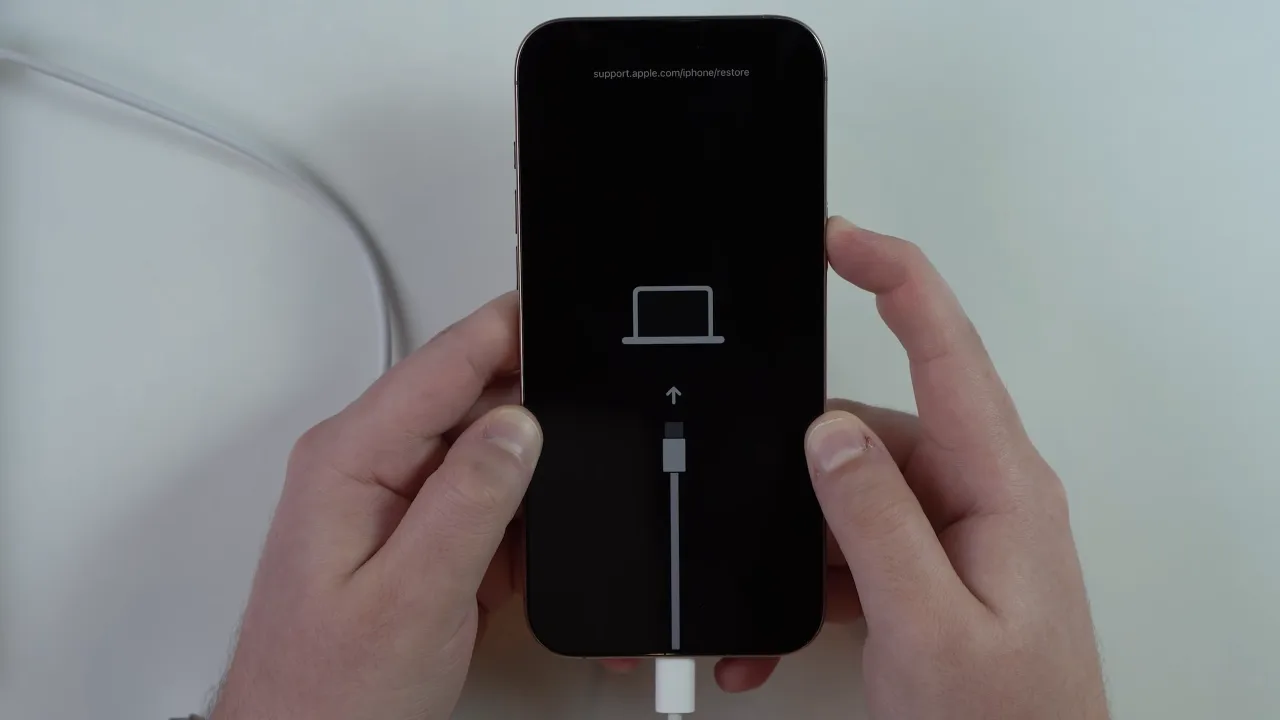
- Release only when you see the Recovery Mode screen, an illustration of a cable pointing toward a computer.
For old models:
- iPhone 7 and iPhone 7 Plus: Press and hold the Volume Down button. While holding, connect the cable to the iPhone. Keep holding until the Recovery Mode screen appears, then release.
- iPhone 6s and older: Press and hold the Home button. While holding, connect the USB cable; keep holding until the Recovery Mode screen appears, then release.
If you see the Apple logo instead of the cable visual, you released the button too early. Power off the phone again and repeat the process. If you cannot get the computer-and-cable graphic to appear after several attempts, the hardware buttons might require inspection by an Apple Authorized Service Provider.
Step 3: Restore via Your Computer
Once the iPhone enters Recovery Mode, your computer will detect it automatically, and a dialog box will appear on its screen.
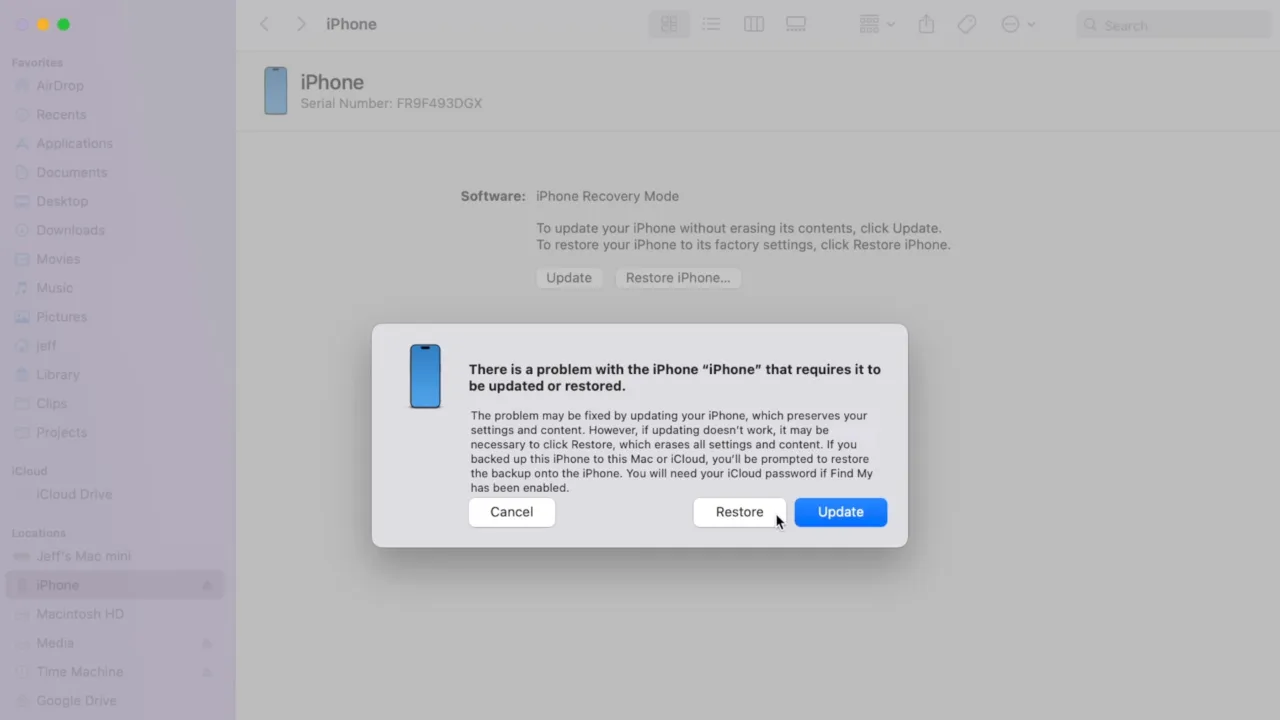
On Mac:
- Open the Finder app.
- Select your iPhone in the left sidebar under the Locations section.
- Select Trust [Your Device] if prompted.
- A pop-up box will appear with two options: Update or Restore. Click Restore.
On Windows PC:
- Open the Apple Devices app (or iTunes).
- Select your iPhone from the sidebar menu.
- Select Trust [Your Device] if prompted, then open the General tab.
- Click Restore (or Restore iPhone) and follow the instructions on the screen.
Your computer will download a new iOS package. Depending on your Internet speed, this can take 15 minutes or longer.
If the download drags on, your iPhone will exit Recovery Mode. Let the process finish on your computer. Once it’s done, power off the iPhone, repeat Step 2 to re-enter Recovery Mode, and the restore will continue without another download.
Step 4: Set Up Your iPhone
Once the restore finishes:
- The progress bar on your iPhone will complete, and it will restart.
- The Hello screen will appear on its display.
- Disconnect your handset from the PC, and follow the on-screen setup wizard.
How to Erase Your iPhone Remotely via iCloud
When you need to erase information from your iPhone but don’t have physical access to it because it’s lost, stolen, or the screen is too damaged to operate, you can reset it remotely from any browser as long as Find My iPhone was enabled before the incident occurred.
- On any browser, go to icloud.com/find.
- Sign in with your Apple ID and password.
- Click All Devices at the top of the map view.
- Select your iPhone from the list.

- Tap Erase, then Next to continue.
The erase command is sent to the device and will execute immediately if the iPhone is online or the next time the offline device connects to the internet. Learn how to fix the issue if your iPhone won’t connect to Wi-Fi.
Activation Lock is automatically cleared when you erase via iCloud Find Devices under your own Apple ID. If the device is locked to a different account and you are the legitimate owner, you’ll need to contact Apple Support with proof of purchase to proceed. Apple cannot remove Activation Lock without identity verification.
During this process, you’ll be prompted to either delete or keep your eSIM data. To transfer the number, check with your carrier first. But when you’re selling your iPhone, choose to delete the eSIM.
Restore Your iPhone After a Factory Reset
Once the reset completes, your iPhone displays the Hello setup screen. At the Apps & Data step, you have two options:
1. Restore from a Previous Backup
From iCloud:
- Select Restore from iCloud Backup.
- Sign in with your Apple ID.
- Select the most recent backup from the list.
- Keep the device connected to Wi-Fi and the charger until the restore completes.
From Mac or PC:
- Connect your iPhone to the computer with a cable.
- Open Finder on Mac or Apple Devices app/iTunes on PC.
- Select your iPhone and click Restore Backup.
- Choose the correct backup file from the list and click Restore.
2. Set Up as New iPhone
Select Set Up as New iPhone at the Apps & Data screen if you are giving the device to someone else, want a fresh start without old settings or data, or are troubleshooting a software issue and want to rule out backup-related culprits.
Once you choose this option, sign in with an Apple ID, set up Face ID or Touch ID, configure your passcode, and follow the remaining setup instructions.
Frequently Asked Questions
Does a factory reset change the iOS version?
No. A factory reset through Settings leaves the current iOS version installed. Only a restore via Finder or Apple Devices (or iTunes) downloads and installs the latest compatible version of software.
Will a factory reset remove my cellular carrier lock?
No. Erasing your device does not unlock it for use with other cellular networks. Carrier locks are connected to your device’s IMEI number on the provider’s servers. You must contact your current mobile carrier and request an official unlock before switching networks.
Do I need a specific battery level to reset my iPhone?
Apple recommends having at least a 50% battery charge before initiating a factory reset. If your battery is too low, the system may prevent the process. Keep your iPhone plugged into a reliable charger for the entire data erasure process to avoid unexpected shutdowns or device damage.
Can a reset improve battery life or fix a sluggish iPhone?
Sometimes, if sluggishness is caused by corrupted files, bloated app data, or misconfigured settings accumulated over time, a clean reset can noticeably improve speed and battery performance. However, if the culprit relates to hardware like an aging battery, a factory reset will not help.