- First, Identify the Exact Wi-Fi Problem
- Quick Fixes for Windows Wi-Fi Problems
- 1. Restart Your Router and PC
- 2. Run the Windows Network Troubleshooter
- 3. Forget the Wi-Fi Network and Reconnect
- If Windows Connects to Wi-Fi But Says No Internet
- 4. Release and Renew the IP Address
- 5. Reset TCP/IP and Winsock
- 6. Change DNS Servers
- If Wi-Fi Networks Do Not Appear
- 7. Check the Wi-Fi Adapter in Device Manager
- 8. Update or Reinstall the Wi-Fi Driver
- 9. Check WLAN AutoConfig Service
- If Wi-Fi Keeps Disconnecting
- 10. Disable Power Saving for the Wi-Fi Adapter
- 11. Adjust Router Channel and Security Settings
- If Wi-Fi Works After Disabling VPN or Antivirus
- 12. Test VPN, Antivirus, and Firewall Conflicts Safely
- Advanced Fixes for Stubborn Windows Wi-Fi Problems
- 13. Generate a Windows Wireless Network Report
- 14. Disable IPv6 to Temporarily Test
- 15. Perform a Network Reset
- 16. Clean Boot Windows to Find App Conflicts
- 17. Check Windows Updates and Roll Back a Bad Driver
- 18. Check Hardware and Antenna Problems
- Last-Resort Options
- Reset This PC
- Registry Network Throttling Tweak
- Common Windows Wi-Fi Error Messages and What They Mean
- Can’t Connect to This Network
- No Internet, Secured
- Wi-Fi Doesn’t Have a Valid IP Configuration
- The Default Gateway Is Not Available
- Wi-Fi Option Missing from Settings
- FAQ
- Why does my Windows PC connect to Wi-Fi but have no internet?
- Why does Wi-Fi keep disconnecting on Windows 11?
- Should I use Network Reset in Windows?
- Is it safe to disable IPv6 to fix Wi-Fi?
- How do I know if my Wi-Fi adapter is broken?
- Final Thoughts
- Sources
Wi-Fi problems on Windows can show up in different ways. Sometimes your PC sees the network but refuses to connect. Sometimes it connects but says No Internet, Secured. In other cases, the Wi-Fi option disappears completely, or the connection keeps dropping every few minutes.
The good news is that most Windows Wi-Fi issues can be narrowed down quickly if you check them in the right order. This guide covers Windows 10 and Windows 11 fixes for missing networks, no internet access, unstable connections, DNS problems, driver issues, router conflicts, and adapter failures.
Before changing advanced settings, confirm three simple things: Airplane Mode is off, Wi-Fi is turned on, and another device can use the same network. Press Windows + A to open Quick Settings/Action Center and check the Wi-Fi tile. If your phone also cannot connect to the same Wi-Fi, the issue is probably with the router or internet service, not only your Windows PC.
This troubleshooting flow is written for Windows 11 and Windows 10 systems using built-in Wi-Fi adapters and USB Wi-Fi adapters. Before publishing, add your real test details here, such as the Windows version, laptop/PC model, adapter model, and router type used during testing. Real device details improve trust and help readers know whether the steps match their setup.
First, Identify the Exact Wi-Fi Problem
Do not start with the most advanced fix. First, match your symptom with the likely cause. This saves time and helps you avoid unnecessary changes.
| Problem you see | Likely cause | Start with this fix |
|---|---|---|
| Wi-Fi network is visible but will not connect | Saved profile, wrong password, router security mismatch | Forget the network and reconnect |
| Connected but says No Internet, Secured | DNS failure, DHCP problem, router issue, TCP/IP corruption | Restart router, reset TCP/IP, change DNS |
| No Wi-Fi networks appear | Disabled adapter, driver problem, WLAN service stopped | Check adapter, driver, and WLAN AutoConfig |
| Wi-Fi keeps disconnecting | Power saving, weak signal, driver issue, router channel conflict | Disable adapter power saving and update driver |
| Wi-Fi option disappeared from Windows | Driver failure, disabled hardware, BIOS/UEFI setting, adapter fault | Check Device Manager and reinstall driver |
Also helpful: How to Change DNS Server on Windows and Mac
Quick Fixes for Windows Wi-Fi Problems
1. Restart Your Router and PC
A proper restart clears temporary router sessions, refreshes DHCP leases, and gives Windows a clean chance to reconnect. This is basic, but it fixes many temporary connection problems.
Restart your modem/router this way:
- Unplug the router from power.
- If you use a separate modem, unplug that too.
- Wait at least 30 seconds.
- Plug the modem back in first and wait until its lights are stable.
- Plug the router back in and wait for Wi-Fi to appear again.
- Reconnect your Windows PC to the network.
Then restart Windows:
- Click Start.
- Select the Power icon.
- Choose Restart, not Shut down.
If your laptop has been sleeping or hibernating for days, a real restart is better than closing and opening the lid. Restarting reloads drivers and services that may have frozen in the background.
2. Run the Windows Network Troubleshooter
Windows includes built-in troubleshooters that can detect disabled adapters, IP configuration issues, DNS problems, and service failures.
On Windows 11:
- Press Windows + I to open Settings.
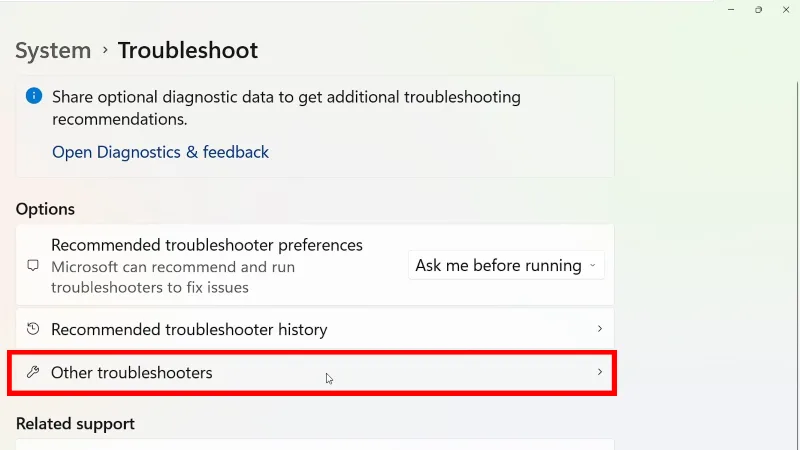
- Go to System > Troubleshoot > Other troubleshooters.
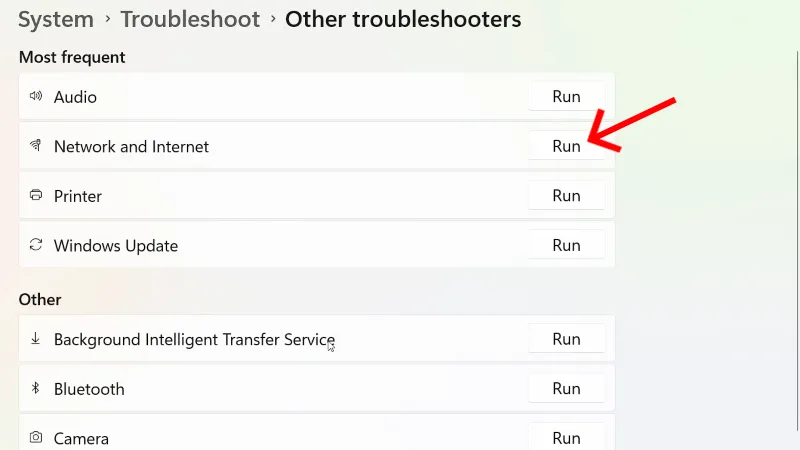
- Next to Network and Internet, click the Run button.
- Follow the instructions and apply any recommended fixes.
- Restart PC if Windows asks you to.
On Windows 10:
- Open Settings.
- Go to Update & Security > Troubleshoot.
- Select Additional troubleshooters.
- Run Internet Connections.
- Then run Network Adapter as well.
Depending on your Windows build, the tool may appear as Network and Internet, Internet Connections, or Network Adapter. Run the closest matching option you see.
3. Forget the Wi-Fi Network and Reconnect
If Windows saved an old password, outdated security setting, or corrupted network profile, forgetting the network creates a fresh connection profile.
On Windows 11:
- Open Settings > Network & Internet > Wi-Fi.
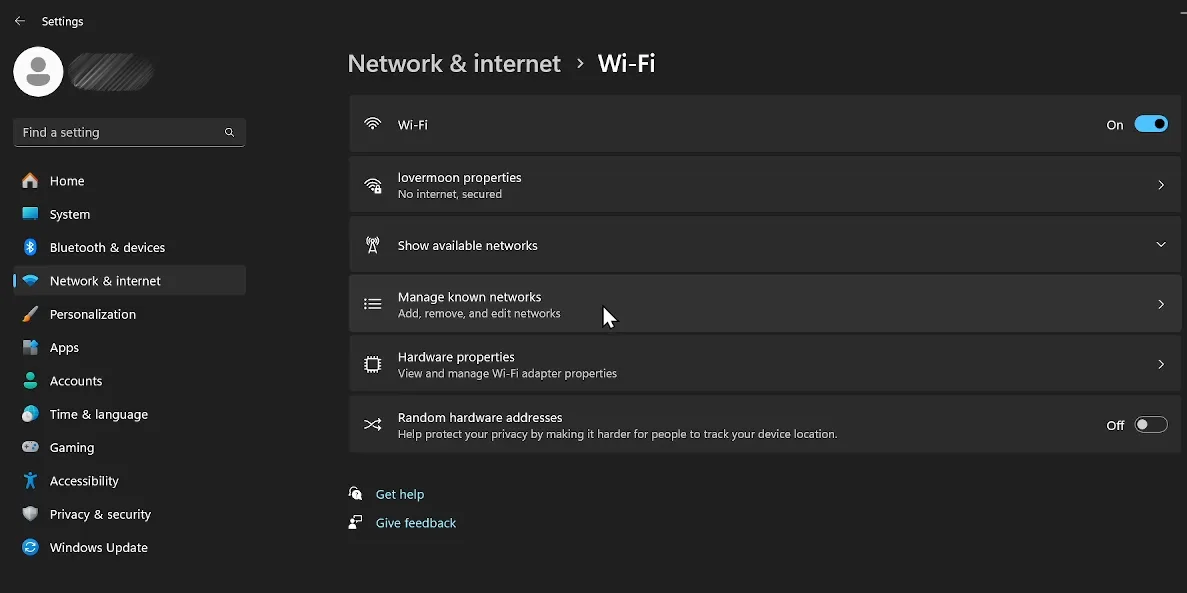
- Click Manage known networks.
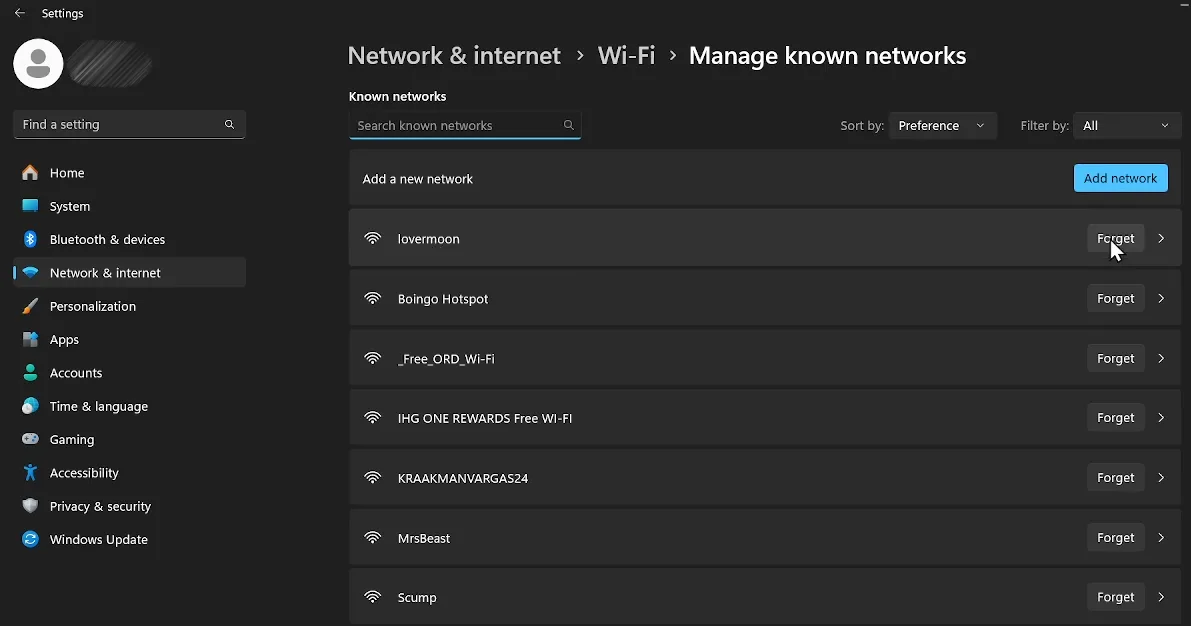
- Find the problematic network and click Forget.
- Go back to the Wi-Fi page.
- Click Show available networks.
- Select your Wi-Fi network, enter the password, and connect again.
On Windows 10:
- Open Settings > Network & Internet > Wi-Fi.
- Click Manage known networks.
- Select your Wi-Fi network.
- Click Forget.
- Click the network icon in the taskbar and reconnect with the correct password.
Wi-Fi passwords are case-sensitive. If your router label has both uppercase and lowercase letters, enter them exactly as shown.
If Windows Connects to Wi-Fi But Says No Internet
4. Release and Renew the IP Address
If your PC connects to the router but cannot access the internet, it may not be receiving a proper IP address from the router.
- Right-click Start.
- Select Terminal (Admin) or Command Prompt (Admin).
- Run this command:
ipconfig /release- Then run:
ipconfig /renew- Wait for Windows to request a new IP address.
- Open a browser and test the connection again.
If this fails with a DHCP-related error, restart the router and try again. If other devices are also failing, contact your internet provider.
5. Reset TCP/IP and Winsock
When Windows shows No Internet, Secured, loads Wi-Fi but does not browse, or gives IP configuration errors, the network stack may be corrupted. Resetting TCP/IP and Winsock rebuilds core network components.
- Right-click Start.
- Open Terminal (Admin) or Command Prompt (Admin).
- Run these commands one by one:
netsh winsock reset
netsh int ip reset
ipconfig /release
ipconfig /renew
ipconfig /flushdns- Close the window.
- Restart your PC.
- Reconnect to Wi-Fi and test the internet.
If you use VPN software, Hyper-V, VMware, VirtualBox, or custom virtual adapters, a Winsock/network reset may break those configurations. You may need to reinstall or reconfigure your VPN or virtual network adapter afterward.
6. Change DNS Servers
If the Wi-Fi connection is active but websites do not load, your DNS server may be failing. Switching to a reliable public DNS provider can fix browsing problems.
On Windows 11:
- Press Windows + I.
- Open Network & Internet.
- Select Wi-Fi or Ethernet.
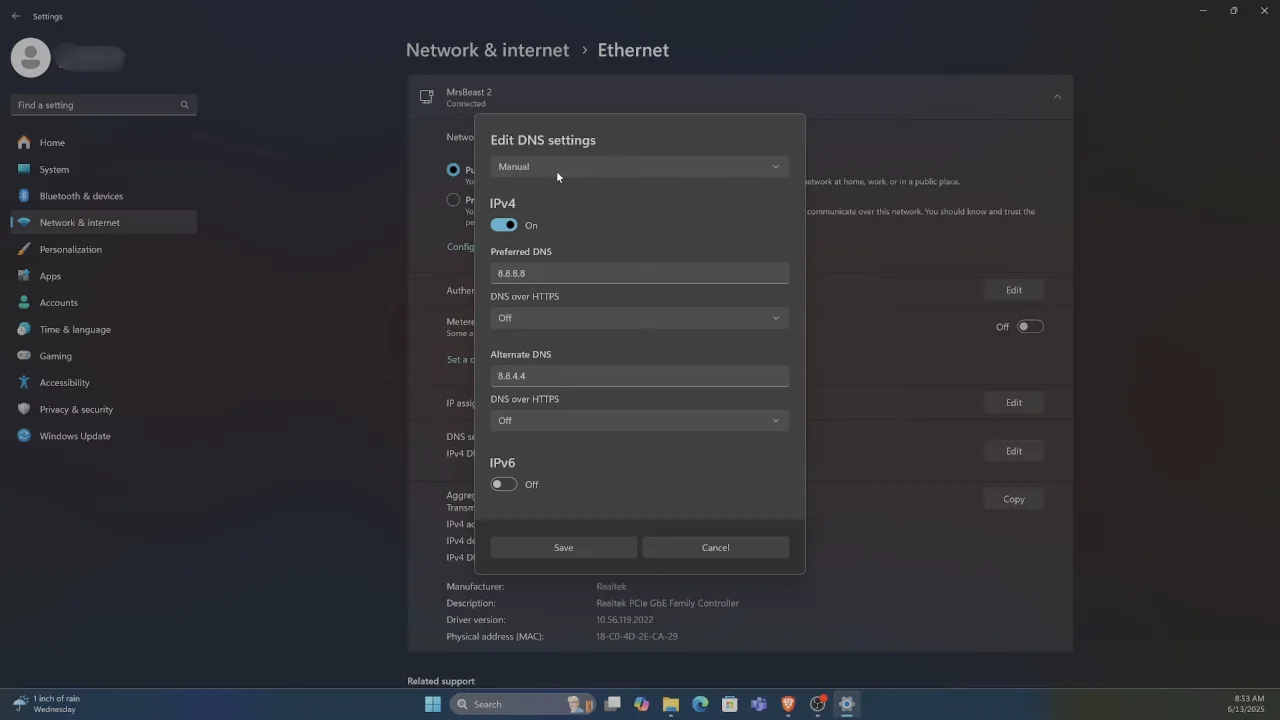
- Click Hardware properties.
- Click Edit next to the DNS server assignment option.
- Change it from Automatic (DHCP) to Manual.
- Enable IPv4.
- Enter one of these DNS pairs:
- Google DNS: 8.8.8.8 and 8.8.4.4
- Cloudflare DNS: 1.1.1.1 and 1.0.0.1
- Click Save.
- Open Terminal and run:
ipconfig /flushdnsOn Windows 10:
- Open Settings > Network & Internet.
- Click Status.
- Select Change adapter options.
- Right-click your Wi-Fi connection and choose Properties.
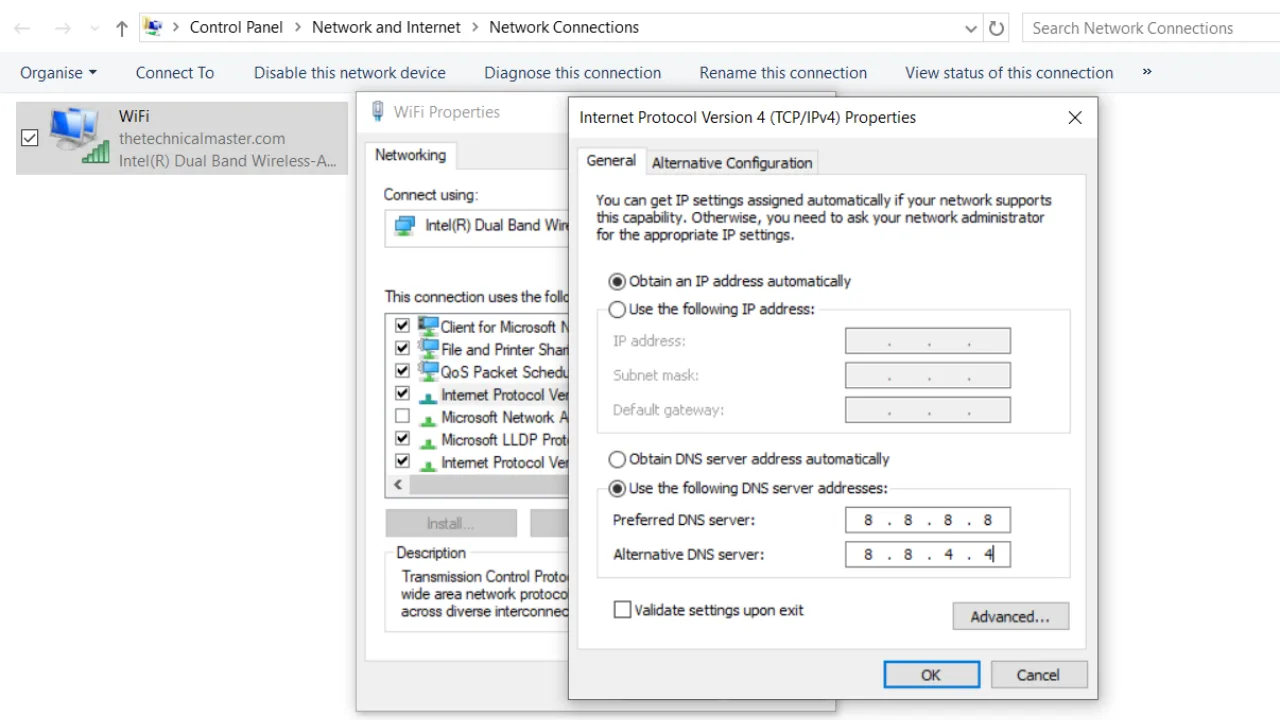
- Select Internet Protocol Version 4 (TCP/IPv4).
- Click Properties.
- Select Use the following DNS server addresses.
- Enter 8.8.8.8 and 8.8.4.4, or 1.1.1.1 and 1.0.0.1.
- Click OK.
- Open Command Prompt and run ipconfig /flushdns.
Changing DNS can fix website loading and name-resolution problems. It will not fix a missing Wi-Fi adapter or a PC that can’t connect to the router at all. Also, remember that your DNS provider may be able to process DNS requests unless encrypted DNS is configured.
Related: How to Change DNS Server on Windows and Mac
If Wi-Fi Networks Do Not Appear
7. Check the Wi-Fi Adapter in Device Manager
If Windows does not show any Wi-Fi networks, the wireless adapter may be disabled, missing, or using a broken driver.
- Press Windows + X.
- Select Device Manager.
- Expand Network adapters.
- Look for an adapter with words like Wireless, Wi-Fi, 802.11, Intel Wireless, Realtek Wireless, or Qualcomm Atheros.
- If it has a down arrow, right-click it and select Enable device.
If the adapter is not visible:
- In Device Manager, click View.
- Select Show hidden devices.
- Check Network adapters again.
- If the adapter appears faded, uninstall it and restart the PC.
Do not disable your Ethernet adapter by mistake. For Wi-Fi fixes, look for adapter names that include Wireless, Wi-Fi, or 802.11.
8. Update or Reinstall the Wi-Fi Driver
Outdated, corrupted, or incompatible wireless drivers can cause connection failures, missing Wi-Fi networks, random drops, and slow speeds.
To update the driver through Device Manager:
- Press Windows + X and open Device Manager.
- Expand Network adapters.
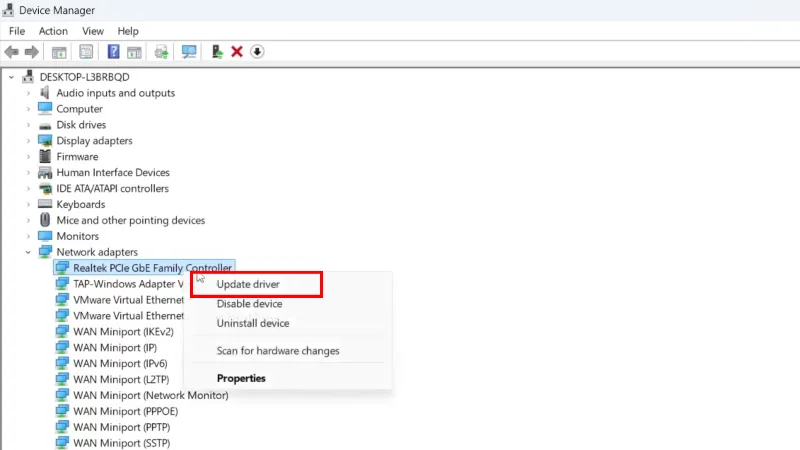
- Right-click your Wi-Fi adapter.
- Select Update driver.
- Click Search automatically for drivers.
- Install any available updates and restart your PC.
If Windows does not find a newer driver, download it manually:
- Find your exact PC model or adapter model.
- Visit the official support website of your PC maker, such as Dell, HP, Lenovo, ASUS, Acer, or Microsoft Surface.
- Download the Wi-Fi driver for your exact model and Windows version.
- Run the installer.
- Restart the computer.
To reinstall the driver:
- Open Device Manager.
- Right-click the Wi-Fi adapter.
- Select Uninstall device.
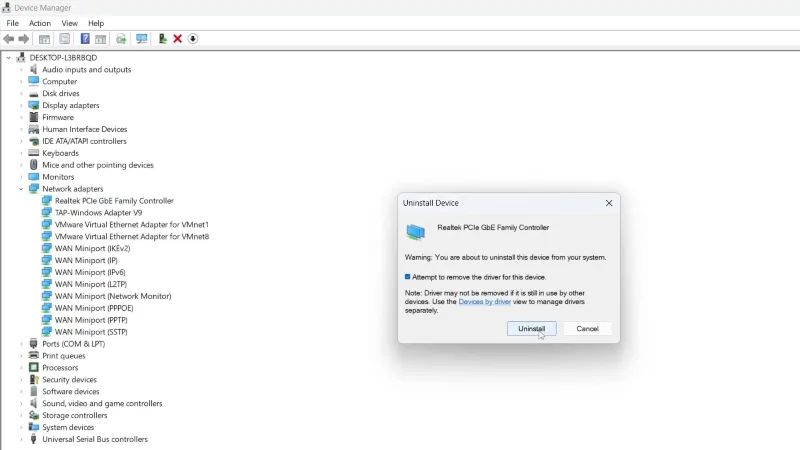
- If available, check Attempt to remove the driver for this device.
- Click Uninstall.
- Restart the PC.
Windows will try to reinstall the adapter automatically. If it does not, install the driver you downloaded from the manufacturer.
Before uninstalling the Wi-Fi driver, save the replacement driver on your desktop or a USB flash drive. If Wi-Fi stops working after removal, you will still have the installer available offline.
9. Check WLAN AutoConfig Service
Windows uses the WLAN AutoConfig service to detect, connect, and manage wireless networks. If this service is stopped, Wi-Fi may not appear or connect properly.
- Press Windows + R.
- Type services.msc and press Enter.
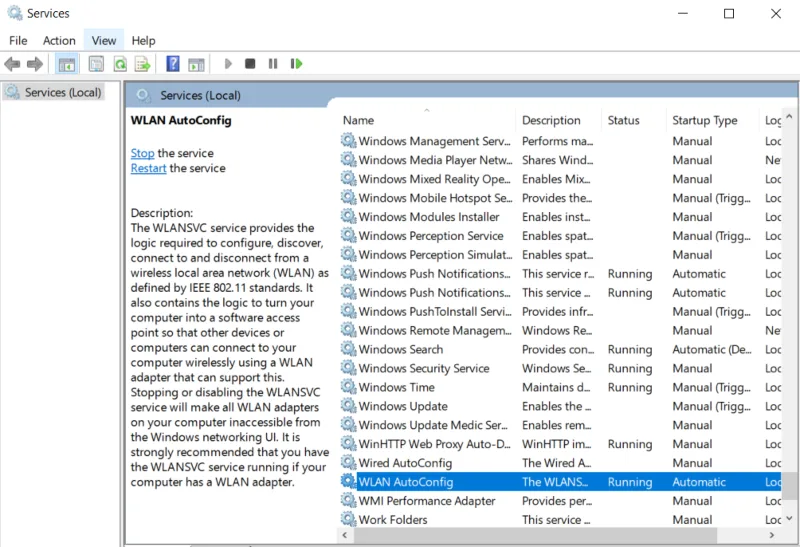
- Find WLAN AutoConfig.
- Its status should be Running.
- Its startup type should be Automatic.
- If it is stopped, right-click it and select Start.
- If it is already running, right-click it and select Restart.
- Double-click it, set Startup type to Automatic, and click Apply.
If Wi-Fi Keeps Disconnecting
10. Disable Power Saving for the Wi-Fi Adapter
Windows can turn off the wireless adapter to save battery. On some laptops, this causes random disconnects, especially after sleep or when battery saver is active.
- Open Device Manager.
- Expand Network adapters.
- Right-click your Wi-Fi adapter and select Properties.
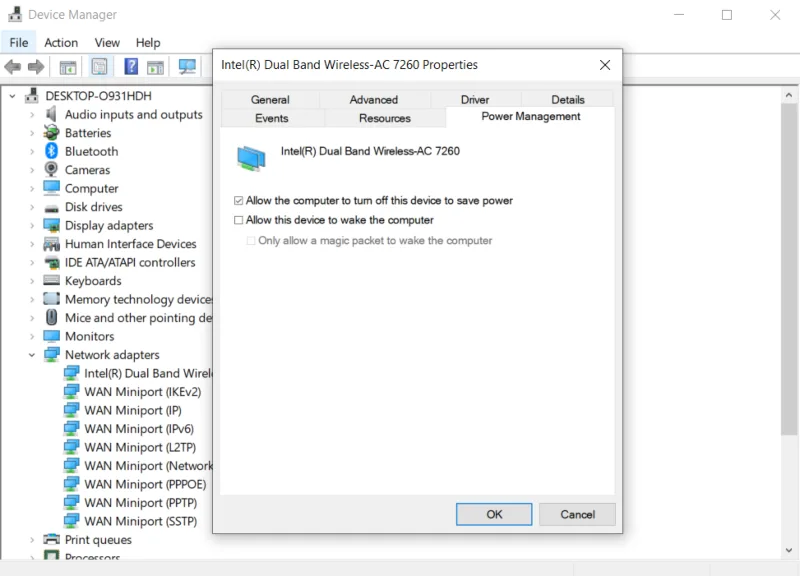
- Open the Power Management tab.
- Uncheck Allow the computer to turn off this device to save power.
- Click OK.
Then check the advanced power plan:
- Press Windows + R.
- Type powercfg.cpl and press Enter.
- Click Change plan settings.
- Select Change advanced power settings.
- Expand Wireless Adapter Settings.
- Expand Power Saving Mode.
- Set both On battery and Plugged in to Maximum Performance.
- Click Apply and OK.
If the problem happens only when your laptop is unplugged, power saving is one of the first settings to check.
11. Adjust Router Channel and Security Settings
If all devices experience weak or unstable Wi-Fi, the problem may be your router, not Windows. Router settings can affect signal stability, speed, and compatibility.
Check these settings in your router dashboard:
- Security: Use WPA2-Personal or WPA3-Personal if your devices support it. Avoid WEP and old WPA.
- 2.4GHz channel: Use channel 1, 6, or 11 to reduce overlap.
- 5GHz channel: Auto usually works well for most home routers.
- Firmware: Keep router firmware updated from the router manufacturer or ISP dashboard.
- MAC filtering: Temporarily disable it to confirm your PC is not being blocked.
Do not unplug or restart the router while firmware is updating. Interrupting a firmware update can break the router and may require ISP or manufacturer support.
If Wi-Fi Works After Disabling VPN or Antivirus
12. Test VPN, Antivirus, and Firewall Conflicts Safely
VPN clients, third-party antivirus tools, firewalls, and old network filters can interfere with traffic routing. This is more likely if the Wi-Fi problem started after installing or updating one of these programs.
Test the VPN first:
- Disconnect the VPN.
- Fully exit the VPN app from the system tray.
- Restart the browser.
- Try loading websites again.
If the connection works without the VPN, update the VPN app or contact its support team. You may also need to change VPN protocol settings.
For antivirus or firewall testing:
- Pause only the third-party security tool for a short test.
- Do not browse unknown websites while protection is paused.
- Test a trusted website.
- Turn protection back on immediately.
If Windows Firewall settings are damaged, you can restore them:
- Open Control Panel.
- Go to System and Security > Windows Defender Firewall.
- Click Restore defaults.
- Confirm the action.
Do not leave antivirus or firewall protection disabled. Use this only as a short test. If the security app is causing the issue, update it, change its network rules, or replace it with a better-maintained option.
Advanced Fixes for Stubborn Windows Wi-Fi Problems
13. Generate a Windows Wireless Network Report
If Wi-Fi connects and disconnects repeatedly, or you cannot tell why the connection fails, create a built-in Windows wireless report. This report shows recent connection sessions, failures, adapter details, and error events.
- Right-click Start.
- Open Terminal (Admin) or Command Prompt (Admin).
- Run this command:
netsh wlan show wlanreport- Windows will create an HTML report.
- Open the file path shown in Terminal.
- Look for failed sessions, red error icons, weak signal patterns, driver failures, or authentication errors.
This report is especially useful when the problem happens randomly, and you need evidence before changing router, driver, or adapter settings.
14. Disable IPv6 to Temporarily Test
Some older routers or ISP setups handle IPv6 poorly, which can cause unstable browsing or partial connectivity. This should be treated as a temporary test, not a permanent fix for everyone.
On Windows 11:
- Open Settings > Network & Internet.
- Click Advanced network settings.
- Select your Wi-Fi adapter.
- Open More adapter options.
- Right-click Wi-Fi and choose Properties.
- Uncheck Internet Protocol Version 6 (TCP/IPv6).
- Click OK.
On Windows 10:
- Open Control Panel.
- Go to Network and Sharing Center.
- Click Change adapter settings.
- Right-click your Wi-Fi adapter and select Properties.
- Uncheck Internet Protocol Version 6 (TCP/IPv6).
- Click OK.
If disabling IPv6 fixes the issue, update your router firmware or contact your ISP. Do not leave IPv6 disabled forever without a reason, because modern networks and services are increasingly using it.
15. Perform a Network Reset
A network reset removes and reinstalls network adapters, clears saved network settings, and restores networking components to default. Use this when normal driver, DNS, and TCP/IP fixes fail.
Network Reset removes saved Wi-Fi networks and passwords. It can also remove VPN adapters, Hyper-V switches, VMware/VirtualBox adapters, static IP settings, and custom DNS settings. Write down important network details before using it.
On Windows 11:
- Open Settings.
- Go to Network & Internet.
- Click Advanced network settings.
- Select Network reset.
- Click Reset now.
- Confirm and let Windows restart.
On Windows 10:
- Open Settings.
- Go to Network & Internet > Status.
- Scroll down and select Network reset.
- Click Reset now.
- Confirm and let Windows restart.
After the restart, reconnect to Wi-Fi and enter your password again.
Related: How to Update Windows Safely
16. Clean Boot Windows to Find App Conflicts
Background apps can interfere with network drivers and services. A clean boot starts Windows with non-Microsoft services and startup apps disabled so you can test whether another program is causing the issue.
- Press Windows + R.
- Type msconfig and press Enter.
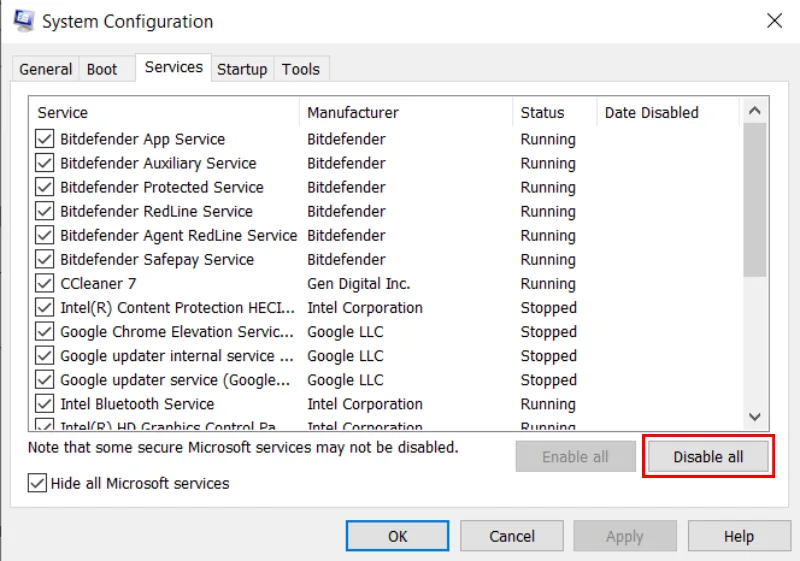
- Open the Services tab.
- Check Hide all Microsoft services.
- Click Disable all.
- Open the Startup tab.
- Click Open Task Manager.
- Disable startup items.
- Restart the PC.
If Wi-Fi works in clean boot mode, re-enable services and startup apps in small groups until the problem returns. Common causes include VPN clients, old antivirus tools, system optimizers, and third-party network managers.
17. Check Windows Updates and Roll Back a Bad Driver
Windows updates can fix network bugs, but sometimes a driver update can also introduce a new problem. Check both possibilities.
- Press Windows + I.
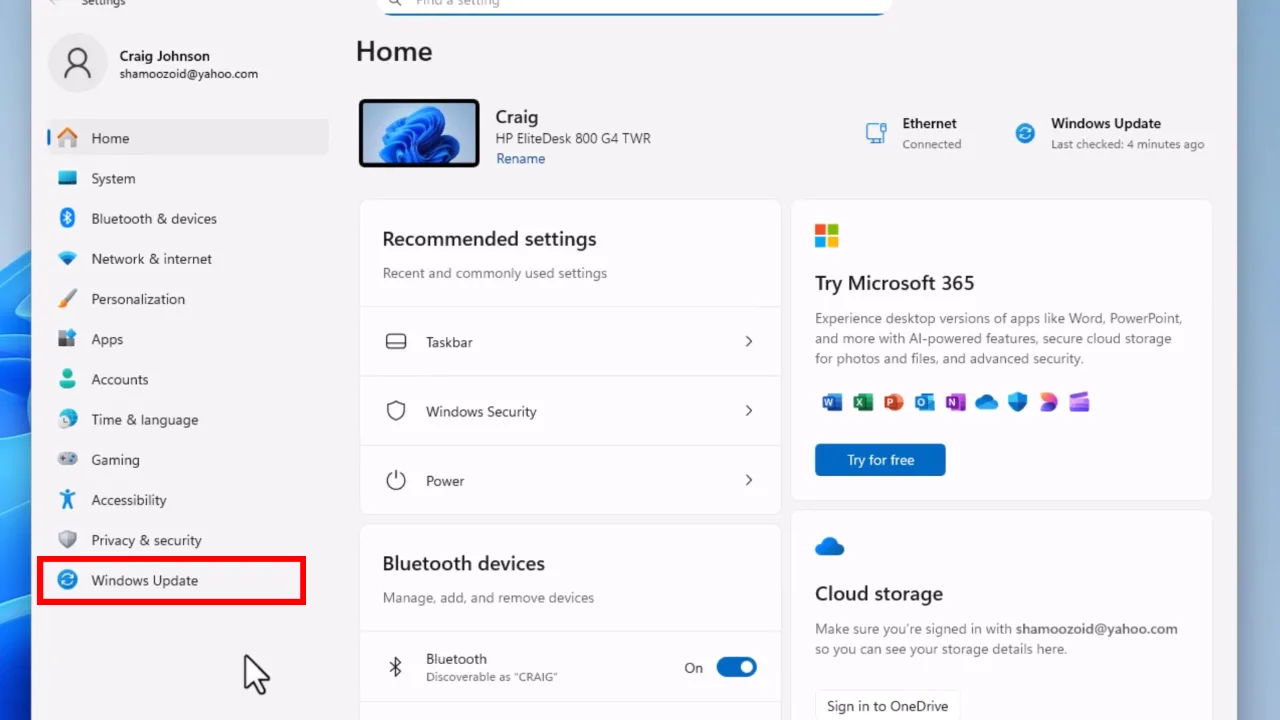
- Open Windows Update on Windows 11, or Update & Security on Windows 10.
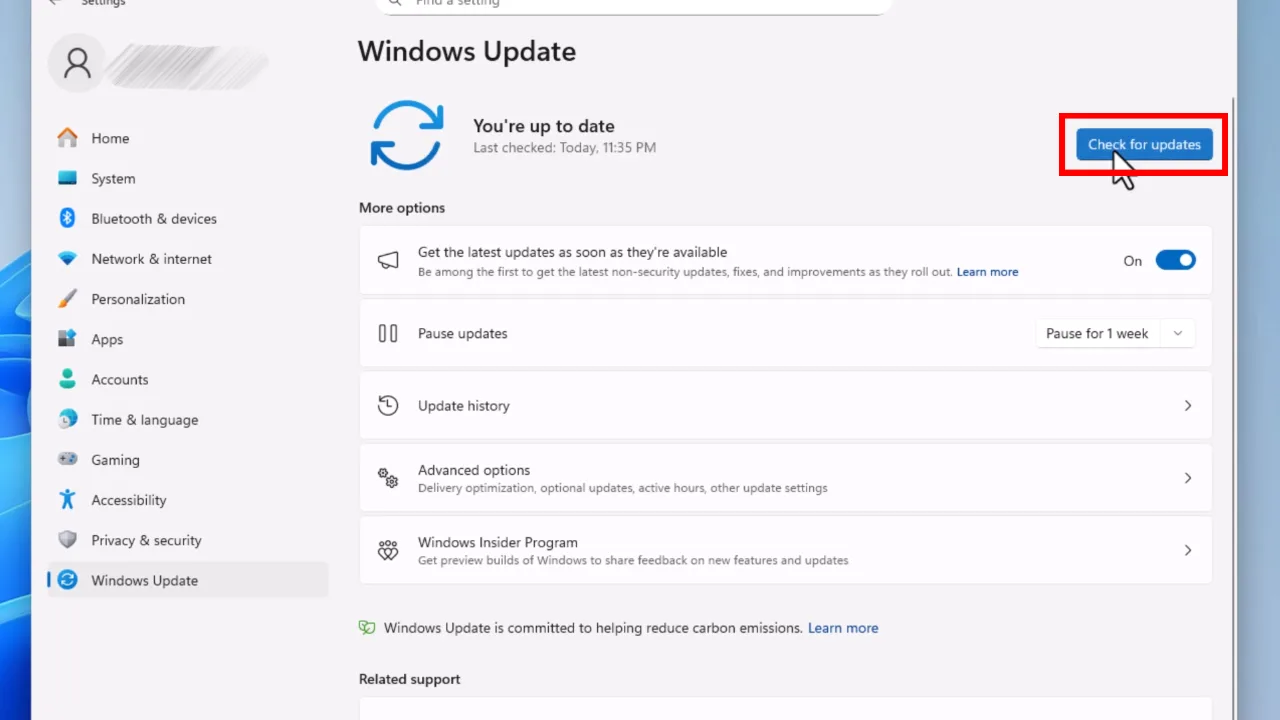
- Click Check for updates.
- Install available updates.
- Restart the PC.
If Wi-Fi broke right after a driver update:
- Open Device Manager.
- Expand Network adapters.
- Right-click your Wi-Fi adapter.
- Select Properties.
- Open the Driver tab.
- Click Roll Back Driver if the option is available.
If Wi-Fi broke right after a major Windows feature update, go to Settings > System > Recovery on Windows 11 and check whether the Go back option is available.
Related: How to Fix Windows Update Error
18. Check Hardware and Antenna Problems
If Windows settings look correct but Wi-Fi remains missing or extremely weak, the issue may be physical.
Try these checks:
- Connect a USB Wi-Fi adapter. If it works, the internal adapter may be faulty.
- Restart the PC and enter BIOS/UEFI using the key shown during startup, often F2, Delete, or Esc.
- Check whether wireless networking is enabled in BIOS/UEFI.
- Look for a physical wireless switch on older laptops.
- Try the wireless keyboard shortcut, often Fn + F2, Fn + F3, or Fn + F5, depending on the laptop brand.
Laptop Wi-Fi antennas often run through the display area or hinge. If Wi-Fi becomes very weak after a hinge repair, drop, or screen replacement, the antenna cable may need professional inspection.
Last-Resort Options
Reset This PC
Use Reset this PC only after trying network-specific fixes. It can help if Windows system files or settings are badly damaged, but it is not the first solution for normal Wi-Fi trouble.
Back up important files before resetting Windows. Even the Keep my files option can remove apps and settings.
- Open Settings.
- Go to System > Recovery on Windows 11, or Update & Security > Recovery on Windows 10.
- Select Reset this PC.
- Choose Keep my files if you want to preserve personal files.
- Follow the on-screen instructions.
Registry Network Throttling Tweak
Most users should skip this. Registry edits are not a normal fix for a missing Wi-Fi network, a failed Wi-Fi connection, or No Internet, Secured error. This tweak is sometimes discussed for latency-sensitive tasks, but it should not be treated as a standard Wi-Fi repair step.
Only consider registry changes if you understand how to restore Windows, have created a restore point, and are troubleshooting a very specific latency problem. Wrong registry edits can damage Windows settings.
If you still want to test it, create a restore point first. Then open regedit and review this path:
HKEY_LOCAL_MACHINE\SOFTWARE\Microsoft\Windows NT\CurrentVersion\Multimedia\SystemProfileDo not change registry values unless you have a clear reason and a rollback plan.
Common Windows Wi-Fi Error Messages and What They Mean
Can’t Connect to This Network
This usually means Windows cannot authenticate with the router or the saved Wi-Fi profile is corrupted. Forget the network, confirm the password, check router security mode, and update the Wi-Fi driver.
No Internet, Secured
Your PC is connected to the router, but internet access is failing. Restart the router, release/renew the IP address, reset TCP/IP, and change DNS. If all devices show the same problem, contact your ISP.
Wi-Fi Doesn’t Have a Valid IP Configuration
Windows is not receiving a usable IP address from the router. Restart the router, run ipconfig /release and ipconfig /renew, then reset TCP/IP if needed.
The Default Gateway Is Not Available
This means your PC is losing its path to the router. Update the Wi-Fi driver, disable adapter power saving, restart the router, and check for weak signal or router firmware issues.
Wi-Fi Option Missing from Settings
The adapter may be disabled, the driver may be broken, or Windows may not detect the hardware. Check Device Manager, show hidden devices, reinstall the Wi-Fi driver, and test with a USB Wi-Fi adapter.
FAQ
Why does my Windows PC connect to Wi-Fi but have no internet?
This usually happens because of a DNS failure, router problem, DHCP/IP issue, or corrupted TCP/IP settings. Restart the router first, then run ipconfig /release, ipconfig /renew, and ipconfig /flushdns. If needed, switch to a public DNS server.
Why does Wi-Fi keep disconnecting on Windows 11?
The most common causes are power-saving settings, outdated Wi-Fi drivers, weak signal, router channel congestion, VPN conflicts, or a buggy Windows/driver update. Start by disabling adapter power saving and updating the wireless driver.
Should I use Network Reset in Windows?
Use Network Reset only after basic fixes fail. It can solve stubborn problems, but it removes saved Wi-Fi networks, custom DNS settings, VPN adapters, and other network configurations.
Is it safe to disable IPv6 to fix Wi-Fi?
It is safe as a short test, but it should not be your permanent default fix unless you know your router or ISP has an IPv6 compatibility problem. If disabling IPv6 helps, update router firmware or contact your ISP.
How do I know if my Wi-Fi adapter is broken?
If the adapter disappears from Device Manager, does not appear in BIOS/UEFI, or a USB Wi-Fi adapter works while the internal one does not, the internal adapter or antenna may be faulty.
Final Thoughts
Start with the simple checks: restart the router and PC, forget the Wi-Fi network, and run the Windows troubleshooter. If the PC connects but has no internet, focus on DNS, IP renewal, and TCP/IP reset. If Wi-Fi networks do not appear, check the adapter, driver, and WLAN AutoConfig service. If Wi-Fi keeps dropping, look at power-saving settings, router channel congestion, and driver stability.
For most users, there is no need to jump straight to registry edits or a full PC reset. Work through the fixes in order, test after each change, and keep notes if you modify drivers, router settings, VPN settings, or adapter properties.
Sources
- Microsoft Support: Fix Wi-Fi connection issues in Windows
- Microsoft Support: Analyze the wireless network report
- Microsoft Support: Fix network connection issues in Windows
Did this fix your issue?
Let us know. Your feedback helps other readers find the right solution.
Great! What solved it for you?
We read every response. Email is optional and never shared.
Sorry to hear that. What happened when you tried?
Leave your email and we will personally help you fix it.