
- How to Disable OneDrive on Windows 11
- 1. Pause OneDrive Sync Temporarily
- 2. Quit OneDrive (Until Next Restart)
- 3. Disable OneDrive from Launch at Startup
- 4. Unlink OneDrive from Your PC
- 5. Disable OneDrive on Windows 11 Pro/Enterprise via Group Policy Editor
- 6. Turn Off OneDrive via Registry Editor
- 7. Uninstall OneDrive from Windows 11
- How to Stop OneDrive from Backing Up Specific Folders
Windows 11 uses OneDrive by default to sync your Desktop, Documents, and Pictures folders to Microsoft’s cloud servers. For a lot of people, that’s fine. But if you’d rather use Google Drive, Dropbox, or keep everything stored locally, OneDrive is nothing but an annoying background process that eats bandwidth and clutters the system tray.
While cloud backup is a good thing to have, forcing your local files, screen recordings, and private documents onto a remote server is not a good idea for every workflow. Depending on what you want — pause it temporarily, stop it from auto start, unlink your account, or remove it from the PC — the steps are different. Read on for the exact methods to pause, unlink, turn off, or fully disable OneDrive from Windows 11.
Read: How to Fix Black Screen Issue on Windows 11
How to Disable OneDrive on Windows 11
1. Pause OneDrive Sync Temporarily
Sometimes you need to free up network bandwidth for a large download and don’t want background uploads to consume the Internet speed. In this case, you can temporarily pause OneDrive for a few hours, and it’s very quick to do.
- Click the OneDrive cloud icon in the system tray (the bottom right corner of your taskbar). If you don’t see it, click the up arrow to show hidden icons.
- Click the gear icon (Help & Settings) in the top right corner of the pop-up menu.
- Select Pause syncing from the dropdown list.
- Choose your preferred timeframe: 2 hours, 8 hours, or 24 hours.
The syncing process will halt immediately and resume automatically once the selected timer expires. It won’t disconnect your account or change any settings. Use this when you need a quick break without any fuss.
2. Quit OneDrive (Until Next Restart)
Pausing leaves OneDrive running in the background. To completely remove it from memory until the next restart, you should quit it. It’ll stay closed until you reboot the computer or open it yourself.
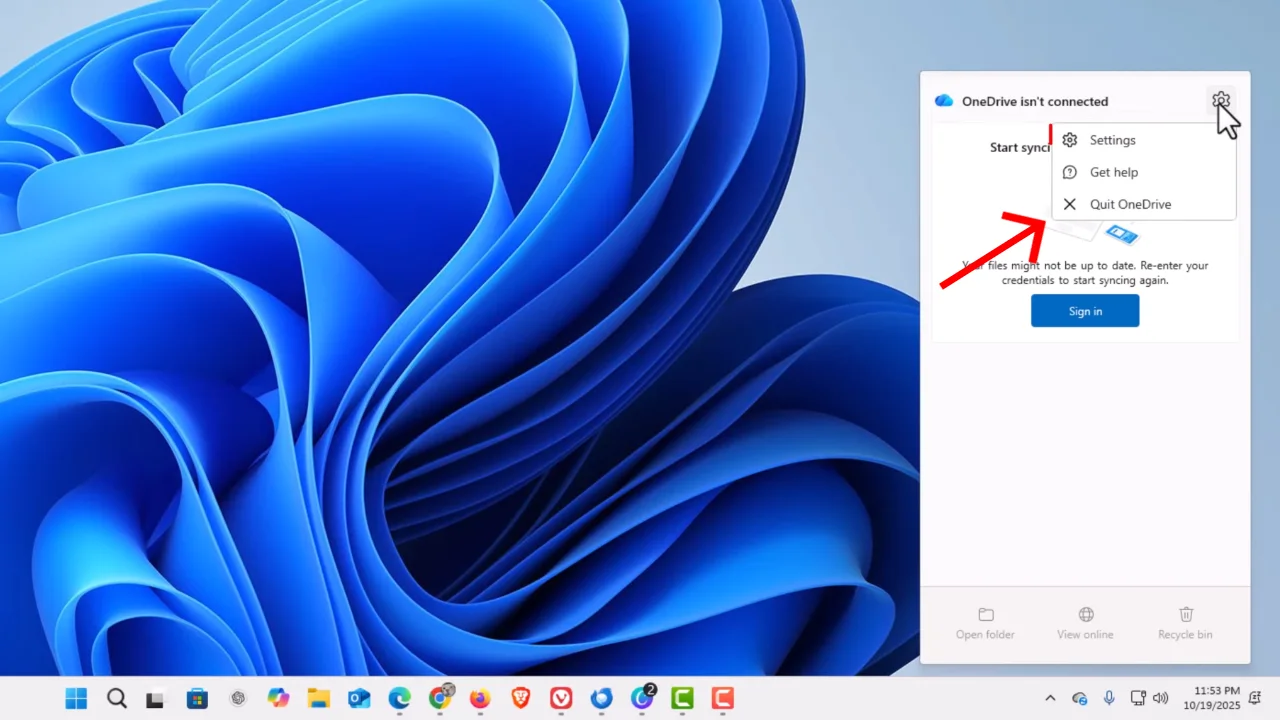
Here’s how to exit OneDrive to turn it off:
- Click the OneDrive cloud icon in the system tray to open the pop-up.
- Click the Settings gear icon.
- Select Quit OneDrive.
- Click Quit OneDrive again in the confirmation window.
The storage app is now completely shut down. But your PC will run it again next time you restart. Why? Because it’s still configured to launch at Windows startup. To fix that, follow the steps in the next method.
3. Disable OneDrive from Launch at Startup
It keeps your OneDrive account linked and files intact, but don’t let the cloud application load on Windows start-up. You can still open OneDrive manually anytime you want.
Microsoft removed the “launch at startup” toggle from OneDrive’s own settings in a recent update, so you have to do this through Task Manager now:
- Right-click in the empty area in the taskbar and select Task Manager, or press Ctrl + Shift + Esc to directly open it.
- Go to the Startup apps tab (the speedometer icon on the left-hand navigation bar).
- Find Microsoft OneDrive in the list.
- Right-click the application and choose Disable.
OneDrive won’t start on Windows 11 boot anymore. You’ll need to launch it manually if you ever want it back.
Read: How to Fix Blue Screen of Death (BSOD) on Windows
4. Unlink OneDrive from Your PC
Unlinking cuts the connection between the system and the Microsoft account on OneDrive. Syncing will stop, your local files will remain where they are, and OneDrive will enter a “not signed in” state. Nothing will get deleted from OneDrive.com. All cloud files will be kept saved as before, and you can still access them through a browser. This is the best way to stop OneDrive from hijacking your files without having to uninstall it.
- Click the OneDrive cloud icon in the system tray and select the gear icon to open OneDrive’s Settings.
- Go to the Account tab on the left sidebar of the settings screen.
- Click the blue Unlink this PC text link.
- A confirmation prompt will appear, warning you that local files will stop syncing to the cloud. Click Unlink account to end the process.
After that, the OneDrive icon in the taskbar will now show a strike-through to indicate you are signed out. The application will stay installed on the PC and will still launch on startup unless you disable it.
Note: If your Desktop, Documents, or Pictures folders were being backed up by OneDrive, those may appear empty once you’ve unlinked because they were stored in the OneDrive folder path. To get them back, open File Explorer, navigate to your OneDrive folder, and manually move files back to the local folder paths (C:\Users\YourName\Desktop, etc.).
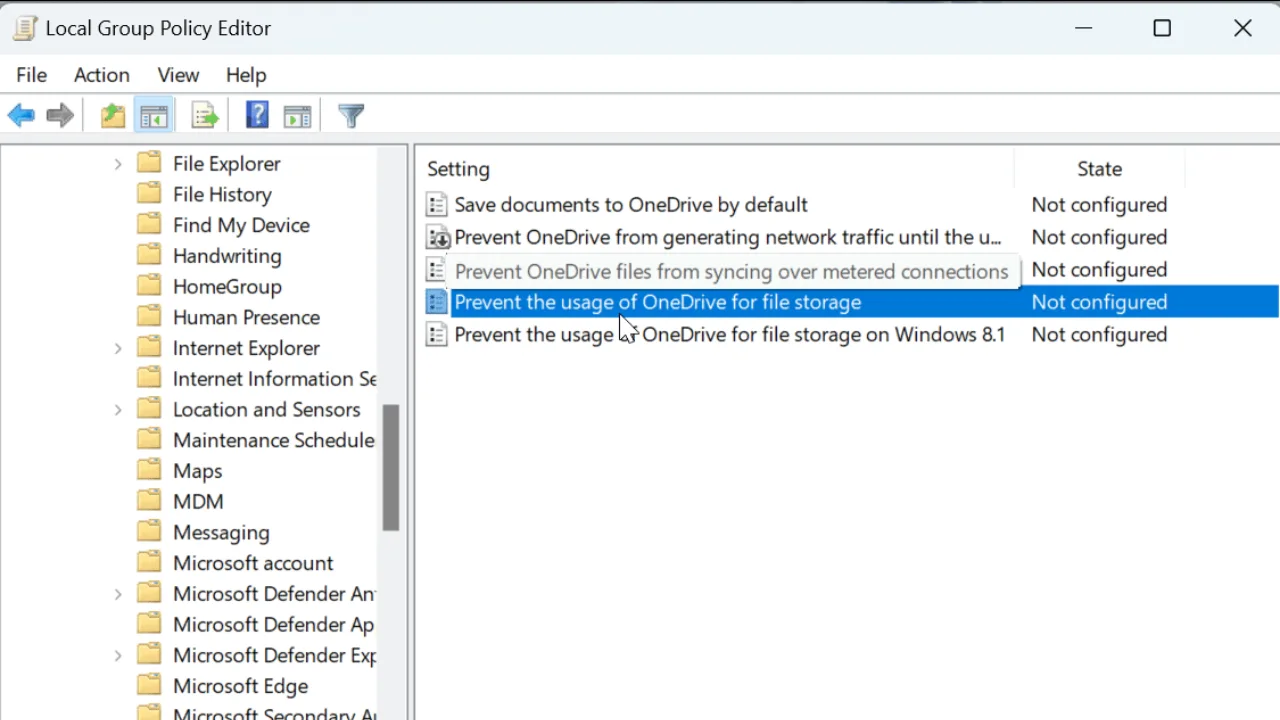
5. Disable OneDrive on Windows 11 Pro/Enterprise via Group Policy Editor
If your computer OS is Windows 11 Pro, Enterprise, or Education, you can use the Group Policy Editor to turn off OneDrive for all users on the machine.
- Press Windows + R to open the Run dialog.
- Type gpedit.msc and press Enter.
- In the left panel, go to: Computer Configuration > Administrative Templates > Windows Components > OneDrive.
- Double-click the policy named Prevent the usage of OneDrive for file storage.
- Select Enabled, then click Apply and OK.
- Restart your PC.
Watch out for this part. The policy says “Prevent the usage of OneDrive for file storage,” and you need to set it to Enabled to stop OneDrive. I know it sounds backwards. When you enable this policy, you’re telling Windows, “Yes, enforce this restriction.” A lot of people get confused by this.
After the next restart, OneDrive will get blocked at the system level. Nobody can turn it back on through normal settings. Just remember that Windows 11 Home doesn’t include Group Policy Editor, so you won’t see this option if that’s your OS edition.
6. Turn Off OneDrive via Registry Editor
Don’t have Group Policy? The Registry Editor works on all Windows 11 editions, including Home.
- Press Windows + R, type
regedit, and press Enter. Click Yes when User Account Control asks for permission. - Navigate to this path:
HKEY_LOCAL_MACHINE\SOFTWARE\Policies\Microsoft\Windows - Right-click the Windows folder in the left sidebar, select New > Key, and name it OneDrive.
- Click the new OneDrive key. In the right pane, right-click the empty space, choose New > DWORD (32-bit) Value, and name it
DisableFileSyncNGSC. - Double-click the new DWORD value and set it to 1.
- Click OK and restart your system.
Once rebooted, OneDrive will be disabled at the policy level, even on the Home edition. To undo this, either delete the key you created or set the DWORD value back to 0.
7. Uninstall OneDrive from Windows 11
Don’t want OneDrive to clutter up your computer? Uninstall it to remove the app from your system. It will kick it out of File Explorer’s sidebar and kill every background process it runs. You can always reinstall it later from the Microsoft Store if needed.
Here’s how you can uninstall OneDrive on Windows 11 via Settings:
- Press Win + I to open the Windows Settings app.
- Select Apps from the left-hand menu, then click Installed apps.
- Scroll down the list or use the search bar at the top to find Microsoft OneDrive.
- Click the three horizontal dots next to the app and choose Uninstall.
- Click Uninstall again on the pop-up prompt to confirm your choice.
From the Run dialog (alternative method):
- Press Windows + R.
- Type or paste:
%SystemRoot%\SysWOW64\OneDriveSetup.exe /uninstall(on 64-bit systems) or%SystemRoot%\System32\OneDriveSetup.exe /uninstall(on 32-bit systems). - Press Enter and follow any prompts.
Once you’ve removed OneDrive, the folder will disappear from File Explorer’s sidebar, and the app won’t run or take system resources. Your files stored at OneDrive.com will remain intact; only the local sync app will be removed. Because Windows Updates can occasionally reinstall the app, use the registry method so it won’t happen.
Read: Windows 11: How to Remove Chat from Taskbar
How to Stop OneDrive from Backing Up Specific Folders
Maybe you don’t want to ditch OneDrive completely, but you’re tired of it continuously uploading the Desktop or Documents folder. You can tell the app exactly which folders to ignore.
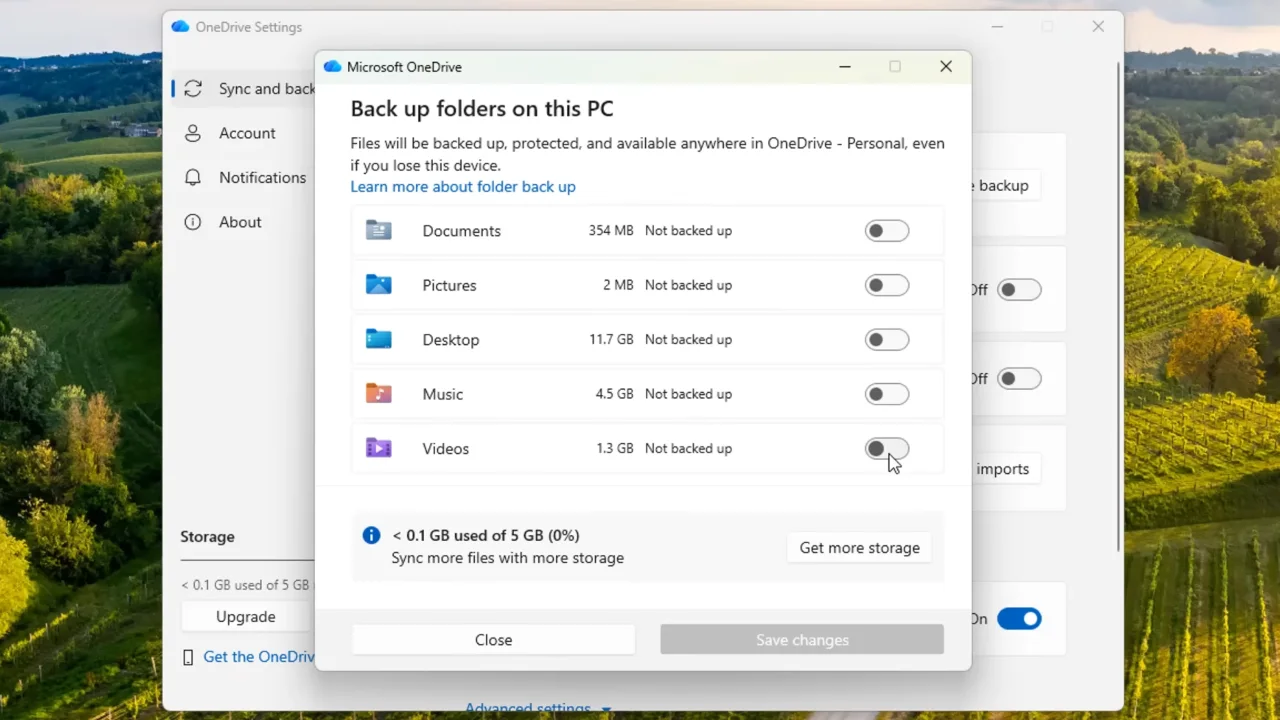
- Click the OneDrive icon in the system tray.
- Click the gear icon > Settings.
- Open the Sync and backup tab and select Manage backup.
- Toggle off the folders you want to exclude, such as Desktop, Documents, or Pictures.
- Click Stop backup to confirm the change.
Once you turn off backup for a folder, files already uploaded to OneDrive will remain in the cloud and will no longer sync from that point forward. New files you add to these folders will be local only within the hard drive.