

- The 6 Common Reasons for Laptops Overheating
- 1. Dust Block Vents and Fans
- 2. Dried-Out Thermal Paste
- 3. Surface Placement Block Airflow
- 4. CPU/GPU Overload from Software
- 5. Outdated Drivers and BIOS
- 6. High Ambient Room Temperature
- Warning Signs You’re Already in Trouble
- Check Laptop Temperatures First
- Software Fixes to Cool Down an Overheating Laptop
- Restrict Background Tasks
- Scan for Malware
- Change Power Plan
- Update BIOS and All Drivers
- Gut Your Startup Programs
- Close Browser Tabs
- Hardware Fixes: Clean Your Laptop Properly
- What You Need Before You Start
- How to Clean: Step-by-Step Process
- How to Replace Thermal Paste on a Laptop
- Cooling Pads and Laptop Stands
- Room and Surface: What People Ignore
- When to Get Professional Help
- Long-Term Prevention Schedule
- Frequently Asked Questions
- Can a laptop’s overheating damage the battery?
- My laptop is brand new and already overheating. Is that normal?
- Does undervolting a laptop CPU help with the system getting hot?
- Will reinstalling Windows or macOS fix overheating?
- How do I know if my laptop fan has failed?
Want to know how to fix laptop overheating? Laptops cram high-performance processors into tight shells of metal and plastic. Heat is the inevitable byproduct of that computing power. When it can’t escape the body, the system throttles to avoid a catastrophic meltdown. Games drop frames, exports drag, and even typing becomes sticky. When pushed far enough, the CPU hits its thermal ceiling, and the laptop shuts down without warning.
In this guide, you’ll learn the mechanical realities of laptop thermal management, the diagnostic steps to identify the heat source, the maintenance process to clear blocked airflow, and the advanced software configurations to prevent the processor from running overtime. The gap between a sluggish machine and a lightning-fast one most often comes down to a tiny drop of dried-out grey paste hidden under a copper pipe.
Dust-choked vents are the top physical culprit. Start with compressed air.
Quick software checks take 5 minutes and often fix issues outright like Task Manager, power plan, and driver updates.
Thermal paste doesn’t last forever. After 2–3 years, it can dry out and increase temperatures, even on clean machines.
A bed, couch, or pillow can smother bottom vents and increase temperatures by 15–20°C.
If your CPU remains above 90°C for very long, take immediate action.
Malware forcing the CPU to 100% is a common and often-missed cause.
In most cases, you can solve laptop overheating without a visit to a repair shop.
The 6 Common Reasons for Laptops Overheating
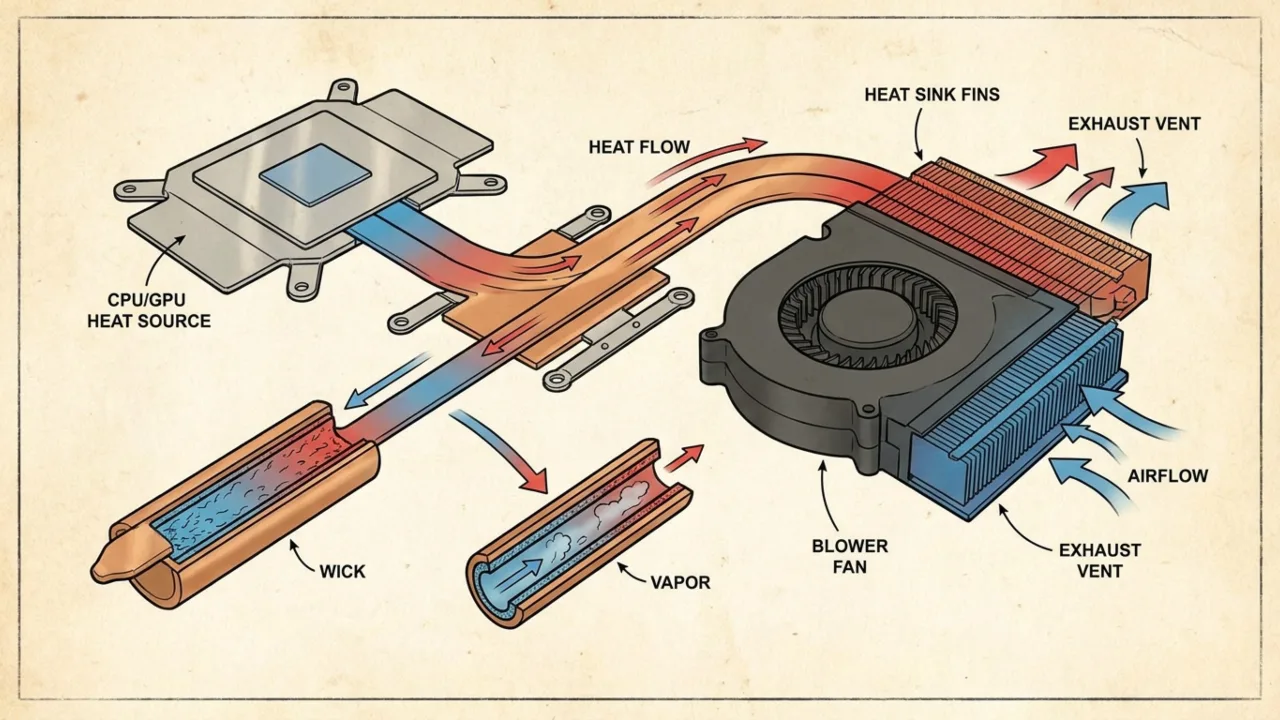
The cooling system in a portable computer relies on a delicate balance. A copper heat pipe absorbs heat from the processor. Liquid inside the pipe turns to vapor, travels to the radiator fins, cools down, and condenses back into liquid. A fan then drives room-temperature air through those fins to carry the heat away. Breaking any part of this chain causes overheating.
Every laptop ships with the same contradiction. It contains a processor that can dump massive heat under load into a chassis less than an inch thick, with a cooling system the size of your palm. Something has to give, and what gives first is usually airflow.
That doesn’t mean the thermal design is always the villain. Most laptop overheating comes down to something you can control. The cause should indicate the fix. Treating it like a checklist wastes time and can create new problems.
Also: How to Fix “No Battery is Detected” on Your Laptop
These are the usual suspects, roughly in the order they appear in systems:
1. Dust Block Vents and Fans
Dust accumulation acts as an unwanted thermal blanket. Microscopic particles get sucked into the intake vents and lodge in the radiator fins. Over months and years, this dust forms a solid, felt-like barrier. The fan then spends its life pushing air into a dust wall; the air bounces back, and the heat remains trapped in the chassis.
Laptop fans work like dust vacuums. Every hour the machine runs, they drag air over hot components, and whatever rides in that air—lint, skin cells, pet dander, crumbs—sticks to the fan blades and heat-sink fins. By the two-year mark on an average laptop, there can be enough buildup to cut airflow by half. That’s not an exaggeration.
2. Dried-Out Thermal Paste
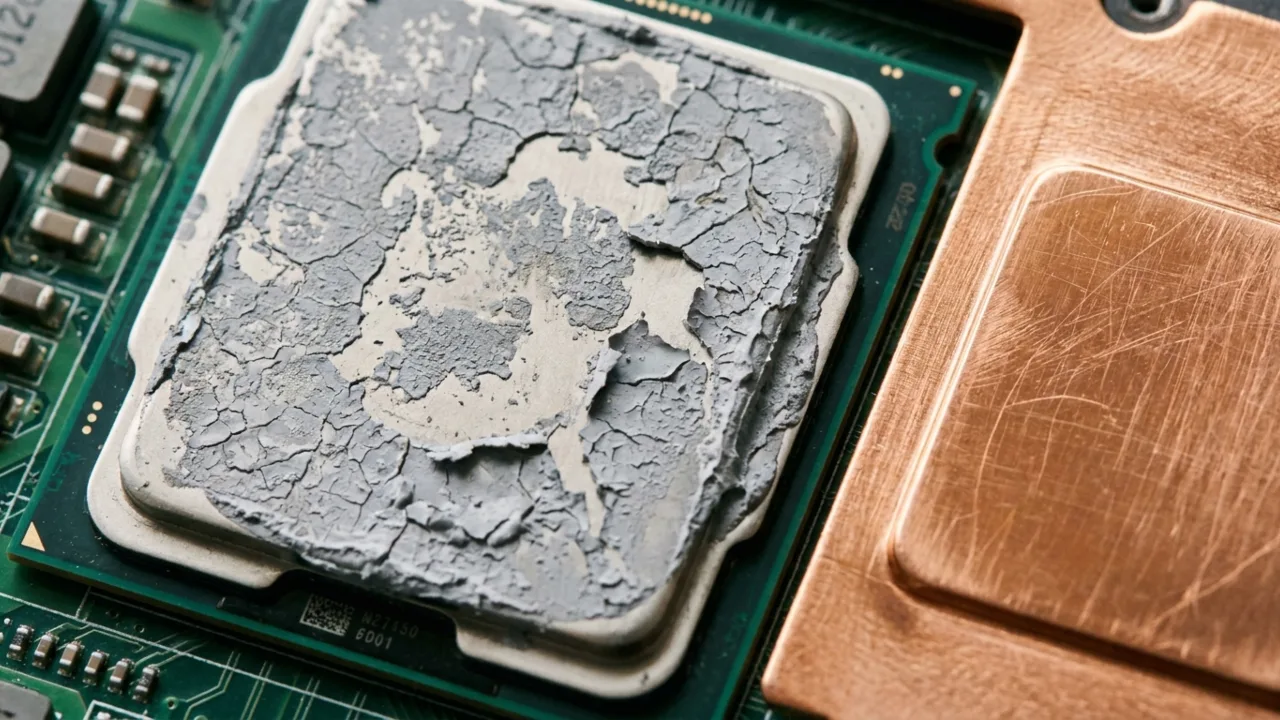
Dried thermal paste creates an invisible barrier. Factories apply a silicone-based thermal compound between the silicon chip and the copper heat sink. This paste fills microscopic imperfections in the metal. After enough hard heating and cooling cycles, the thermal paste bakes into a dry, chalky crust, and heat can no longer transfer from the chip to the copper pipe.
Temperatures rise even if the fan and vents are spotless. That’s why this one surprises people: everything looks fine from the outside. The fans spin, the vents seem clear, but the laptop still gets hot.
3. Surface Placement Block Airflow
Most laptops pull cool air through vents on the bottom panel and move hot air out the sides or back. If you place it on a bed, a couch cushion, or a pillow, those intake vents will be completely blocked, and the laptop will start breathing its own warm exhaust instead of drawing in cool air. Thanks to that, the heat will climb very fast, and the fan can’t keep up.
4. CPU/GPU Overload from Software
Heavy apps such as video editors, games, browsers with 40 tabs open, and background sync processes keep the processor pegged. Modern CPUs throw off plenty of heat at full tilt. When paired with weak cooling, there’ll be guaranteed thermal trouble. Importantly, this includes invisible culprits like cryptomining malware and bloatware that run in the background, drive CPU usage to 100% with zero obvious symptoms on screen.
5. Outdated Drivers and BIOS
Manufacturers release firmware and driver updates that tighten fan curves and power management. An old BIOS can leave a fan too slow to ramp up, or keep a CPU from dropping its clock speed under light loads. If you skip updates, you will miss performance and thermal control improvements.
6. High Ambient Room Temperature
A laptop that peaks at 80°C in a 20°C room can climb to 95°C in a 35°C summer room. Same workload, same cooler, different result. Ambient heat doesn’t only add a few degrees; it squeezes the headroom out of everything.
If overheating gets noticeably worse in summer or in warmer rooms, higher ambient temperatures expose a thermal issue that might be tolerable in cool months.
Warning Signs You’re Already in Trouble
To track the overheating status on your laptop, pay attention to these signs:
- Performance suddenly drops mid-task. This happens through the process called thermal throttling. When the CPU crosses a safe temperature threshold, it slows itself down to generate less heat. Because of this, your video render or game session slows to a crawl as the system tries to protect itself.
- The fan sounds like a jet engine. Occasional fan noise under heavy load is normal, but the one that screams at full speed even during web surfing or document editing is not. It happens because the cooling system works overtime to fight a thermal issue it can’t solve.
- Random shutdowns with no warning. When temperatures hit critical levels, typically 95–100°C depending on the chip, the system performs an emergency shutdown to prevent hardware damage. If you face this, don’t file it under “weird glitch.” It’s already past the warning stage.
- The chassis is too hot to touch comfortably. Warm-to-the-touch is normal during a heavy workload, particularly around the keyboard and near exhaust vents. Burning hot that makes you reflexively pull your hand away from the laptop is a sign of trouble. The bottom panel, especially, should never be extremely warm.
Never ignore a burning smell coming from your laptop. It could be dust burning off on the heat sink, which is less serious but worth investigating, or indicate electrical component degradation, which is a serious issue. Either way, power off the laptop immediately and let it cool before you open or diagnose it again.
Check Laptop Temperatures First
The best free tools to check the temperature are:
- HWMonitor (Windows) — real-time readouts for CPU, GPU, drives, fan speeds, and voltages. If you want the most complete free picture, this is it.
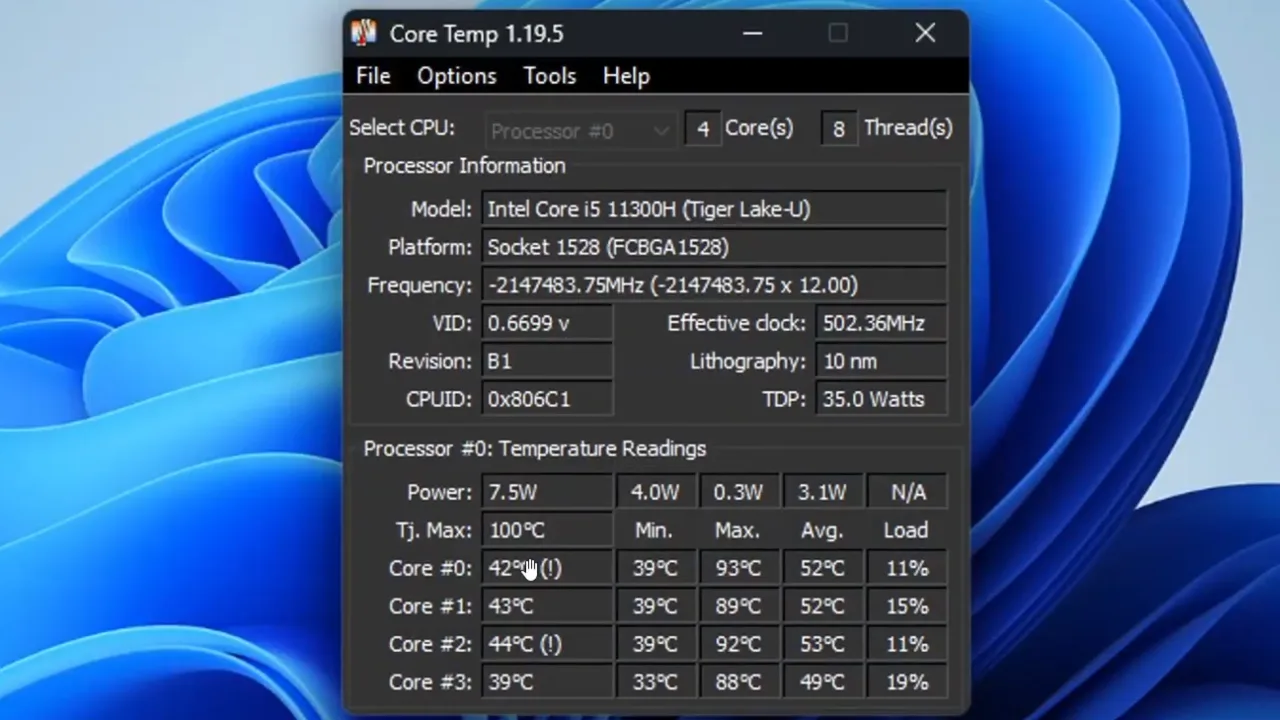
- Core Temp (Windows) — per-core CPU temperatures. Lightweight and accurate when you need a quick CPU check.
- MSI Afterburner (Windows) — GPU temperatures, fan speed, clock speeds, and is valuable for gaming laptops.
- Macs Fan Control (macOS) — monitors all temperature sensors and fan RPM on MacBook. The free version gives you the essentials.
Let the tool run for at least 30 minutes while you do your normal work. Then write down two things: which component got hottest, and the highest number you saw that tells you what to fix.
| Scenario | ✓ Safe Range | ⚡ Caution Zone | ? Act Now |
|---|---|---|---|
| CPU (idle/light use) | 30–55°C | 56–70°C | 70°C+ at idle |
| CPU (under heavy load) | Up to 80°C | 80–90°C | 90°C+ sustained |
| GPU (gaming/rendering) | Up to 80°C | 80–85°C | 85°C+ sustained |
| NVMe SSD | Under 55°C | 55–65°C | 70°C+ |
Use the monitoring tool before and after every fix you apply so you can know exactly which change made the difference, and stop troubleshooting once temps drop into a safe range, rather than doing unnecessary work.
Software Fixes to Cool Down an Overheating Laptop
Software problems cause overheating just as often as physical ones, sometimes more. Start here:
Restrict Background Tasks
Software drives hardware load just as much as dust does. A clean physical fan won’t save a CPU that has been continuously put under a lot of stress. You must audit your software environment.
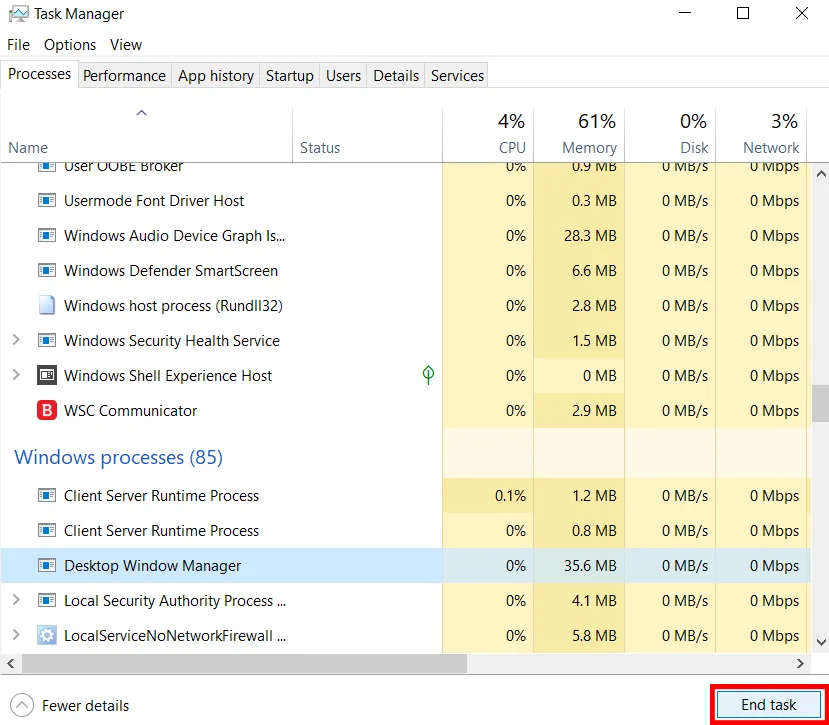
Open Task Manager on Windows (Ctrl + Shift + Esc) and sort processes by CPU usage. Check applications eating an unusual share of cycles when the computer is idle or when you’re not doing anything demanding. The common offenders are Windows Update in the background, antivirus deep scans, browser sync, and app updates at startup.
Right-click suspicious processes and hit End Task. Then watch your temperature monitor for the next few minutes. If the numbers fall, you’ve found the culprit.
Scan for Malware
Cryptomining malware hijacks the system to mine cryptocurrency for someone else. It pegs the CPU hard around the clock, generates heat, and drags down performance with no obvious window or notification. If the processor stays high and the laptop overheats even when you are doing little, run a full scan with Windows Defender, Bitdefender, or Malwarebytes. Malicious actors frequently disguise cryptomining software as legitimate background processes.
Change Power Plan
On a Windows laptop, you can change power plans in a couple of clicks. Use Settings if you want speed, or Control Panel if you want the full set of options.
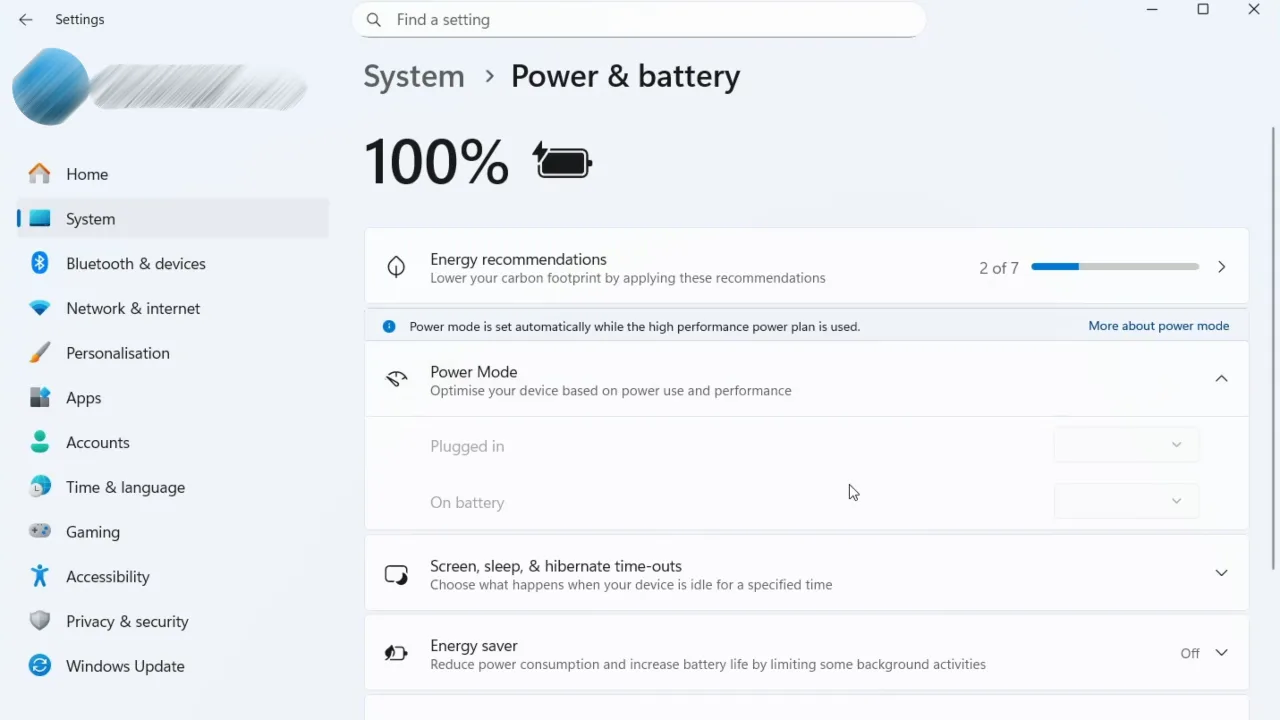
- Windows 11 Settings (quick): Go to Start > Settings > System > Power & battery. Under Power mode, pick between Best power efficiency, Balanced, or Best performance.
- Control Panel (more options): Open Control Panel. Set View by to Large icons, then choose Power Options. Pick a plan, or click Show additional plans to see others, including High performance.
- Battery icon (laptops): Click the battery icon on the taskbar. Drag the slider left for Best battery life, or right for Best performance.
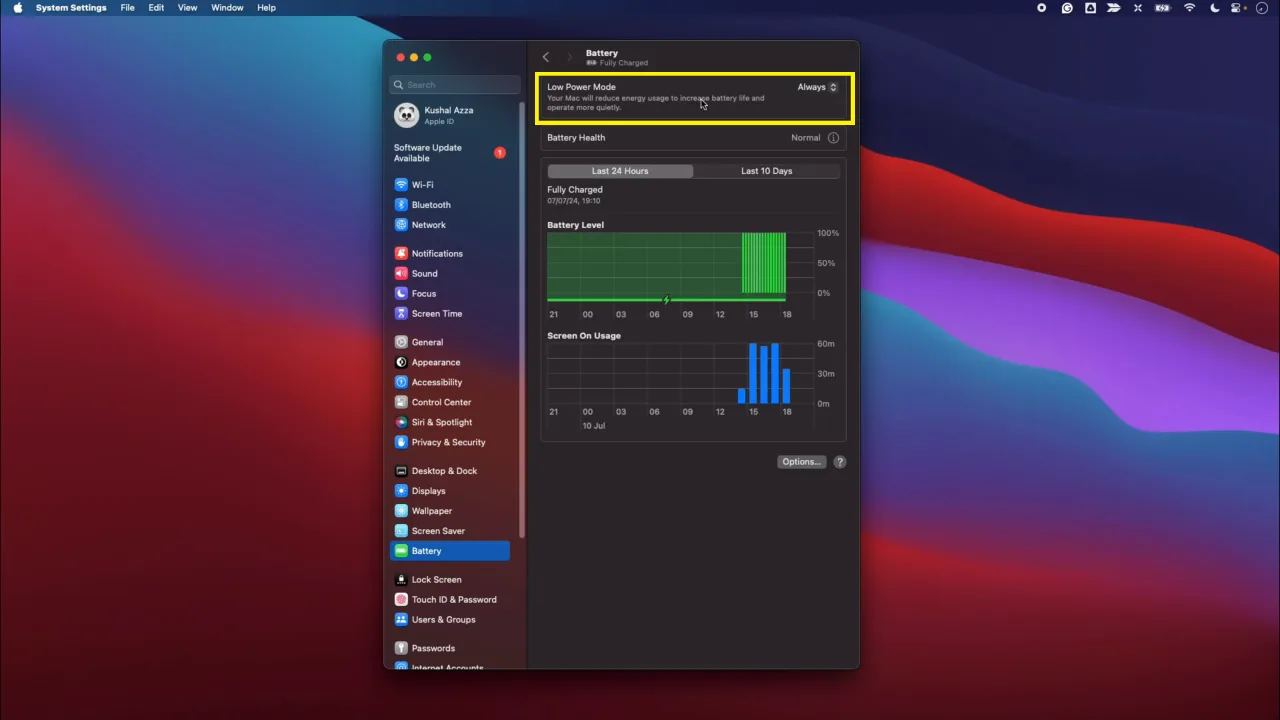
On macOS, go to System Settings > Battery and turn on Low Power Mode for light work sessions. These modes let the CPU scale back when maximum performance is not required, which reduces heat production.
Better yet, create a custom plan on Windows. Under “Processor power management,” set maximum processor state to 95% instead of 100%. This prevents turbo boost from frequently pushing chips to their thermal limits while barely impacting performance.
Update BIOS and All Drivers
Manufacturers release BIOS updates that improve fan curve behavior and also fix power management bugs that cause unnecessary heat. Visit your laptop manufacturer’s support page directly (Dell SupportAssist, HP Support Assistant, Lenovo Vantage) rather than relying just on Windows Update, which frequently misses critical firmware updates.
Gut Your Startup Programs
You know what happens the second you power on your laptop? Half a dozen processes launch in the background. Harmless enough on their own. But add five or ten of them together, and they put a fair bit of strain on the processor, which creates a steady background heat. Many programs, especially gaming clients and manufacturer utilities, run background processes that continuously consume CPU cycles.
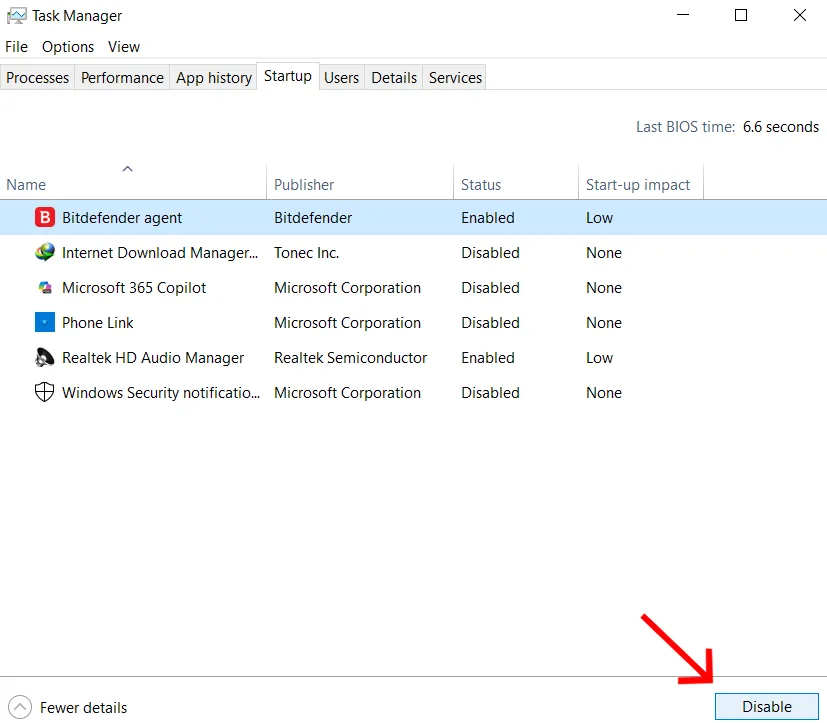
- On Windows: go to Task Manager > Startup tab and disable everything you don’t need to use.
- On macOS: do the same at System Settings > General > Login Items.
Close Browser Tabs
Each open browser tab periodically refreshes and triggers CPU cycles. A session with 30+ tabs is really hard work for a basic machine. Keeping tabs under 10 has a measurable thermal effect. Use a tab manager extension if you must keep multiple tabs open at once.
Run the temperature monitor for another 30 minutes once the software fixes are applied. If peak temps dropped by 10°C or more, software was the problem, and that’s it. If they’re still in the danger zone, it’s time to troubleshoot hardware.
Hardware Fixes: Clean Your Laptop Properly
Physical cleaning is where most overheating problems can be sorted out that software can’t resolve. When done right, it will take 20–40 minutes and can drop peak temperatures by 15–25°C on a laptop that hasn’t been cleaned in a couple of years.
What You Need Before You Start
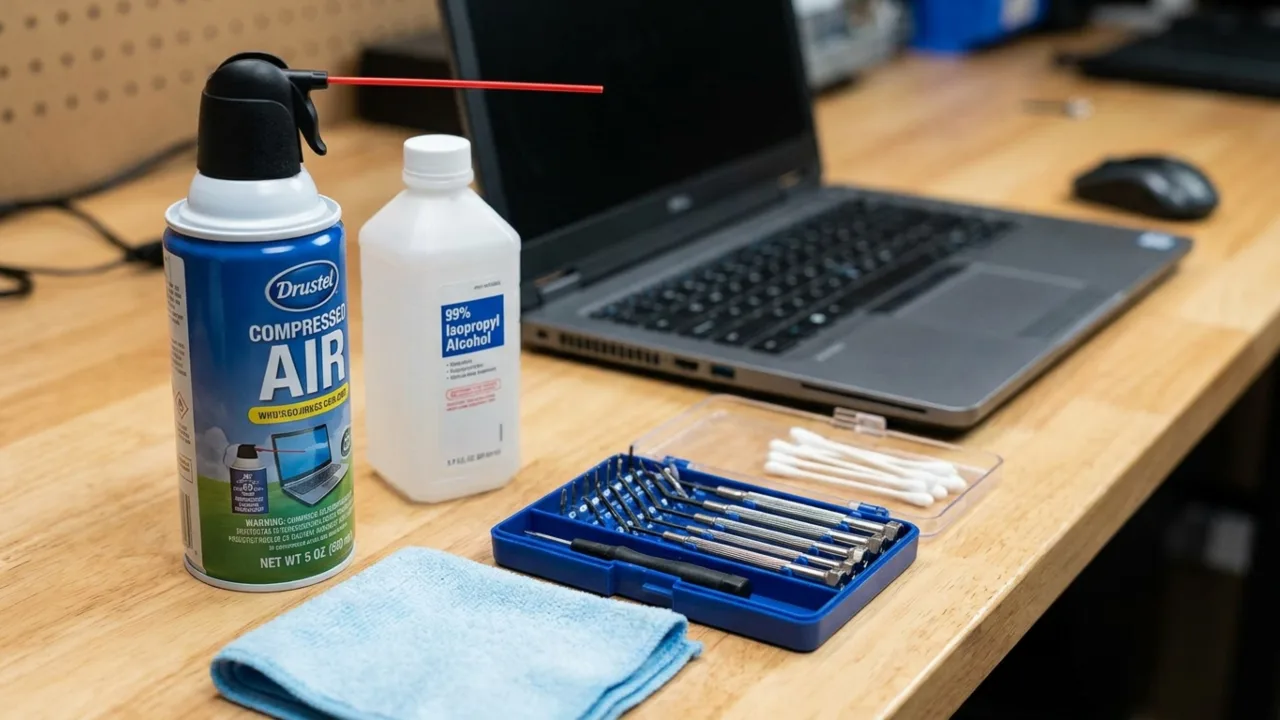
- Compressed air canister or an electric air duster: Electric dusters are reusable and release a strong blast of air. Canisters are fine, but they run out fast.
- Phillips #0 or #1 screwdriver: Most modern laptops use these. Have a quick look at your model’s teardown guide on iFixit to confirm the exact size.
- Plastic spudger or pry tool: Required to open the laptop’s bottom panel without bending or scratching the case.
- Isopropyl alcohol (90% or higher): For cleaning heat sink fins and removing old thermal paste. Lower concentrations leave residue behind.
- Lint-free cotton swabs and cloths: To apply the isopropyl alcohol and wipe it off without leaving bits of fluff everywhere.
- Anti-static wrist strap: Optional, but I’d still recommend it. Static discharge causes mysterious failures weeks later, not immediately obvious damage.
How to Clean: Step-by-Step Process
- Completely turn off the laptop and unplug it. Hold the power button for 5 seconds after shutdown to discharge residual electricity from capacitors.
- Remove the battery if it’s detachable. If it’s integrated, confirm the power cable is unplugged, and the machine is completely off.
- Get a can of compressed air and blast it through every vent. Use short, controlled bursts — two or three seconds at a time. Before you blast, gently stick a toothpick against any fan blade you can see through the vents to stop it from spinning freely. Letting a fan spin fast from forced air rather than its own motor isn’t good for the bearings. The goal is to blow dust out, not further in.
- Next, open the bottom panel. Most laptops have Phillips screws around the edges, and a few manufacturers hide some under the rubber feet, which lift off cleanly if you slide a fingernail underneath. Look up your model’s teardown guide first; it’ll show you exactly where every screw is and where not to pry.
- Clean fan blades and heat sink fins inside the machine. Use a soft brush first to loosen packed dust, then compressed air. The heat sink fins, thin metal plates the fan blows across, are where dust most aggressively blocks airflow. Blow perpendicular to the fin stack rather than straight into it.
- Use isopropyl alcohol (IPA) to clean compacted dust. For dust stuck between fins that compressed air won’t budge, run a cotton swab dampened with IPA along each fin channel to clear it out completely.
Never use a vacuum cleaner inside a laptop. Vacuums generate static electricity that can fry components on the spot. They’ll also drag dust and crumbs further in, wedging them into places you don’t want to be poking around. Stick to compressed air instead. Blow the muck out, don’t try to suck it in.
How to Replace Thermal Paste on a Laptop
This is the fix most people either don’t know about or are afraid to try. They shouldn’t be. The process is simple, but it does require opening the machine and accessing the CPU directly. The payoff on old machines is massive; a fresh, premium paste can drop temperatures by 10–20°C.
The right time to replace thermal paste is when a laptop two or three years old or more runs consistently hot, even after you’ve cleaned the fans properly. Budget machines sometimes leave the factory with a poor thermal paste application and can benefit from being repasted even when they’re relatively new.
To change thermal paste, you’ll need new paste, isopropyl alcohol (90%+ concentration), coffee filters or lint-free cloth, and a plastic tool or old credit card. Then do this:
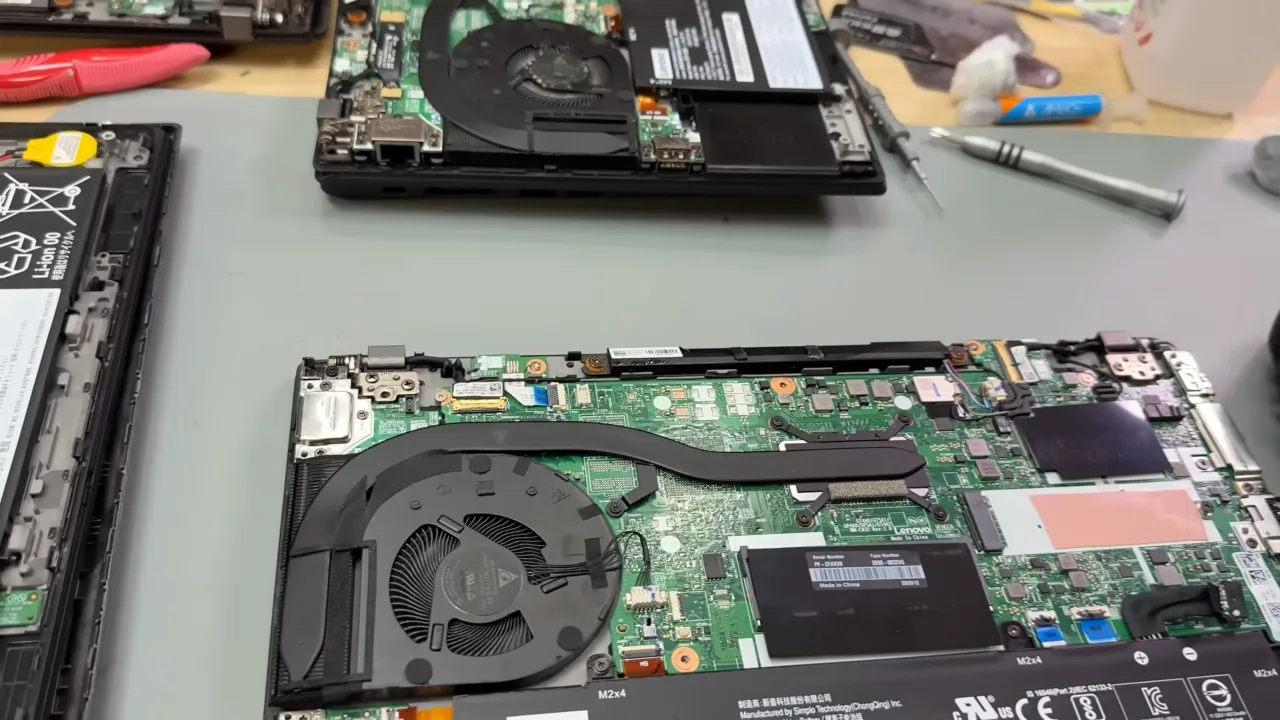
- With the machine powered off and the bottom panel removed, find the CPU and GPU (if it’s a dedicated graphics card) beneath the heat sink, the metal plate with copper heatpipes across it.
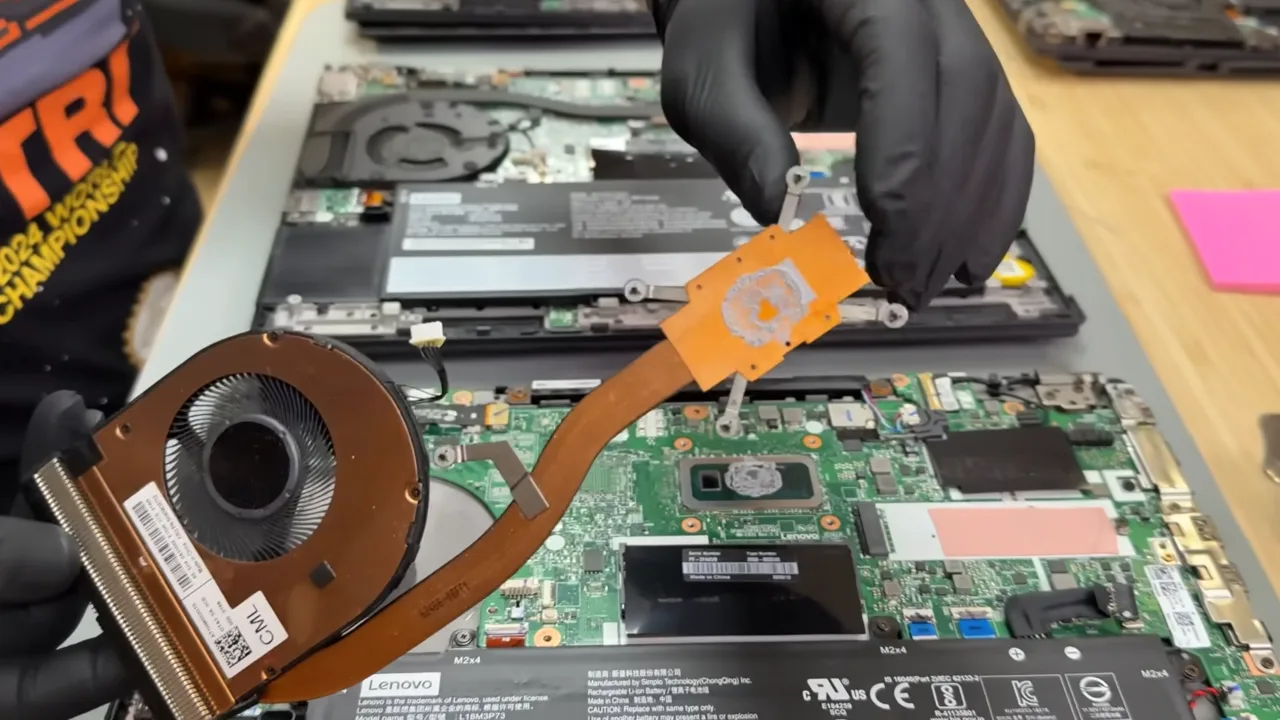
- Remove the heat sink screws in a diagonal cross pattern to lift it evenly without stressing the board. You will see crusty, dried grey material on the shiny silicon chips and the copper contact plates.
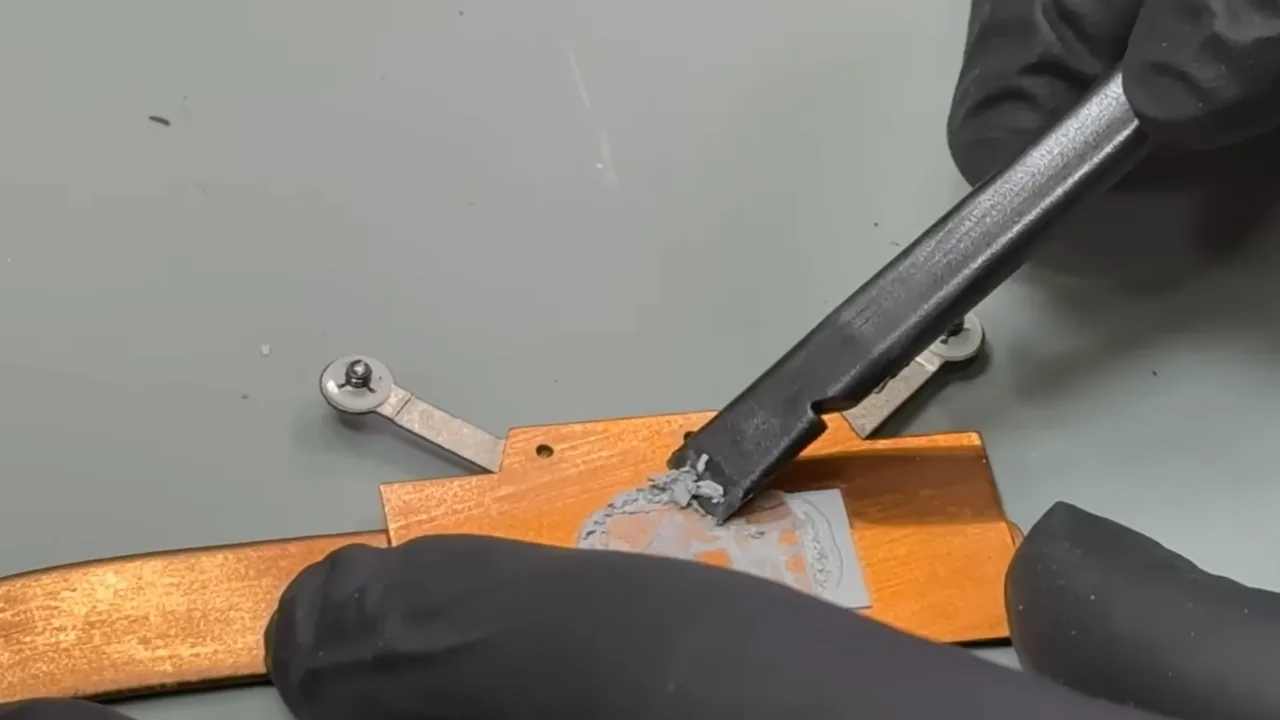
- Clean the old paste completely off both the CPU die and the underside of the heat sink with isopropyl alcohol and a lint-free cloth. Even small traces of old paste mixed with new will cause uneven contact and hot spots.
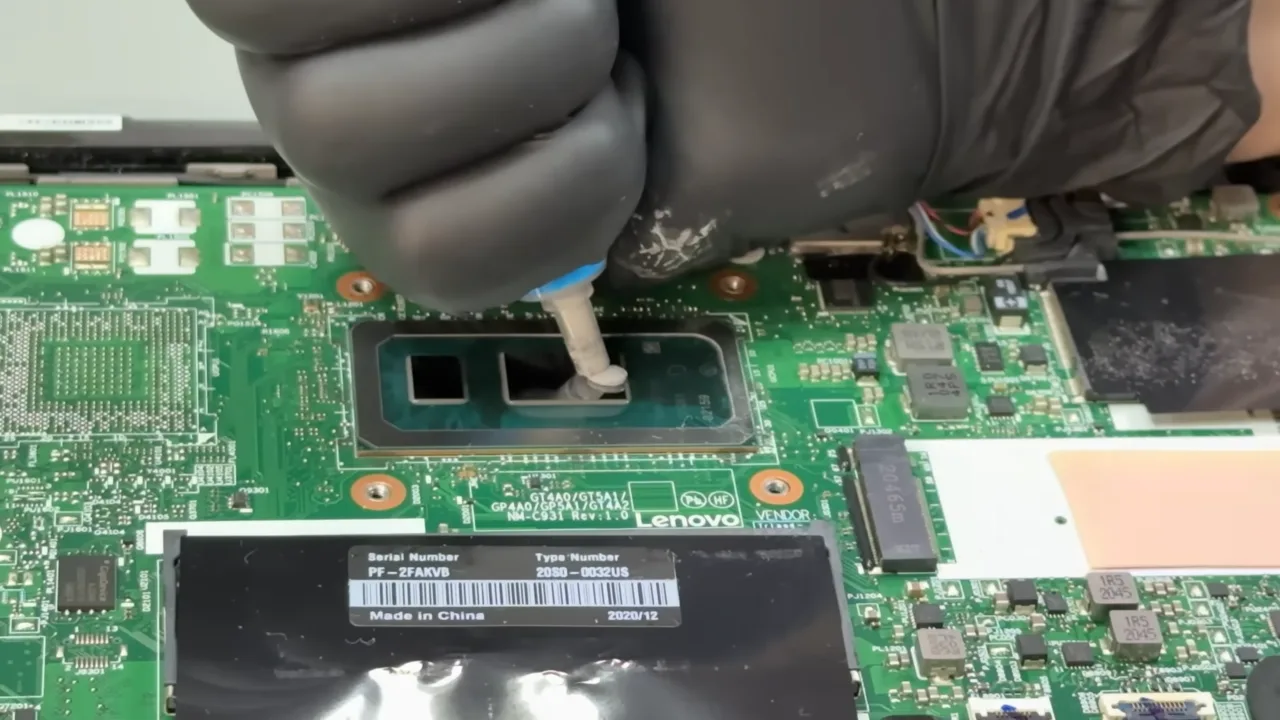
- Apply a small, centered pea-sized (a rice grain-sized) dot of new thermal paste to the CPU die. For large GPU dies, use a thin line across the center. Don’t spread it manually, as the heat sink distributes it evenly when pressed down. Spreading by hand often creates air pockets that reduce contact.
- Reinstall the heat sink in the same diagonal cross pattern. Press evenly and don’t overtighten the screws.
Different laptop models have wildly different disassembly complexity. Some need the entire motherboard removed only to access the processor. Check your specific model on YouTube before you proceed with this complex task.
Cooling Pads and Laptop Stands
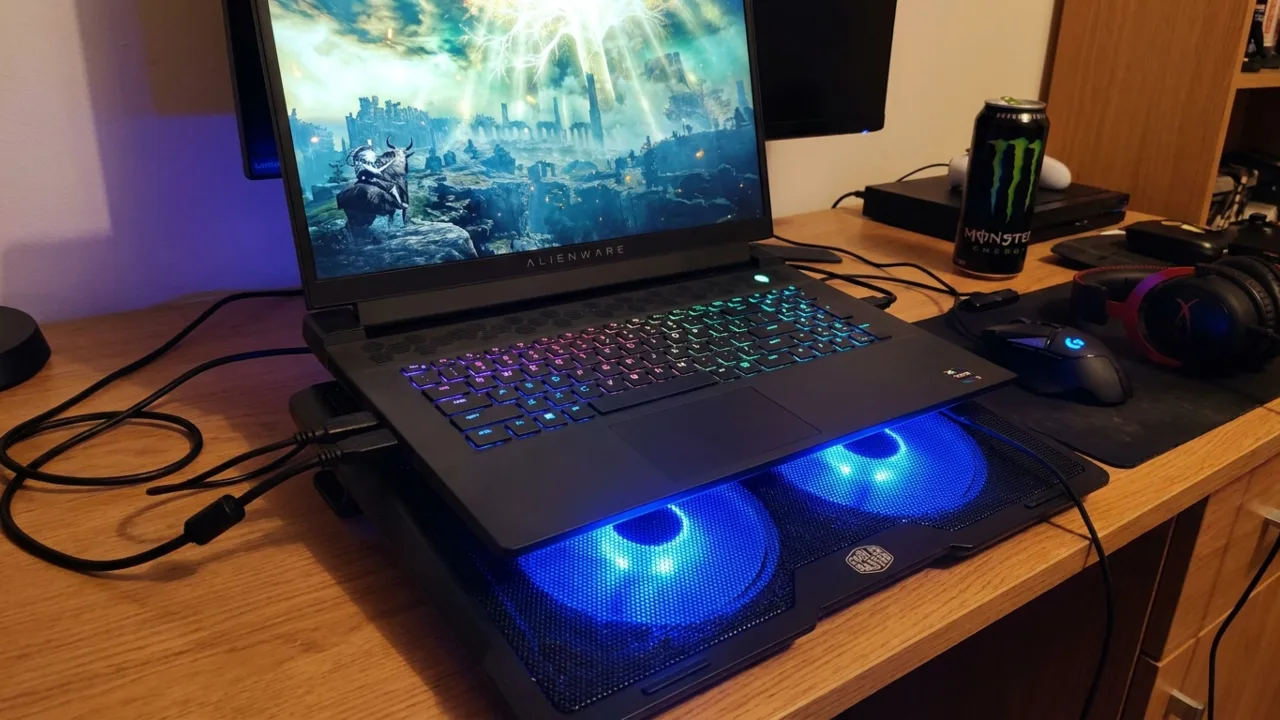
Internal fans can only move a limited volume of air. External cooling hardware forces fresh air into the chassis by less subtle means.
Cooling pads sit underneath the laptop and feature one or more large USB-powered fans. They are hit or miss. A cooling pad isn’t a miracle fix for a dirty or thermally degraded machine. But as part of a properly maintained setup, a good one genuinely helps, particularly for gaming laptops that push the thermal envelope as a matter of design.
Look for pads with larger fans (120mm or bigger) that shift more CFM (cubic feet per minute). Metal mesh surfaces conduct heat away better than plastic. Adjustable height and angles let you optimize cooling and ergonomics.
Further, the pad’s fans should align with your laptop’s intake vents (usually on the bottom). Some systems take air in from the sides or the bottom center, and a pad won’t help them much. Expect drops of 5–10°C during high-intense loads with a good pad. It’s not too much, but combined with other measures, it can keep you below thermal throttling thresholds. For a cheap alternative, point a desk fan at the laptop during gaming sessions. It works.
USB-powered cooling pads draw power from your laptop. That’s fine when plugged in, but on battery, they’ll drain the cell’s juice. So, during battery-only sessions, plug the stand into its own power source if possible, or keep the laptop on the charger.
Laptop stands without fans are underrated for their thermal effect. Elevating the rear of the machine 15–30 degrees improves natural airflow around the chassis and lifts it clear of the desk surface that was partly blocking ventilation. You can use a dedicated stand, two bottle caps, or a small block of wood. The angle also provides a more ergonomic typing position.
Soft surfaces are the enemy of electronics. A bed sheet will conform to the exact shape of the bottom case, sealing off every single ventilation hole.
Room and Surface: What People Ignore
When a laptop gets hot, people usually blame the hardware. Most of the time, they need to look at where it’s placed. Two controllable environmental factors lead to more overheating problems than most users want to admit.
Surface placement is non-negotiable. A laptop on a bed or a sofa suffocates the intake vents underneath. The machine tries to pull in cold air and ends up choking on hot fabric instead. Move it to a hard, flat desk, and the temperature can drop by 10 to 15 degrees without the need for any other change.
Ambient room temperature is a multiplier. A machine that handles 80°C peak CPU temp in a 20°C room might hit 95°C in a 35°C summer room. Same workload, same hardware, completely different result. Air conditioning, a room fan, or working near an open window all help. If overheating worsens seasonally, that’s not a coincidence.
Keep your laptop out of direct sunlight. The display, case, and especially the battery absorb radiant heat from the sun on top of everything the system generates internally. It’s a fast way to cook the machine and wreck the battery.
When to Get Professional Help
Most overheating problems are fixable at home, but some indicate that hardware has failed or is failing. Take it to a technician when:
- The fan doesn’t spin or make grinding noises. A failed fan bearing produces a rattling sound. A completely dead fan produces nothing that can only be replaced with a new one.
- Warped heatsink. Dropping a laptop can bend the heatsink base, which prevents proper CPU contact. This needs professional straightening or replacement.
- Temperatures stay above 95°C after cleaning and repasting. At that point, the thermal design itself may be failing, like bent heat pipes, cracked heat sink contact, or a degraded CPU/GPU. These aren’t DIY fixes.
- Emergency shutdowns continue after every fix is applied. If the machine still cuts power unexpectedly after a full clean, fresh paste, software optimization, and surface change, the problem is deeper than maintenance can address.
- You smell burning. Not dust burning off on the heat sink — electrical component burning. Power off immediately because that’s an emergency, not a maintenance call.
UPGRADE vs. REPAIR
If your laptop is 5–6 years old and still overheating after every fix in this guide, the honest answer may be that it has reached the end of its thermal life. Old chips operate hot by design, cooling infrastructure degrades, and repair costs can approach the laptop’s resale value. That’s when a replacement becomes the better call.
Long-Term Prevention Schedule
| Frequency | Task | What It Prevents | Time Required |
|---|---|---|---|
| Every Month | Blast compressed air through all external vents (no disassembly needed). | Slow dust accumulation that causes major blockages over time. | 2–3 minutes |
| Review and trim startup programs in Task Manager (Windows) or Login Items (macOS). | Unnecessary background CPU load generating steady background heat. | 5 minutes | |
| Run a full malware scan with Windows Defender or Malwarebytes. | Silent cryptomining or adware pushing CPU to 100% undetected. | 10–20 minutes | |
| Every 3–6 Months | Full internal cleaning — remove the bottom panel, clean the fan blades, and heat sink fins. | Major airflow blockage; 15–25°C temperature spikes under load. | 20–40 minutes |
| Update BIOS from the manufacturer’s support page (not just Windows Update). | Poor fan curve behavior and power management bugs causing unnecessary heat. | 10–15 minutes | |
| Update chipset, GPU, and power management drivers. | Outdated driver conflicts that prevent proper CPU/GPU clock scaling. | 10 minutes | |
| Log a temperature baseline reading with HWMonitor and compare it to the previous session. | Early detection of gradual thermal degradation before it becomes critical. | 30 minutes (passive monitoring) | |
| Every 2–3 Years | Replace thermal paste on CPU and GPU with quality compound. | Dried-out paste causing poor heat transfer; 10–20°C temperature rise even on clean machines. | 30–60 minutes |
| Inspect fan bearings for grinding noise or reduced RPM; replace the fan if needed. | Mechanical fan failure leading to zero active cooling and emergency shutdowns. | Visual + audio check: 5 minutes | |
| Always | Use only hard, flat surfaces such as desk, table, laptop stand. | Bottom vent blockage from soft surfaces (beds, pillows, laps), causing instant 10–15°C spikes. | Habit, no time cost |
| Keep battery charge between 20–80%; avoid leaving it at 100% all the time. | Excess heat from continuous full-charge cycles accelerates battery cell degradation. | Habit, no time cost | |
| Close unused apps and keep browser tabs under 10 during heavy workloads. | Unnecessary CPU load building heat during sessions that don’t need full performance. | Habit, no time cost | |
| Avoid using the laptop in direct sunlight or in rooms above 30°C. | Ambient heat and radiant sun exposure that stack on top of internal component heat. | Habit, no time cost |
Frequently Asked Questions
Can a laptop’s overheating damage the battery?
Yes. Heat speeds up the chemical ageing inside lithium‑ion cells, so the battery’s capacity drops for good. If your laptop runs hot a lot, you’ll see the battery life fade much sooner than on a cooler machine, sometimes roughly halving the useful lifespan.
My laptop is brand new and already overheating. Is that normal?
No, but not rare either. Cheap and mid-range laptops sometimes ship with poorly applied thermal paste from the factory. Also, new laptops often hammer the CPU for a while doing background tasks like Windows indexing and app installs. If overheating continues past the first 24 hours of normal use, contact the manufacturer; it could be a warranty issue.
Does undervolting a laptop CPU help with the system getting hot?
Undervolting does help, yes — quite a lot, actually. It drops the voltage the CPU operates on below what the manufacturer set by default, which cuts power consumption and heat. You can often see temperatures fall by 10–15°C under load, with no impact on performance. On Windows, you can use ThrottleStop or Intel XTU tools for this. Note that Intel locked undervolting on many post-2020 CPUs, so check whether yours supports it before you go digging around.
Will reinstalling Windows or macOS fix overheating?
Only if the cause is software like malware, corrupted power management, or runaway system processes. A clean OS install removes these issues, though it won’t help if the laptop’s overheating is physical: dust buildup, dried paste, or a failing fan. Exhaust the targeted software fixes in this guide first; they’re faster, less disruptive, and more often than not enough.
How do I know if my laptop fan has failed?
As for a failed fan, temperature monitoring software will normally tell you what you need to know. If the RPM reading is at zero while temperatures are climbing, that’s a bad sign. You might also notice there’s no airflow coming out of the vents, complete silence when the laptop should be loud, or it’s throttling almost immediately under any kind of load.
Did this fix your issue?
Let us know. Your feedback helps other readers find the right solution.
Great! What solved it for you?
We read every response. Email is optional and never shared.
Sorry to hear that. What happened when you tried?
Leave your email and we will personally help you fix it.


