
- How to Check Storage on Your Mac
- Why Your Mac Keeps Filling Up
- How to Clear Disk Space on Mac
- 1. Use Apple’s Built-In Storage Recommendations
- 2. Clean up the Downloads Folder
- 3. Find and Delete Large Files
- 4. Delete Old iPhone Backups
- 5. Remove Apps You Don’t Use
- 6. Clear Browser Cache
- 7. Clean up System Data and Cache Files
- 8. Move Photos to iCloud or an External Drive
- 9. Move Your Music Library
- 10. Compress Files You Want to Keep
- 11. Delete Duplicate Files
- A Few Extra Options
- How Often Should You Clear Space on a Mac?
- Frequently Asked Questions
- How much free space does a Mac need to run properly?
- Will clearing storage speed up my Mac?
- Is it safe to delete the System Data category?
- What happens if my Mac’s startup disk is full?
- Can I add more internal storage to my Mac?
- Can I delete the “sleepimage” file to save room?
We used to have plenty of room back when Macs had spinning hard drives. Then came SSDs, which offer speed but much tighter capacity. To make matters worse, our high-definition videos, photos, and bloated software now demand more space than ever. Thanks to it, MacBook users often battle low-storage alerts, even while their machines run completely fine.
If that happens, avoid impulsive file deletions as they rarely address root causes like accumulated system data, caches, and local duplicates of synced content from services like iCloud. You might wipe out a valuable document while the underlying bloat stays right where it belongs.
The world generated approximately 181 zettabytes of data in 2025—nearly triple the volume in 2020, and your machine is bearing the brunt of this ceaseless sync. The good news? You can trim the excess without ripping out the heart of your workflow. Let’s take a smart, targeted way to free up space on your Mac. This guide will show the steps to identify and manage storage on a Mac. We’ll explain how to find what files are taking up space, what you can safely delete, and how to get rid of Mac storage capacity issues.
Also: How to Show Hidden Files on Mac
How to Check Storage on Your Mac
Before executing a digital massacre, one must survey the battlefield. It’s crucial to keep at least 20% of the drive’s capacity free; otherwise, performance will degrade. At the absolute minimum, a Mac requires roughly 10% free space to avoid severe sluggishness or outright startup failure. Before you start deleting things at random, take 30 seconds to review the storage condition.
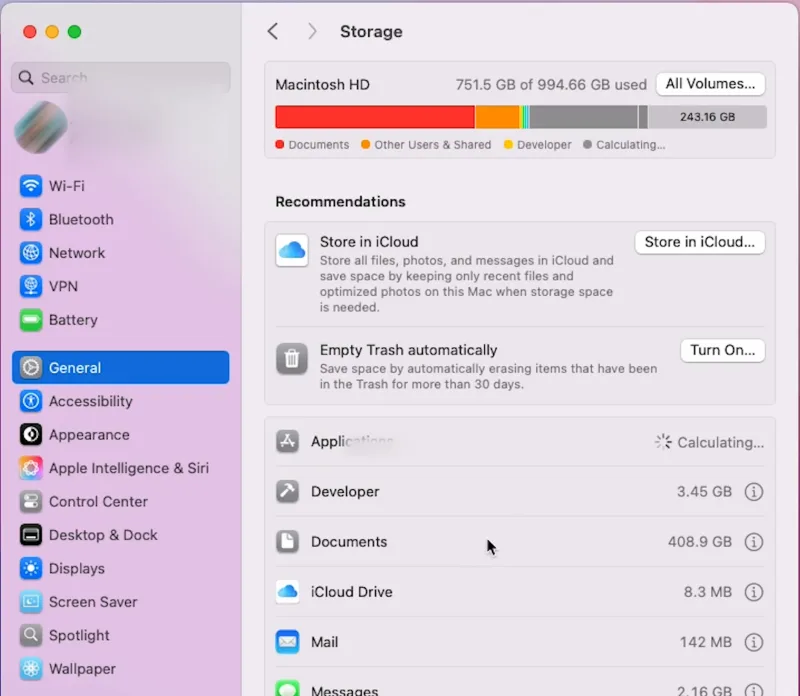
- On macOS Ventura or later: Go to Apple menu > System Settings > General > Storage.
- On earlier macOS versions: Open Apple menu > About This Mac > Storage.
- Alternatively, old macOS builds might require you to click the Apple icon, select About This Mac > More Info…, and then click the Storage Settings button.
You’ll see a color-coded bar broken into categories such as Apps, Documents, System Data (all Apple and third-party files), Photos, and so on. Hover over each section to see the amount of storage it has consumed.
The colored storage graph gives a broad, high-level overview of how much space is used, but it’s not meant to be a precise, real-time diagnosis. GBs of data might not show up on that visual bar at all. So, you should check the breakdown next to individual categories to get an accurate estimate.
As you delete items, this storage information updates automatically. Should you spot a More Info button next to a category, click it for further management options. This is particularly helpful for categories like Applications, Documents, Messages, Podcasts, Trash, Music Creation, and TV.
Why Your Mac Keeps Filling Up
You haven’t been downloading GB files, so why is the Mac disk full? Many background processes pile on the data that you don’t realize. Here’s what can happen behind the scenes so your Mac storage fills up:
- System caches and temporary files build up. Every time you use a program, open a browser tab, or install a software update, the Mac generates temporary data to speed up future tasks. The problem is, most of this cache hangs around after you’re done with it, and clutters your drive over time.
- App remnants are particularly devious. When you drag an application to the Trash, you think you’ve purged it. You haven’t. The main executable disappears, but the support files, user preferences, and hidden cache folders remain behind in the Library folder, invisible and untouched, and occupy space long after the program is removed.
- iCloud sync is kind of a mixed bag. On the one hand, it’s very convenient to have local copies of your files on a Mac for offline access. But on the other hand, these copies eat up system storage, even though the originals are stored in the cloud.
- Old backups. Time Machine snapshots or iPhone/iPad backups stored on your Mac drive. These can silently balloon to 10-20 GB or more, and by the time you notice, the system is already gasping for room.
How to Clear Disk Space on Mac
So you’re running low on disk space on your Mac. Here are some very effective tips to help you manage it, and you can do it either manually or automatically, whatever you like and what works for you.
1. Use Apple’s Built-In Storage Recommendations
Apple provides a good starting point for space clearance. If you’re on a new version of macOS, open System Settings > General > Storage (Ventura+). If you’re using an old operating system, go to About This Mac, then Storage, and choose Manage.
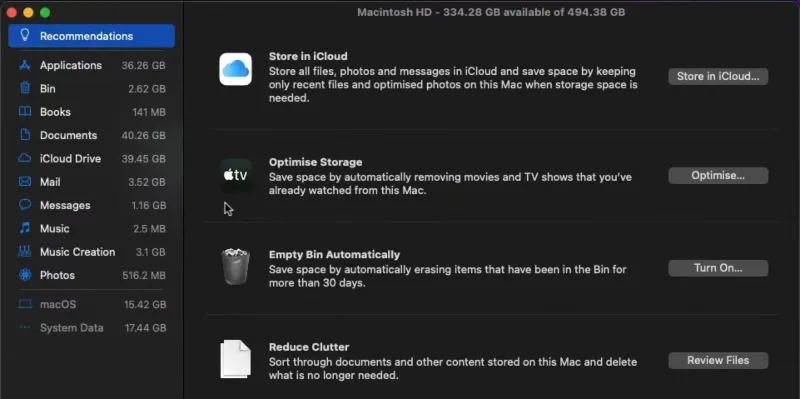
If Apple has any recommendations for you regarding storage, these will be shown below the color bar, and you might see these three options:
- Store in iCloud: This moves your Desktop, Documents, and Photos into the cloud. Your Mac keeps only the files you’ve recently opened locally and downloads the others on demand. To open it, go to the main Apple menu > About This Mac > More Info > Storage Settings. Click Store in iCloud, pick what you’d like to save to the cloud, then click Store in iCloud again to confirm the choice. If you pay for enough iCloud storage, this alone can recover tens of gigabytes in a single afternoon.
- Optimize Storage: It automatically deletes watched movies and TV shows from the Apple TV app and scrubs old email attachments from your hard drive, leaving them safely stored on the mail server. Switch it on and stop thinking about it. Since you can re-download these for free anytime from the web, there’s no reason to keep them on the drive. You can check if the Optimize Storage feature is enabled in the Apple ID section of System Settings/System Preferences.
- Empty Trash/Empty Bin Automatically: Finally, kill the Trash/Bin. Set it up under Finder > Settings > Advanced > Remove items from the Bin after 30 days. It forces a permanent delete on anything gathering digital dust for a month.
Do these three things first before you start to dig through folders manually. They’re safe, reversible, and often recover more space than you’d expect.
2. Clean up the Downloads Folder
Once you’ve decided to clean up your Mac, the best place to start is with the Downloads folder. You’ve probably downloaded a ton of stuff over time, and let’s be honest, you don’t need most of it. It’s time to get rid of all the useless files by sending them to the Trash/Bin. Here’s how you can do it:
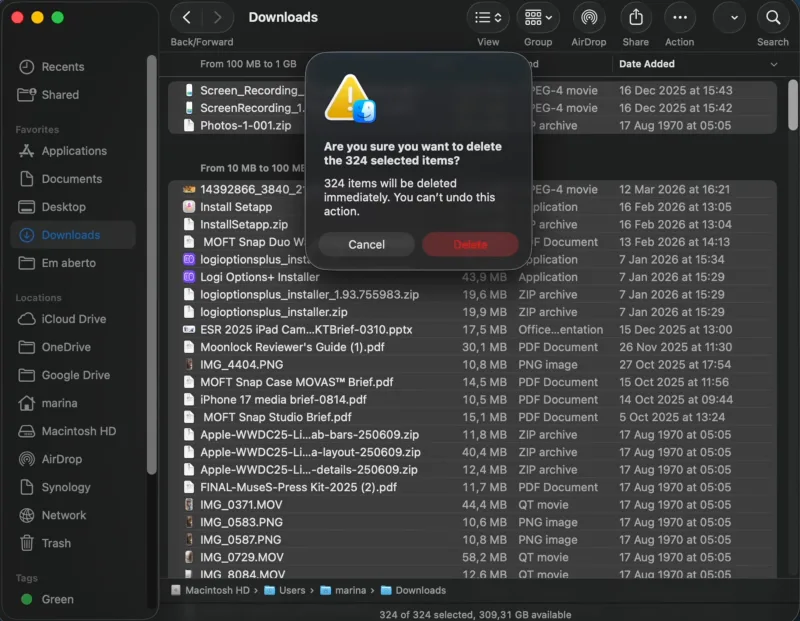
- Open Finder, go to Downloads, and click Size to filter the largest files to the top.
The Downloads folder is a Mac wasteland of forgotten ZIP files and useless installer packages. - You’ll almost certainly find DMG installers, ZIP archives you already unzipped, PDFs you downloaded once and forgot, and video files from three years ago.
- Right-click the files to delete and select Move to Trash/Bin, then clear the Trash.
- Press Command + A to select all files at once if you prefer a scorched-earth approach. This is the easiest win on the list, and the one people ignore the longest.
DMG files — the disk image installers you downloaded to install apps — are safe to delete after installation. You can always re-download them if required in the future.
If you haven’t opened a download in six months, you probably don’t need clearance here. But after doing that, the expected space recovered is 2–5 GB, sometimes even more.
Also: How to Connect AirPods to MacBook, iPhone or Android
3. Find and Delete Large Files
To find big files in directories, open Finder and press Command + F.
- Select “This Mac.”
- Click “Other…” in the dropdown menu and choose “File size“.
- Set the parameters to “is greater than” and type 100 MB.
You’ll get a clear picture of what’s eating the most space. Look for old DMG files, ZIP archives, video exports, and anything else you no longer need.
Next, open Finder’s search bar, type a single asterisk, then click the “+” button to add a filter. Choose “Other” from the “Kind” dropdown, type “File extension,” and hit OK. Now you can type any extension like .dmg, .zip, .mov, and the system will list every matching file. Scroll through the results, flag the ones you see as useless, and drag them to Trash. The process trims the clutter without affecting the software you still use.
Avoid deleting Payloads, as they belong to macOS Install Data, which the system uses to install and repair itself. If removed, they can severely disrupt optimal system performance.
4. Delete Old iPhone Backups
Outdated iPhone backups can swallow 10-20 GB of storage, lingering on your Mac like forgotten houseplants. If you ever tethered your iPhone to a cable to back it up, those copies will be saved on your drive and expand over time. The space they take isn’t obvious until you see the “Other” category and wonder where it all went.
Here’s how to find and delete them to free up space on your Mac:
- Open Finder.
- Click Go > Go to Folder in the menu bar.
- Paste in:
~/Library/Application Support/MobileSync/Backupand press Return. - Delete the folders inside (or right-click a specific backup and choose Delete). Or drag the contents of this folder directly to the Trash/Bin.
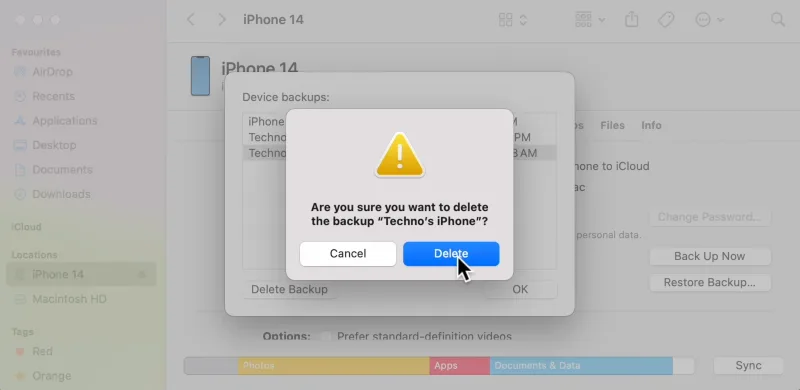
To target a specific backup, connect the device via cable, open Finder, select your device under Locations, then click Manage Backups. Right-click the backup name, choose Delete, and confirm.
Only delete backups you’re certain you no longer need. If you’re switching from an old iPhone to a new one, keep the latest backup until the transfer is confirmed complete.
5. Remove Apps You Don’t Use
Apps are deceptive. When you install one, it introduces supporting daemons, launch agents, and preference files that get embedded across macOS. Dragging an app to the Trash removes the main file but leaves behind support files, caches, and preferences. The remnants from multiple apps you uninstalled can pile up over time and take up several gigabytes.
Follow these methods to properly delete unused apps along with their leftovers:
- Via Finder: The simplest way to discard an app is to drag it from the Applications folder and drop it in the Trash.
- Via Launchpad (pre-macOS Tahoe): Open Launchpad, press the Command key and hold the app icon until it shakes, and click the [X] symbol to uninstall it. Mac’s Monterey version removed that Launchpad shortcut, so use the Applications folder instead.
To find forgotten software, open Applications, switch to List view, and sort by size. The list can reveal decade‑old copies of Microsoft Office or trial utilities that haven’t been opened in months or years, and you forgot to delete.
For a thorough removal without a third-party tool, you can manually check ~/Library/Application Support/ for leftover folders from deleted apps, but only remove the ones that match apps you’ve confirmed are gone; stray files can cripple the system.
Also: How to Change Your DNS Server on Windows and Mac
Free tools like AppCleaner automate the process—drag an app onto the AppCleaner window, and it surfaces associated files for removal.
Background services, including launch agents and daemons, don’t show in the Applications folder. Cleaner apps usually expose a “Leftovers” or “Background items” tab to find such hidden processes.
6. Clear Browser Cache
A heavy internet user’s drive is choked with browser cache like images, scripts, and fragments that every site you visit drops behind you. If you spend half your life online (who doesn’t nowadays?), the loaded web pages leave a trail of crumbs on your machine and turn Mac into a cache graveyard.
Whichever is your favorite, here’s how to clear caches on the well-known browsers:
- Safari: Open browser and go to Safari > Settings (or Preferences) > Privacy > Manage Website Data, then click Remove All to wipe every cookie and cache file at once, or click Remove next to the specific sites you want to clear.
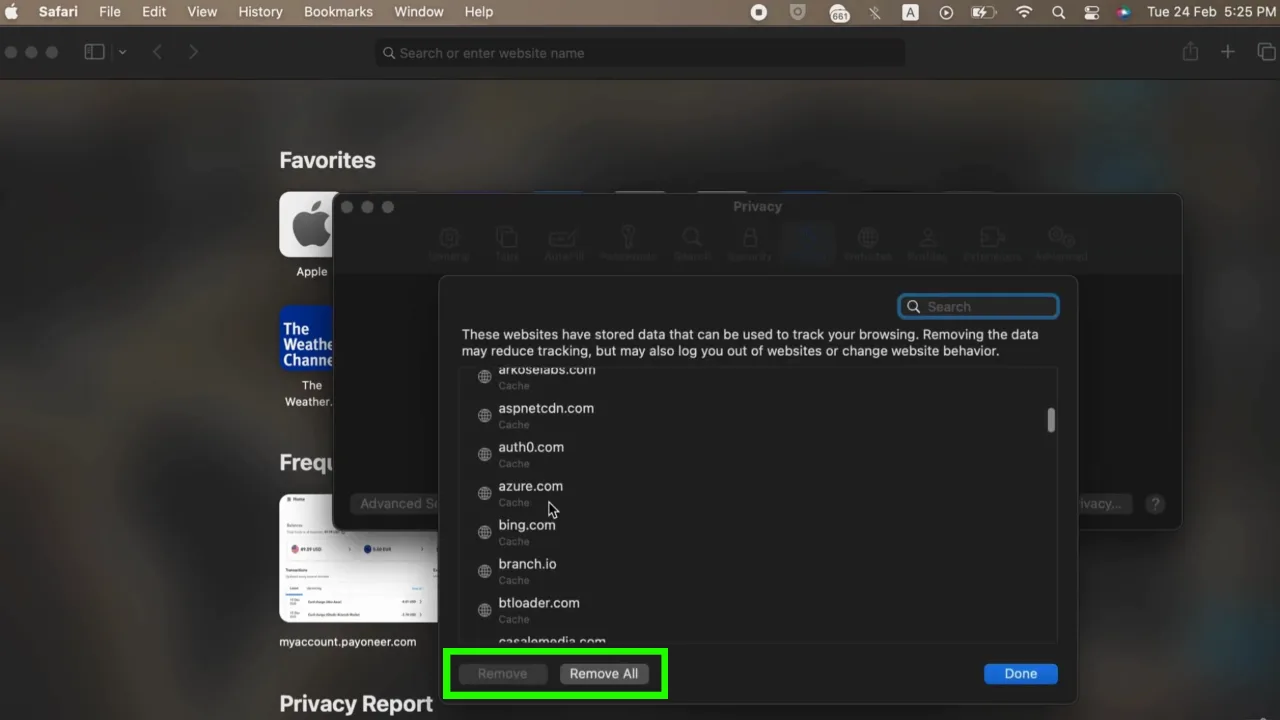
- To be more thorough, use the Develop menu. Open Safari > Settings, and look under Advanced to check the box for Show Develop menu in menu bar. Once turned on, click Develop in the menu bar at the top of your screen and select Empty Caches.
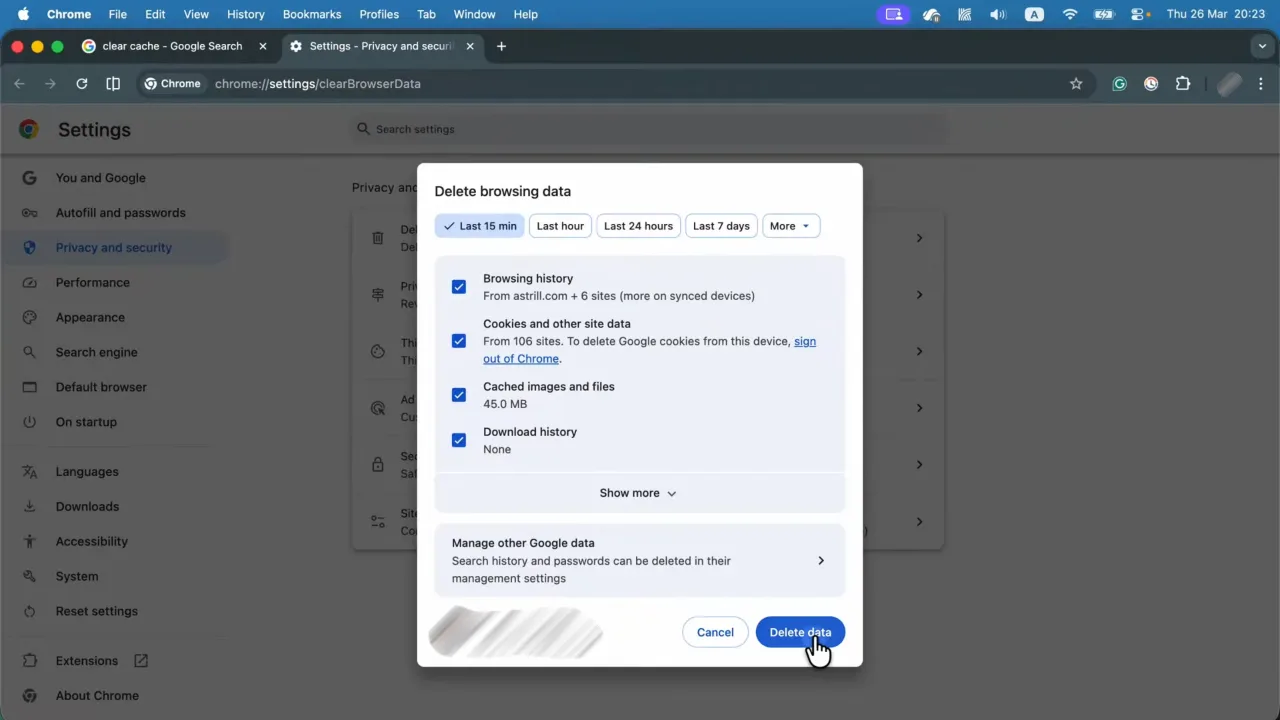
- Google Chrome: On Chrome, click the three-dot icon at the top right, go to Settings > Privacy and security, and select Delete browsing data. Choose a time range, check the box for Cached images and files, and click Delete from this device.
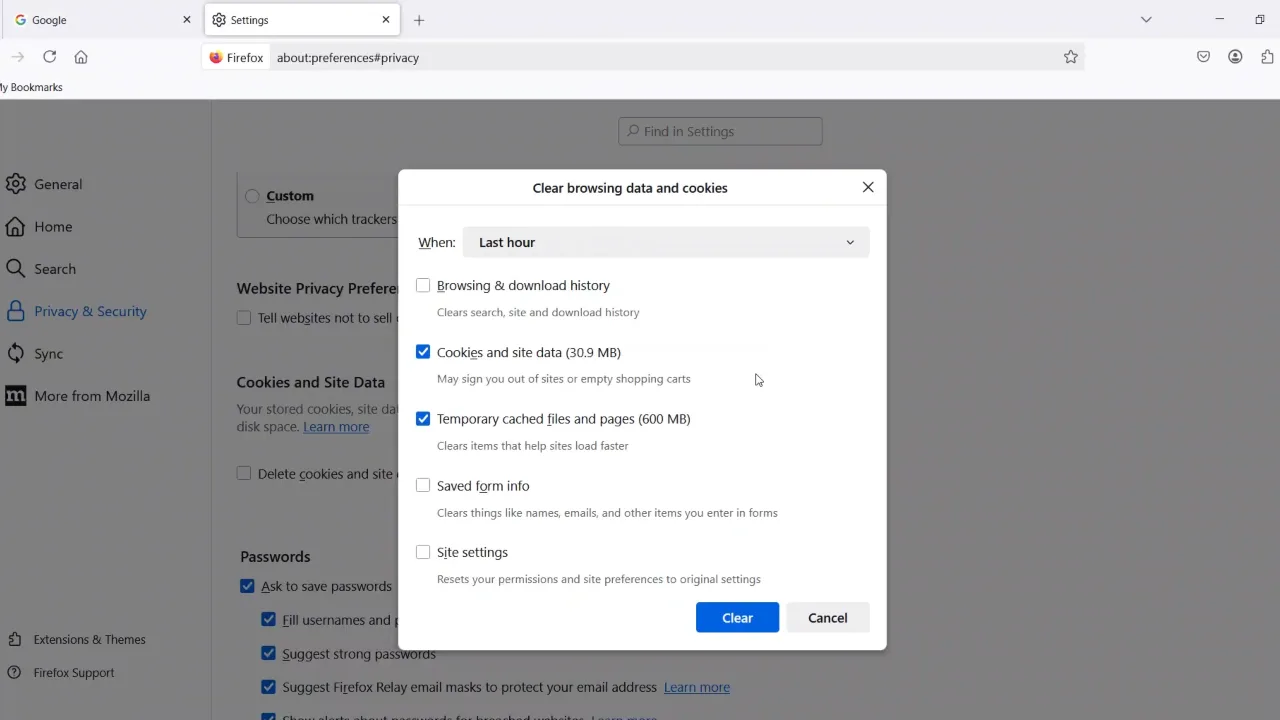
- Mozilla Firefox: Click the menu button and choose Settings. Head to Privacy & Security and click Clear browsing data in the Cookies and Site Data section. Once the dialog box opens, set the When: dropdown to Everything. Just make sure only the Temporary cached files and pages option is checked, then click Clear.
7. Clean up System Data and Cache Files
If your Mac has an operating system earlier than Monterey, your drive’s “Other” storage category likely contains a digital junk drawer. Apple named it System Data since the Monterey release. It’s a catch-all repository for the clutter that macOS cannot or will not label.
Inside this bucket are GBs of cache files, temporary system logs, app localizations, and Time Machine snapshots that defy clean categorization. These files are the debris of daily computing. While they rarely serve a direct purpose for the user, macOS keeps them on hand, often long after their relevance has expired.
Safe things you can clear manually:
Time Machine local snapshots — These are rolling backups stored on your Mac’s own drive. Open Terminal and run:
tmutil listlocalsnapshots /
This lists all snapshots. To delete one:
tmutil deletelocalsnapshots [snapshot-date]
Replace [snapshot-date] with the actual date string from the list (e.g., 2026-03-25-175408).
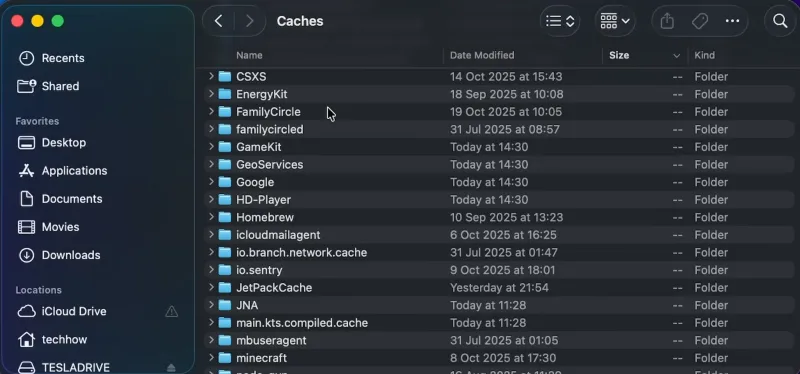
User (system) cache files — Open Finder, press Command + Shift + G, type ~/Library/Caches, and press Enter. You’ll see folders named after applications. Find directories belonging to apps you no longer use and move them to the Trash.
Log files — Go to ~/Library/Logs and /Library/Logs. These are safe to delete, though they’ll regenerate over time.
Don’t delete anything in /Library/Caches or system-level folders unless you’re confident about what it is. Deleting the wrong cache can cause apps to behave strangely until they rebuild their data.
8. Move Photos to iCloud or an External Drive
A large photo library is often the single biggest space user on a Mac. If you’ve been taking photos on your iPhone for a few years, it’s not hard to end up with a 50‑100 GB collection.
Option 1: iCloud Photos
The quick way to reclaim space on a clogged Mac isn’t by deleting files; it’s by offloading them to Apple’s servers. With iCloud storage enabled, you can sync your photos, documents, and desktop files to the cloud, leaving them accessible on demand rather than permanently anchored to your hard drive.
iCloud configuration requires only a few clicks. Follow these steps:
- Open System Settings/System Preferences, based on your macOS version, and select your Apple ID.
- From there, open iCloud and click Manage next to Account Storage.
- Choose Change Storage Plan to ensure you have the capacity, and enable Optimize Mac Storage.
If you subscribe to a better iCloud plan, the system syncs your entire library. Your files remain visible in their usual folders, but they’ll be lightweight placeholders until you click to open them. That’s when the original file gets downloaded locally.
Keep in mind: iCloud’s free plan gives you just 5 GB. You’ll need a paid plan (50 GB, 200 GB, or 2 TB) to store massive data online.
Option 2: External Drive
Quit Photos, copy your Photos Library file (found in ~/Pictures/) to an external drive, then hold Option while opening Photos and select the new library location. Once confirmed, you can delete the original from your Mac.
If you delete photos from your Mac while iCloud Photos is active, they’ll be deleted from iCloud too. So be careful.
9. Move Your Music Library
If you imported CDs or downloaded a lot of music over the years, your Music library eventually hits a ceiling. When the folder balloons to many gigabytes, it suffocates your Mac’s internal storage.
To move it to an external drive: Open the Music app, go to Settings > Files, click Change next to Music Media folder location, then point toward the external storage.
If the clutter becomes too much, Apple Music offers a clean exit. For $10.99 a month, the service gives access to the full catalog, rendering your local files redundant. You can delete the library and choose only the stream.
If your Mac is a laptop, connecting it to a separate drive defeats the point of mobility. In case you regularly stay away from the desk, Apple Music or the included iTunes Match service is a better way to keep a library accessible without the dead weight of physical files.
10. Compress Files You Want to Keep
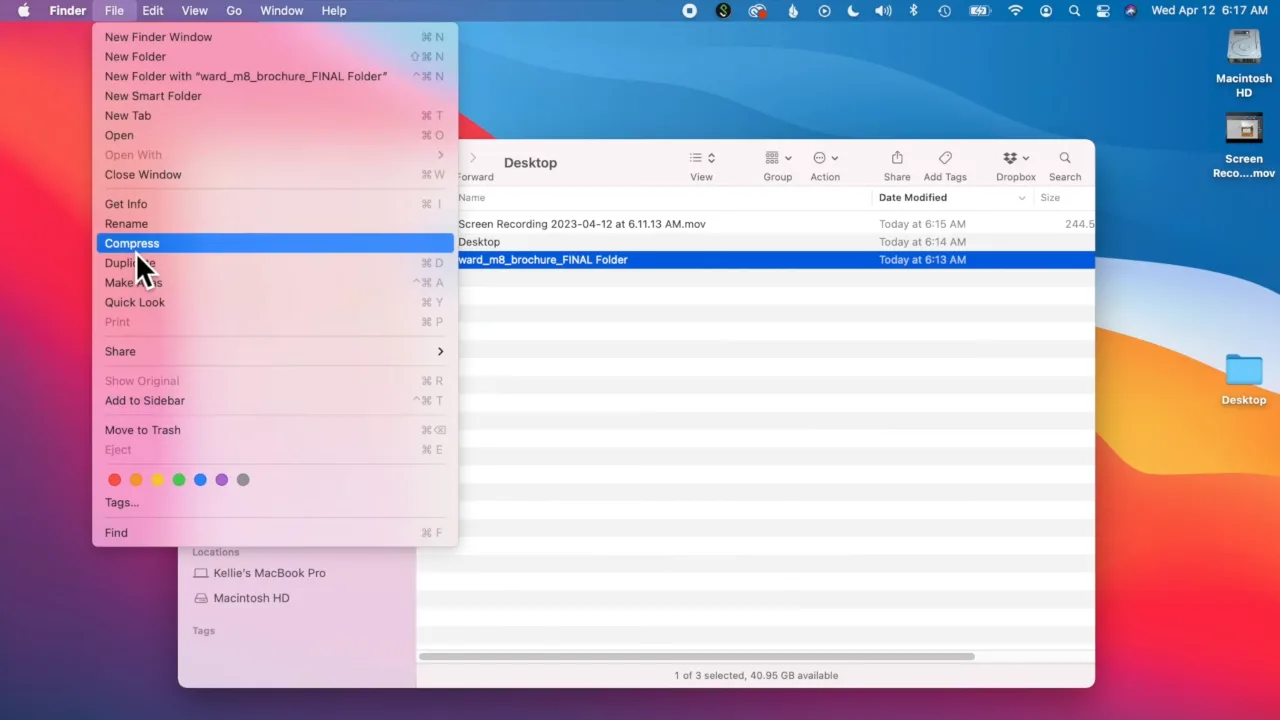
Can’t delete it but don’t need it for now? Compress it. Archiving files offers a lossless (no quality loss) alternative to permanent deletion, shrinking file sizes without sacrificing quality. Right-click a folder in Finder and select “Compress” or select the folder, then click File > Compress from the top menu as shown in the above figure.
The system creates a lossless ZIP archive and leaves the original untouched. Once the archive appears, you can safely delete the source files or move the folder to external storage.
The process is surgical, but not universal. Presentations and standard documents shrink a lot, saving you vital GBs. But movies/video files and JPEGs offer little reward. They are already compressed, so squeezing them further means almost nothing.
11. Delete Duplicate Files
Duplicates build up unnoticed, particularly in photo libraries and music collections. iTunes used to copy all files into its own folder by default, so every track you added ended up duplicated. Mail does the same with attachments, keeping its own copies. In the Music app, click View > Only Downloaded Music, then sort by Title to see duplicates side by side.
When it comes to photos and general duplicates, Gemini duplicate finder is a good tool. It finds exact copies and even similar images. Open the cleaner, run its clutter‑scan, review the Duplicates tab, and delete the twin photos in one go.
A Few Extra Options
- Remove extra language files: macOS installs localizations for 25+ languages. If you only use one or two languages, apps like Monolingual (donation-based) can remove the unused ones, but a misstep can leave the system unstable.
- Cloud storage sync settings: Dropbox and OneDrive both mirror every folder on the local drive. These storage apps let you choose which folders sync locally. Open each app’s preferences and deselect the directories you don’t need offline to keep the cloud the sole repository for the rest.
- Restart your Mac regularly: Every so often, give your Mac a full reboot. Long‑running apps collect temporary files; a restart flushes the caches and restores the reclaimed GBs to the system.
- Safe Mode cleanup: When you boot into Safe Mode, macOS automatically cleans up caches and removes any extra files. After the cleanup, restart normally. The method proves handy before a large OS upgrade, which can require anywhere from 25 GB to 80 GB of free storage.
How Often Should You Clear Space on a Mac?
How often you should clean up your Mac’s hard drive depends on your use, but a good rule of thumb is to do it every month. This way, you can prevent digital clutter from becoming a bottleneck. At the very least, you should do a clean wipe before any major macOS update, as these require a big overhead, and a disk with room to breathe will reduce the number of errors you’ll encounter. When macOS tells you the startup disk is almost full, don’t ignore it.
Frequently Asked Questions
How much free space does a Mac need to run properly?
Your Mac demands a buffer, so keep at least 10–20% of your total drive capacity empty at all times. What that means is, if you have a 512 GB Mac, you must keep around 50–100 GB free. If less than this, macOS will struggle because virtual memory, swap files, and background processes all need extra room to work.
Will clearing storage speed up my Mac?
Yes, but only if low storage was the issue. When the drive nears capacity, the system struggles to manage virtual memory, which causes a performance drag. Freeing up some space can make a big difference. But if your Apple notebook is aging or suffers from other hardware issues, storage alone won’t fix everything.
Is it safe to delete the System Data category?
You cannot delete the full System Data because it’s a collection of cache files, logs, and snapshots. Some parts of it are safe to remove, like browser cache, old Time Machine snapshots, or leftovers from apps you’ve uninstalled. But proceed with caution. If you blindly delete system-level files, you’ll risk breaking the OS. So, it’s really important to understand what something is before you move it to the trash.
What happens if my Mac’s startup disk is full?
Well, that’s a problem. At that point, the operating system won’t be able to write the temporary files it needs to function, and the system becomes unstable or unresponsive. In severe cases, it won’t boot. If you find yourself staring at a frozen screen, boot into Safe Mode to trigger an automatic cache purge, which will buy you just enough space to recover.
Can I add more internal storage to my Mac?
Unfortunately, on most of the latest Macs, it’s not possible. The SSD is embedded in the motherboard and can’t be upgraded after purchase. Old MacBooks with traditional hard drives are the exception. But for most people, your best bets are to buy external drives, NAS (Network Attached Storage) for a desktop setup, or pay for the best iCloud storage plan.
Can I delete the “sleepimage” file to save room?
While the sleepimage file can consume gigabytes equal to your Mac’s physical RAM, deleting it is a futile endeavor. The operating system will immediately recreate it the next time your machine enters sleep mode. Leave this crucial power-management file alone; the risk of system instability outweighs any marginal space you might briefly reclaim.