

Dust 2 is Counter-Strike’s main classroom where every player learns how to call, rotate, and read the battlefield. Every box, corner, and door has a name, and if you don’t know them, you’ll hear your teammates yelling “He’s on cat!” while you’re still staring at Mid, wondering what a cat has to do with it. Knowing Dust 2 callouts means survival because every callout spot helps your team move fast, trade better, and turn chaos into strategy. This guide explains all 51 CS:GO callouts on the Dust 2 map, what each means, where it’s located, and how it impacts gameplay.
All CS:GO Dust 2 Callouts
Dust 2 is built on a clean three-lane design—A Long, Mid, and B Tunnels. Each lane connects with routes and chokepoints that allow fast rotations or deadly ambushes. That’s why communication is everything here.
With the great callouts understanding, you can read plays, predict rotations, and position yourself before the enemy does.
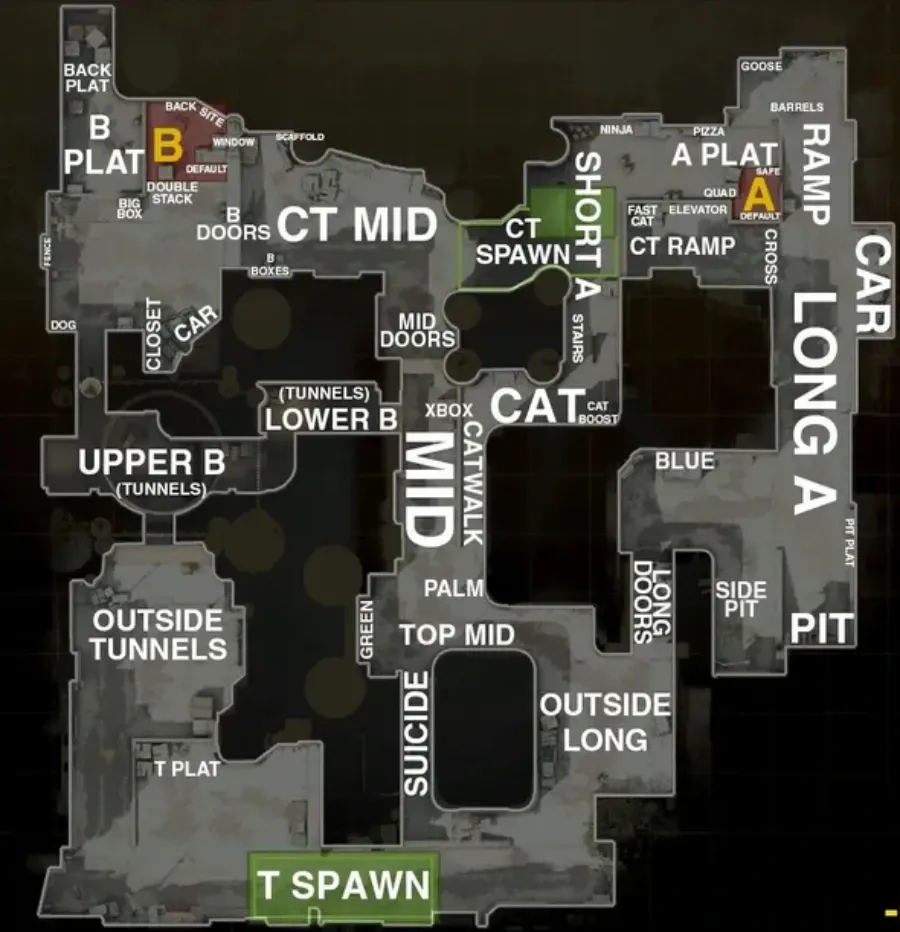
Here are all the callouts on the Dust 2 map:
- A Short: An elevated walkway that connects Mid to the A Bombsite, A Short (or “Cat”) is one of the most crucial routes for Terrorists. It’s the fastest and most direct way to reach A Site once taken control of Mid. Expect CTs to hold from A Platform or Goose, so use smokes and flashes to break through.
- T Spawn: The starting area for Terrorists on Dust 2. From here, you can watch CTs crossing to B through the small window toward Mid. It’s also the decision hub — push B through tunnels, rush Long, or challenge Mid. Skilled AWPers usually peek Mid Doors from the T Spawn edge at round start.
- T Ramp: A downward slope that connects T Spawn to the outside B Tunnels. Ts often use this spot to throw early utility or wait for the team to decide between a B rush or a Mid split.
- T Plat: A raised platform near T Spawn that overlooks the entrance to B Tunnels. It’s a safe vantage point to watch for CT aggression and to line up grenades and further keep sightlines on T Ramp.
- Outside Tunnels: The wide-open space before entering B Tunnels from T Spawn, occasionally used to set up flashes and smokes before a B hit. Be wary of aggressive CTs pushing through Upper B — it’s a common pre-round duel area.
- Upper B Tunnels: The main corridor leading into the B Bombsite. This choke point is heavily contested at the round start, as CTs molly or HE it to delay pushes. Turning left leads to B Site, while right leads down to Lower B Tunnels toward Mid.
- Lower B Tunnels: The lower pathway that branches from Upper Tunnels, leading down toward Mid. This area connects B control to the center of the map, a good spot for split attacks or fakes. CTs at times push here for intel, so check corners carefully.
- Close (B Close): A tight angle just outside the B Tunnels exit. Terrorists use this corner on B Site to get in from the Upper Tunnels. CTs love to tuck here to ambush Ts entering the site. Always pre-fire or flash this corner before pushing B.
- B Closet: Found in the back-right corner of B Site near the tunnel exit, behind the car. It provides deep cover for defenders but is vulnerable to Molotovs and wallbangs.
- B Car: The car parked between B Doors and Tunnels, offers partial cover and a clever off-angle for CTs defending from Upper Tunnels. Be ready to clear it on entry.
- Fence: The wooden barrier behind B Site near Back Plat to hide from the terrorists until they arrive at B Site.. It’s a defensive position for CTs who watch Tunnels or hold late-round retakes. Grenades can easily flush it out, though.
- B Plat: The upper section of B Site, where bombs are planted. It provides great visibility of Upper Tunnels and solid cover during post-plants. Controlling Plat is crucial to secure B.
- Back Plat: A small pocket behind B Plat, out of sight from most entry angles, and used by defenders to hide or delay retakes. It has a special Dust 2 callout name because it’s impossible to view the B Plat rear from the bombsite, so it’s used to indicate if a player is stuffed at this narrow spot. To attack B Site, always clear this tight corner.
- Big Box: This is the large crate between B Plat and the bombsite center. It provides mid-level cover for defenders watching Window and Doors and is also used for off-angle fights.
- Double Stack: Two stacked boxes near the middle of B Site that give defenders vertical cover and make it easy to surprise Terrorists who enter the site.
- B Default Plant: The most common bomb plant location on B, under the Window and beside the Doors. It’s perfect to hold post-plants from Tunnels, Mid, or Back Plat.
- B Window: This is the hole in B Site’s brick wall that connects to CT Mid. It’s used by CTs during retakes and Ts holding post-plants. Always expect fights here as it’s one of the map’s most active points.
- B Back Site: The rearmost area of the B Bombsite, stretching between Plat and Back Boxes, and good for defenders to stall plants or delay entry. You’ll usually see players anchoring here with rifles.
- B Doors: Double doors that link CT Mid to B Site; retake CTs rely heavily on this entry. When you plant on B, make sure to smoke Doors to block vision from CT rotations.
- B Boxes: A stack of boxes just outside B Doors toward CT Mid. CTs use them to peek safely into Mid or assist B defenders, also a handy angle to pick off mid-split attackers.
- Scaffolding: Wooden beams and building materials right outside B Window on the CT side that provide cover and a raised peek angle for retakes or mid-to-B holds.
- CT Mid: This is the area that connects B Site, Mid, and CT Spawn. This open area is critical for rotations — if Ts control CT Mid, they can split B or pressure A Site easily.
- Mid Doors: The double doors dividing Mid from CT Mid. AWP duels here are legendary. Smokes and flashes are important for safe passage, especially when Ts split toward B or A Short.
- Close Mid Doors: The right-hand corner immediately after passing Mid Doors toward CT Spawn. CTs can hide here to catch unsuspecting Ts pushing through.
- Xbox: The box in Mid that can be used to boost onto the Catwalk. It’s also a common reference point for smokes that block Mid Doors, thus gives Ts safe passage toward Short.
- Mid: This is the central area of Dust 2 that connects B Tunnels, Catwalk, and Mid Doors. Controlling Mid gives you full map flexibility, so rotate fast, split B, or pivot to A Short.
- Right Side Mid: The curved section of Mid on the right when viewed from CT Mid. It’s often called by CTs to specify enemy movement without confusing it with Top Mid or Doors.
- Top Mid: The top of Mid near T Spawn, where Ts arrive before committing to a site. It connects Suicide, Catwalk, and Mid Doors which all are crucial early-round routes.
- Palm: Previously marked by a palm tree (now replaced by a telephone or pole), this area sits near the base of Catwalk. It’s used as a landmark for rotating players or calling positions along Short.
- Suicide: The drop-down path from T Spawn straight into Top Mid. It’s fast but dangerous — CT snipers hold Mid Doors, which makes the name quite literal.
- Outside Long: The open area on the T Spawn before Long Doors. Terrorists regroup here before pushing Long or rotating Top Mid and CTs flash-push this spot early for surprise kills.
- Long Doors: The twin double doors that lead from Outside Long to A Long, one of the most iconic choke points in the game. Early control here can decide the round’s pace.
- Blue: The large blue container just across from Long Doors. It’s a defensive point where CTs can hold off early pushes or reposition after throwing utility.
- Side Pit: The small incline that is between Pit and A Long. It offers partial cover but limited vision used for early peeks or bait setups.
- Pit: A lower depression near A Long where players can safely hold angles on A Cross. Players in Pit can be invisible from A Site because of being on the other side and a steep slope. AWPers and riflers love this spot for its visibility and protection.
- Pit Plat: A raised edge on the upper part of Pit, letting players peek toward A Cross or Site with minimal exposure. A favorite for snipers to hold Long control and keep an eye on A Site.
- A Long: The long, narrow lane connecting Long Doors and Pit to A Site. Securing A Long early gives Ts a powerful angle on A Cross and Ramp, so CTs fight for it at round start.
- Long Corner: This is the tight turn of the closet building to Long Doors, where A Long meets A Cross. CTs often hold here with rifles to delay pushes or secure early picks.
- A Car: It’s a car positioned along A Long near the corner. CTs use it for cover during early Long duels or retakes. Be cautious — it’s a common molly spot.
- A Cross: The open area that links A Long to A Site. It’s a dangerous stretch exposed to multiple sightlines, making smokes must for Ts who push from Long.
- A Ramp: The ramp that leads up from A Cross to A Site and the area defenders use to play post-plant angles or contest Long pushes. Utility here can make or break retakes.
- A Default Plant: The standard bomb plant spot on A Site, located near the ramp edge of Platform. It’s visible from Short and Long, a good location to cover from both directions.
- Barrels: A small set of barrels behind A Site’s mesh fence. CTs use this cover for headshot angles or late-round peeks onto Ramp.
- Goose: A corner behind A Site, marked with a goose graffiti. CTs hide here for surprise plays or clutch holds during A executes.
- Elevator: The corner of A Platform closest to CT Spawn that CTs use to boost teammates up onto the A Site during retakes.
- Short Boost: A stack of dumpsters near CT Spawn’s A-side. CTs can boost each other here for quick access to A Short or to hold Catwalk control early.
- A Platform: The elevated base that makes up most of A Site. It separates A Short from A Ramp and houses the default plant spot.
- A Ninja: A small hiding corner with a hole on A Platform that is used for ninja defuses or surprise kills. It’s risky but deadly if your enemies forget to check it.
- Stairs: The set of stairs that connects Catwalk to A Short. This Dust 2 map callout is a common peek spot to defend against A Short pushes.
- Catwalk: The narrow bridge-like path between Mid and A Short. It’s one of the most heavily trafficked routes in the game, perfect for quick rotations and split pushes.
- CT Spawn: This is the spawn area for the Counter-Terrorist team. Located between A and Mid, it’s the center of all CT rotations, and losing control of CT Spawn mostly equals losing the round.
Now that you know every Dust 2 callout in CS2, it’s time to use them in action. Practice with teammates, improve your communication, and you’ll notice how great your rounds become, especially on the clutch retakes.
Every round on Dust 2 is a language test between you and your team. When you call “two mid, one cat, one car,” everyone knows exactly where to look, what to cover, and how to react. The difference between “he’s somewhere near A” and “one holding Goose” can be the difference between victory and defeat.
Want to be an expert in Dust 2? Play, listen, and speak the map’s language fluently.


