- What Happens During CPU Throttling?
- Signs Your CPU is Throttling
- How to Confirm Throttling
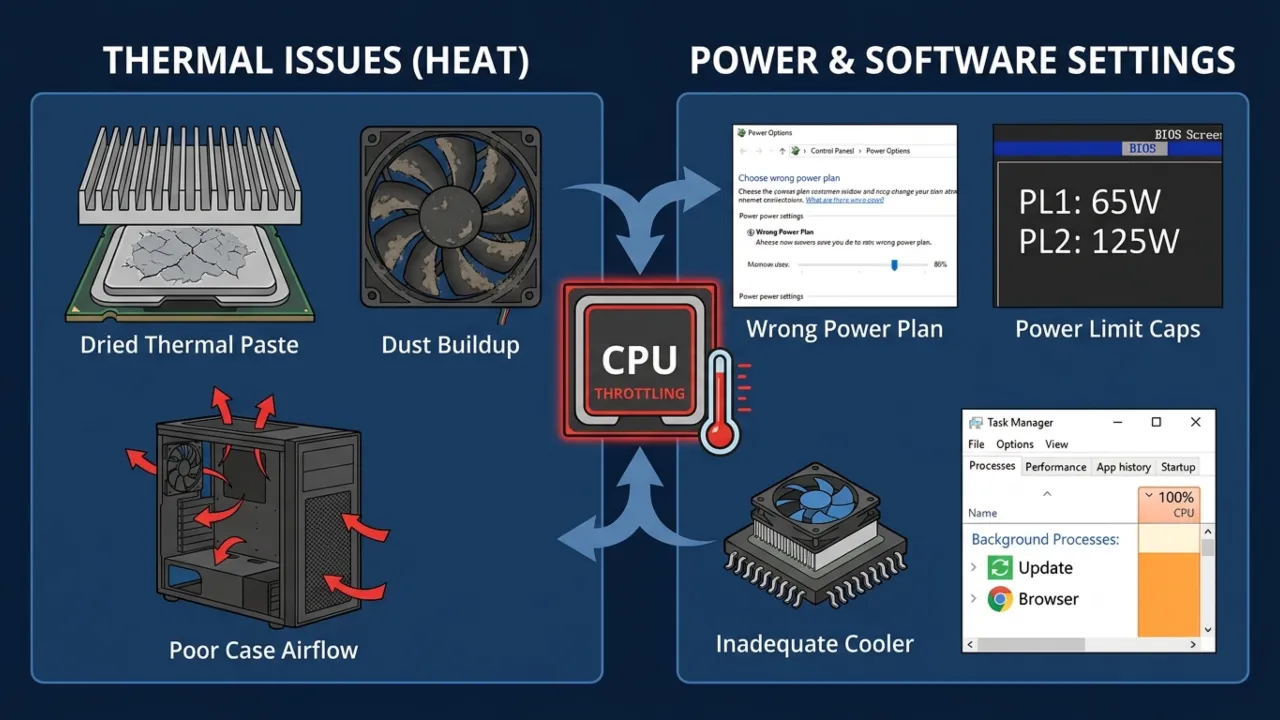
- The Possible Causes of CPU Throttling
- Dried-out Thermal Paste
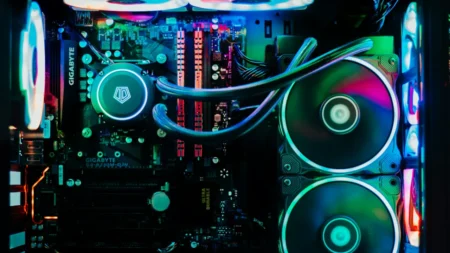
- Dust Buildup in the Cooling System
- Wrong Windows Power Plan
- Power Limit Caps (PL1/PL2)
- Inadequate Cooler
- Poor Case Airflow
- Background Processes
- How to Fix CPU Throttle
- Fix 1: Change Windows Power Plan
- Fix 2: Clean Out the Dust
- Fix 3: Reapply Thermal Paste
- Fix 4: Improve Case Airflow
- Fix 5: Undervolt the CPU
- Fix 6: Upgrade the CPU Cooler
- Fix 7: Adjust Power Limits (Advanced)
- Fix 8: Kill Unnecessary Background Processes
- Fix 9: Check BIOS Updates
- Can You Completely Disable CPU Throttling?
You paid for top processor speeds, but in the middle of a heavy task, everything suddenly grinds to a halt. Frame rates drop, timelines stutter, and the fans roar like a jet engine ready to take off. That’s what we call CPU throttling.
You might blame the game, Windows, or your GPU. But in most cases, the cause sits inside the processor’s guardrails. CPU throttling is easy to miss because it doesn’t crash the PC, yet it steals performance when you need it most. This guide explains what processor throttling is, how to spot it, and quick ways to fix it.
What Happens During CPU Throttling?
Modern processors are incredibly aggressive with their boost clocks. Algorithms like Intel’s Turbo Boost or AMD’s Precision Boost Overdrive will force the CPU frequency as high as possible until it hits a power or temperature wall.
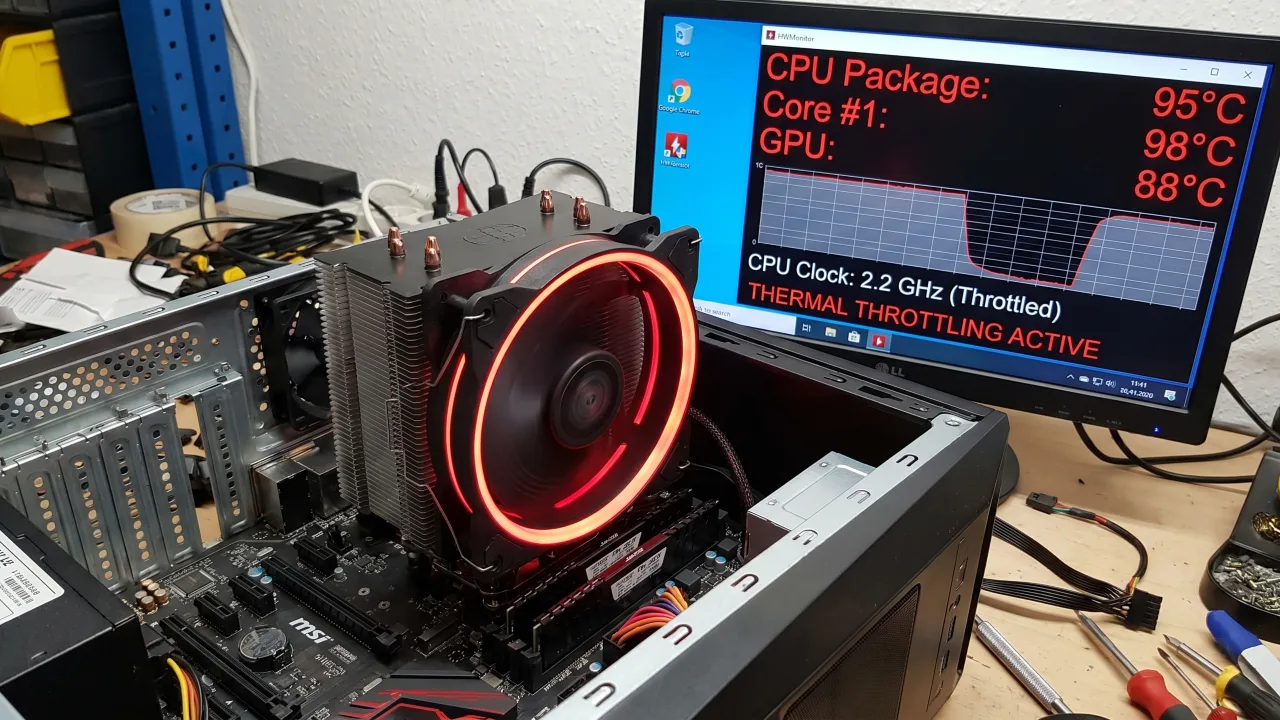
So, every modern CPU, including Intel, AMD, and Apple Silicon, has a built-in safety mechanism that activates immediately when the chip gets too hot (often 95°C for AMD and 100°C for Intel), draws too much power, or pushes electrical limits. When that threshold is reached, the processor automatically drops its clock speed. Your 5.0GHz powerhouse may suddenly downgrade to 2.5GHz or even less. The temperature decreases, the processor remains safe, but the performance falls off a cliff.
Throttling is also known as Dynamic Frequency Scaling in technical terms. The chip adjusts its clock speed on the fly to reduce heat and power draw, then recovers once conditions improve. This cycle — speed up, overheat, back off, cool down, speed up again — regularly during extended use. This leads to inconsistent performance, frame rate fluctuations, and frustrating stutter that worsens over time. While occasional throttling is expected, frequent occurrences under normal circumstances could indicate cooling or system configuration issues.
A throttle alert does not necessarily mean the processor has hit 100°C. There can be many reasons for this warning, and how it appears on monitoring tools can differ.
- Thermal Throttling: The CPU generates heat proportional to clock speed and voltage, and when the cooling system fails to control the heat, on-die sensors decrease clock speed. Desktop chips typically throttle when the temperature approaches their TjMax (usually 90–100°C), while laptop processors start earlier at 85-90°C.
- Power Limit Throttling: The chip hits its configured wattage cap (PL1/PL2 limits). Even with strong cooling, the CPU can throttle if it surpasses power supply limits, which happens when the motherboard’s VRM (voltage regulator module) or the PSU can’t supply enough current. Laptops are particularly prone to this since manufacturers often pair powerful CPUs with undersized power adapters to cut costs.
- VRM Throttling: Voltage Regulator Modules on the motherboard overheat and can’t deliver stable power. It’s common on budget boards when overclocked heavily. The VRM steps 12V down to CPU voltage; poorly designed modules overheat, forcing the processor to slow down even when its temperature is normal, like a sports car starved by a clogged fuel line.
- Current Throttling: The CPU exceeds electrical current limits. Rarer, but it occurs on systems that perform aggressive all-core boost clocks.
Laptops suffer most because the CPU and GPU share a single heatsink with barely any airflow. A thin chassis can show a processor at 70°C and still throttle because the system’s overall thermal budget is exhausted.
Signs Your CPU is Throttling
Some of these are pretty obvious, though a few might catch you off guard. The clear indicator is when the CPU briefly increases its pace, then drops hard under a heavy workload. You might also see stuttering, slow exports, long compile times, or performance that gets worse the longer a task runs.
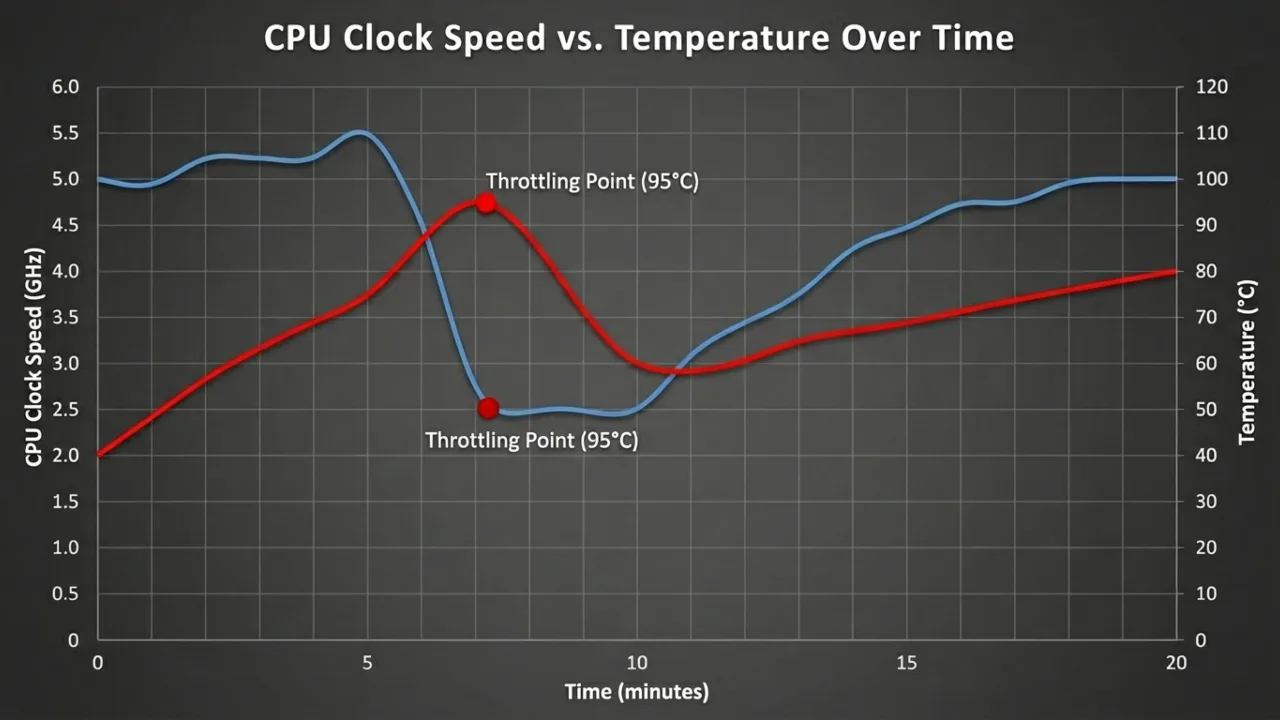
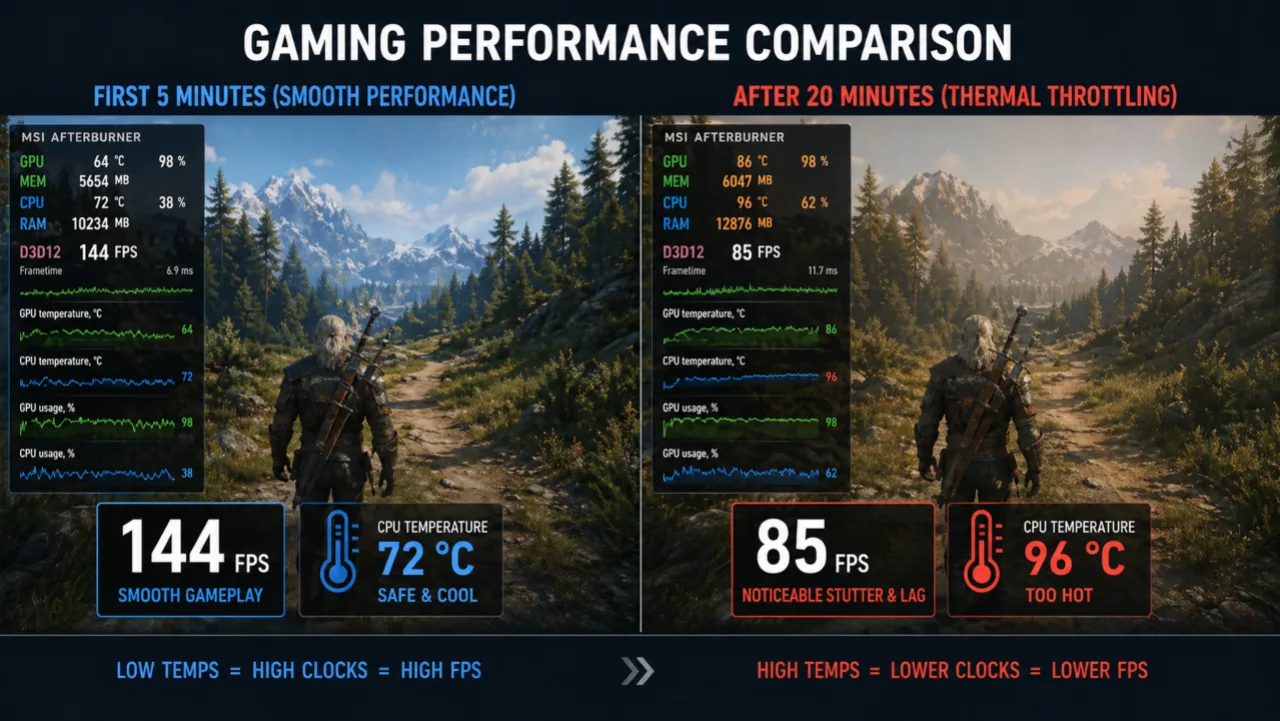
- Frame rates in games degrade after 10 to 20 minutes. The first few minutes deliver smooth performance, then FPS falls as heat saturates the cooling system and the CPU pulls back.
- Stuttering and frame time spikes appear even when the average FPS is high. Inconsistent frame delivery creates a choppy feel that raw frame counters miss. This occurs when the CPU shortly reduces clocks mid-frame, then recovers.
- CPU clock speeds below spec during high load. If your i7 is supposed to boost to 5.0 GHz but you see 2.0–2.5 GHz in monitoring software, something is off.
- Cinebench or stress test scores drop on a second consecutive run. The processor begins the second test already warm and power-limited. If the score drops by 10–15% on the second run, there’s throttling.
- Fan noise rises while performance falls. Loud fans paired with dropping frame rates or longer export times are the signature of thermal throttling. The cooling system is working hard but failing to keep up.
- Tasks that used to take minutes now take very long after extended use. For example, a video export that previously took four minutes might now take seven after the system has been on for two hours.
- Audio can also desync or stutter. Sound may crackle or lag behind video during heavy multitasking.
How to Confirm Throttling
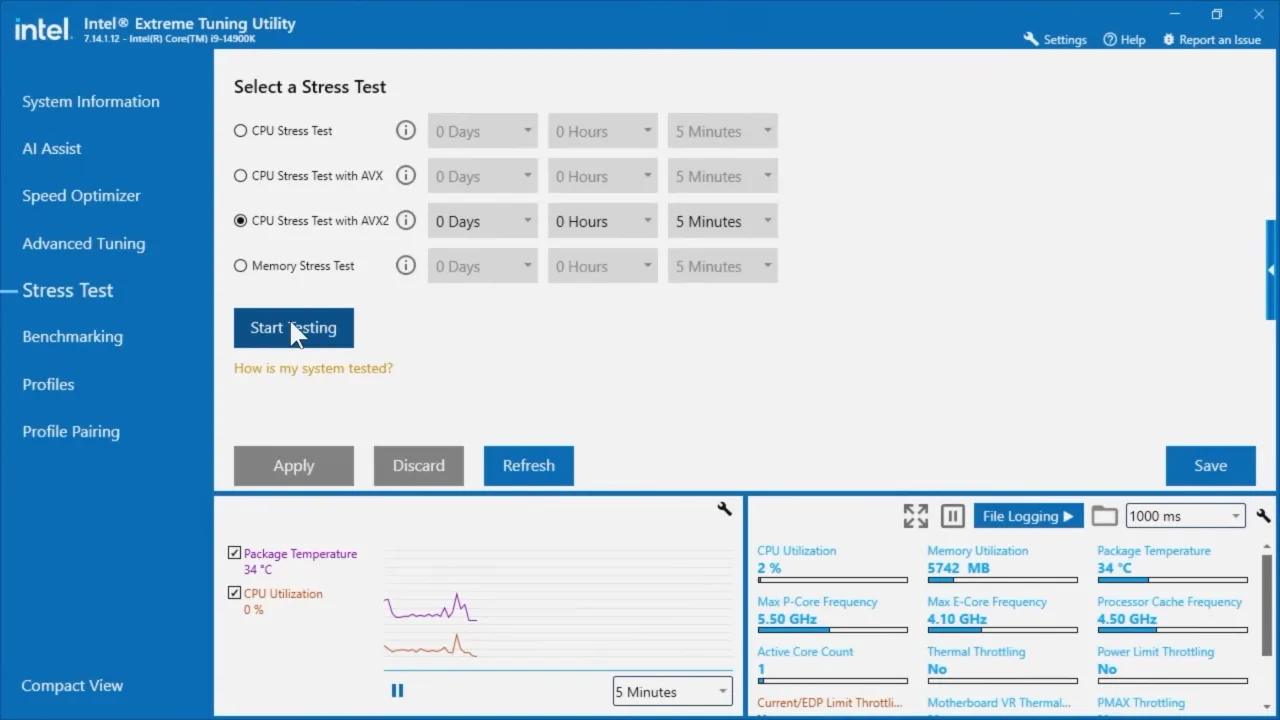
To confirm whether your CPU is throttling, monitor it during a heavy workload such as a game or stress test, using either built-in system tools or third-party software. Dedicated tools offer a clear throttling flag or Yes/No indicator, which is more reliable than manually watching clock speeds drift under demand.
- Download HWiNFO64, the most detailed hardware monitor available that exposes every throttle type directly.
- When prompted, choose “Sensors Only” and click Run. You’ll get a massive scrollable list of live hardware readings.
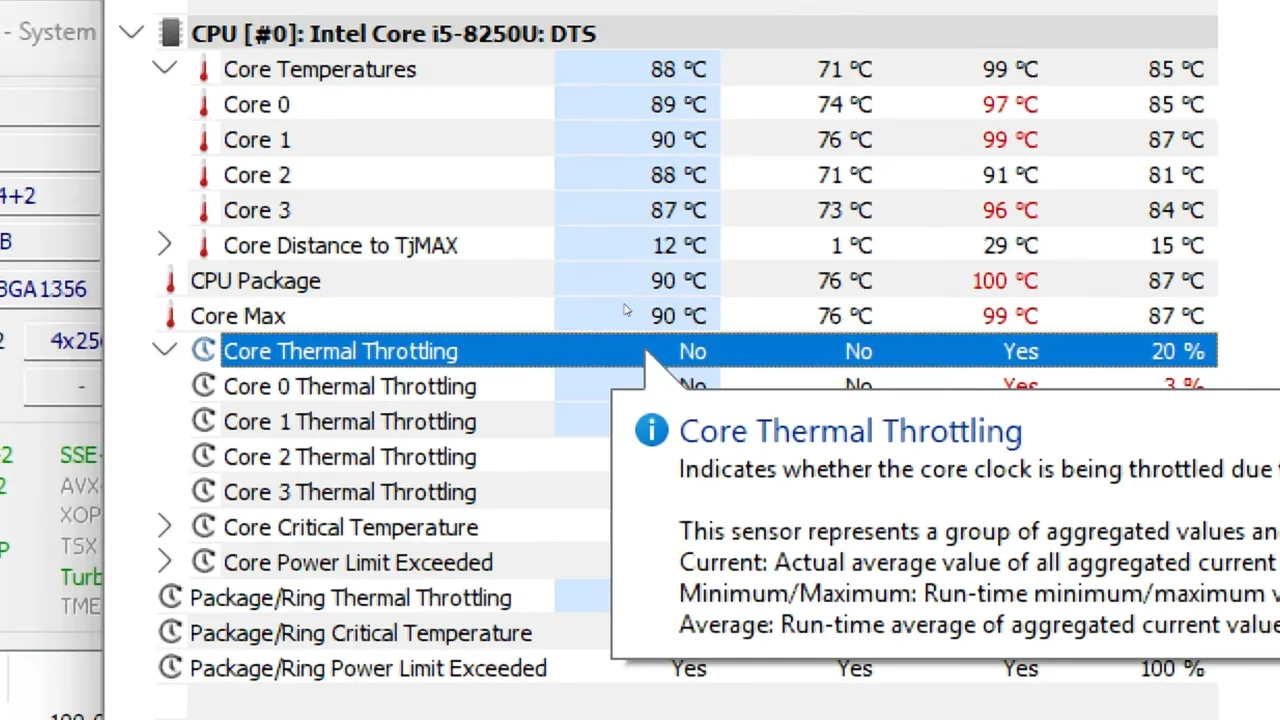
- Use Ctrl+F in the sensors window and search for Thermal Throttling. The row will update in real time — True or False.
- Further, search for Power Limit Throttling and check VRM temperature readings.
- Use Prime95 (Small FFTs preset) or play the game for 10–15 minutes, which causes the problems. Watch the throttling flags. If any read “Yes” or “True,” you have confirmed throttling status.
For gaming validation, run MSI Afterburner alongside HWiNFO. Enable an on-screen display that shows CPU clock speed, GPU clock, and temperatures. When you notice the FPS drop, check the clock speed. If it dipped at once, throttling caused that drop; that’s not a GPU fault.
CPU temperature safe zones vary by chip, but as a general reference:
- Under 80°C — Healthy
- 80–90°C — Warm, watch it
- 90–100°C+ — Throttling zone
Intel’s 12th–14th Gen chips and AMD’s Ryzen 7000 series are rated to operate at 95–100°C for high-intensive tasks without necessarily throttling. Check a given CPU’s TjMax before treating a 95°C reading as a problem.
The Possible Causes of CPU Throttling
CPU throttling usually traces to heat, power limits, or software settings that keep clocks below their peak. These are the common reasons why throttle happens within the PC case.
Dried-out Thermal Paste
Thermal paste between the CPU and heatsink degrades with time. After two or three years, it can crack, dry out, and lose thermal conductivity. What once moved heat into the cooler can turn into a thin insulating gap, which increases temperatures when working hard, and the chip throttles to compensate. On old PCs, this is a common maintenance miss.
Dust Buildup in the Cooling System
Dust insulates. A heatsink packed with it can choke airflow enough that a system that once ran cool now hits throttle thresholds within minutes. Radiator fins, fan blades, and intake vents collect the most buildup.
Wrong Windows Power Plan
Windows’ Balanced plan can cap the Maximum Processor State below 100%, which prevents the CPU from reaching full boost clocks even when a game needs them. When that happens, it means Windows is holding it back.
Power Limit Caps (PL1/PL2)
Intel processors use two power limits. PL2 allows a short burst of higher power for better performance. PL1 is the lower sustained limit that takes over after a few seconds. If a motherboard maker sets PL1 too aggressively, as is normal in thin laptops and some budget boards, the processor throttles to stay under the wattage cap regardless of temperature.
Inadequate Cooler
A 125W TDP processor paired with a low-end cooler, or a laptop cooling system not produced for long gaming sessions, will almost always cause throttling. The cooler doesn’t remove heat fast enough to keep the chip in its comfort zone.
Poor Case Airflow
A desktop with no intake/exhaust fans or blocked vents turns the case into a heat trap. Air around the CPU cooler gets hot, which makes it hard to draw heat away from the processor; even a great cooler struggles when it has to breathe 40°C air inside the case.
Background Processes
If something is already running in the background and forcing CPU usage up before the game launch, you can end up starting with a chip that’s already warm and creeping toward its power limits. Windows Update, antivirus scans, and runaway browser tabs are common causes.
How to Fix CPU Throttle
Fix throttling with the software-related solutions first. They take minutes and solve the majority of cases. Move to hardware only if these don’t work
Fix 1: Change Windows Power Plan
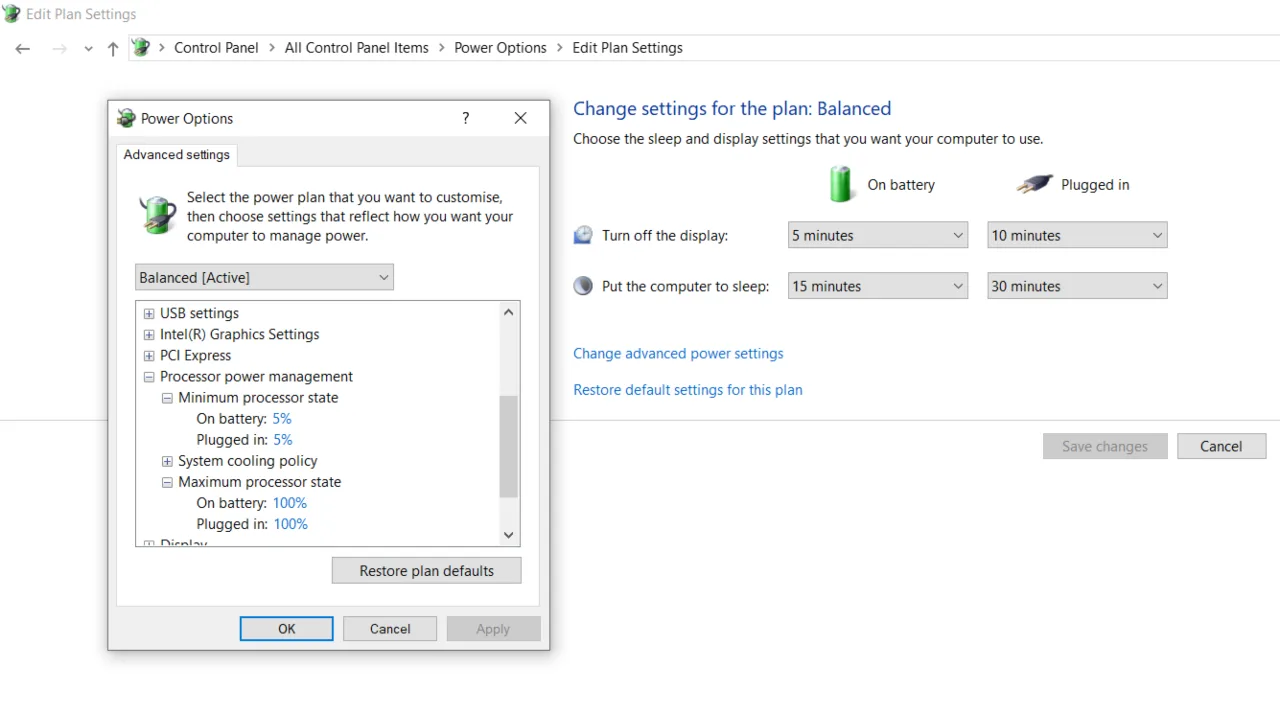
- Open Control Panel > Power Options and choose High Performance.
- Then click Change plan settings > Change advanced power settings, expand Processor power management, and set Maximum processor state to 100%.
- Also set Minimum processor state to 5% to preserve proper idle behaviour.
In Windows 11, you can also change power modes in Settings > System > Power & battery. High Performance will increase performance, but reduce battery life.
On Windows 11 systems with recent Intel processors, consider the Ultimate Performance plan as well. You may need to enable it first in CMD (Admin) with this command: powercfg -duplicatescheme e9a42b02-d5df-448d-aa00-03f14749eb61.
BIOS Settings:
- Disable Intel SpeedStep or AMD Cool’n’Quiet.
- Disable C-States (sleep states).
- Set CPU frequency to manual/fixed mode.
Expect the idle power consumption to double. Only do this if you’re chasing every last FPS or rendering professionally.
Fix 2: Clean Out the Dust
A clogged heatsink can raise temperatures by 15-30°C, turning an adequate cooler into a paperweight. So, it’s very important to clean the dust inside your system every few months.
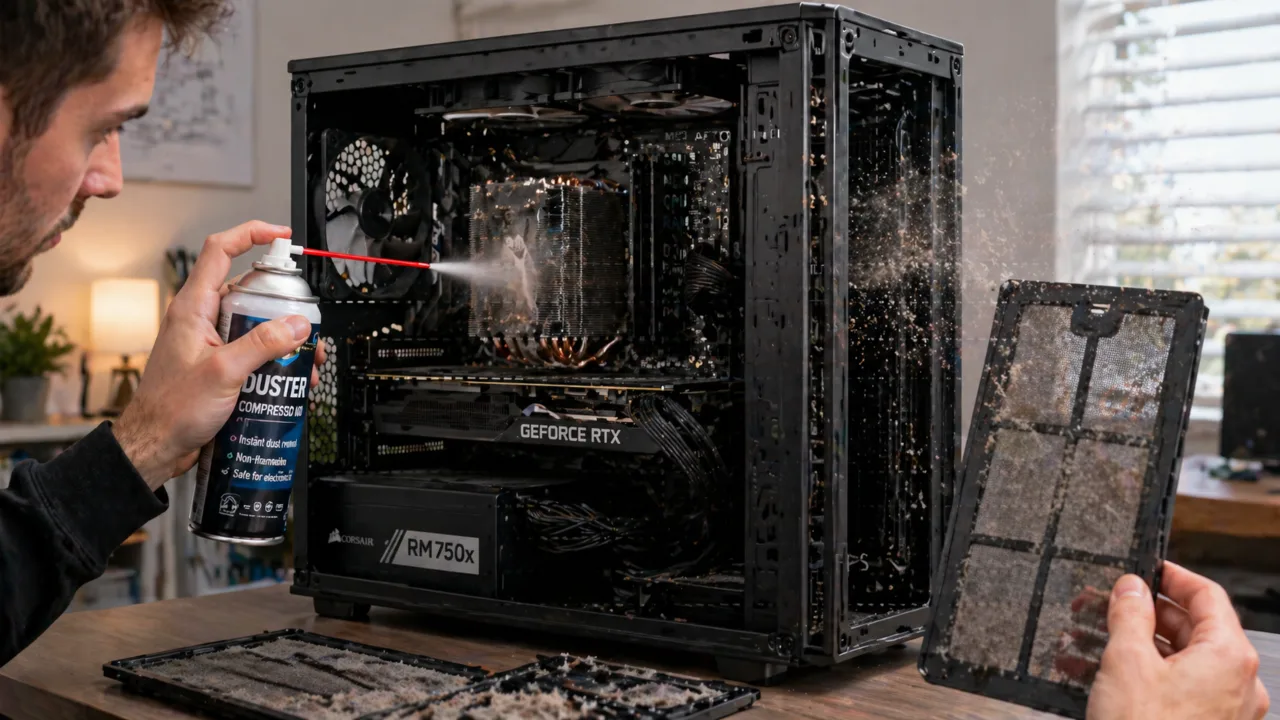
For a desktop:
- Shut down the system, unplug it, and hold the power button for 5 seconds to discharge it.
- Remove the side panel and go section by section.
- Use compressed air to blow out the heatsink, fans, and vents.
- Wash case filters with soap and water.
- Check that all fans spin freely.
To clean the laptop:
- This requires partial disassembly. If you’re not comfortable, skip to software fixes. But if you can, remove the bottom panel, find the heatsink exhaust, and blow compressed air through the fins. You’ll be shocked at the dust brick that comes out.
Do this at a minimum once a year if the system remains on carpet or in dusty environments.
Blow air in the opposite direction of normal airflow, out through the intake. That pushes dust back the way it came instead of driving it deep inside.
Fix 3: Reapply Thermal Paste
If the system is more than two years old and has never been serviced, that’s almost certainly part of the problem. Thermal paste degrades over time. Even quality compounds such as Arctic MX-4 and Thermal Grizzly Kryonaut lose strength after two to three years of heat cycling.
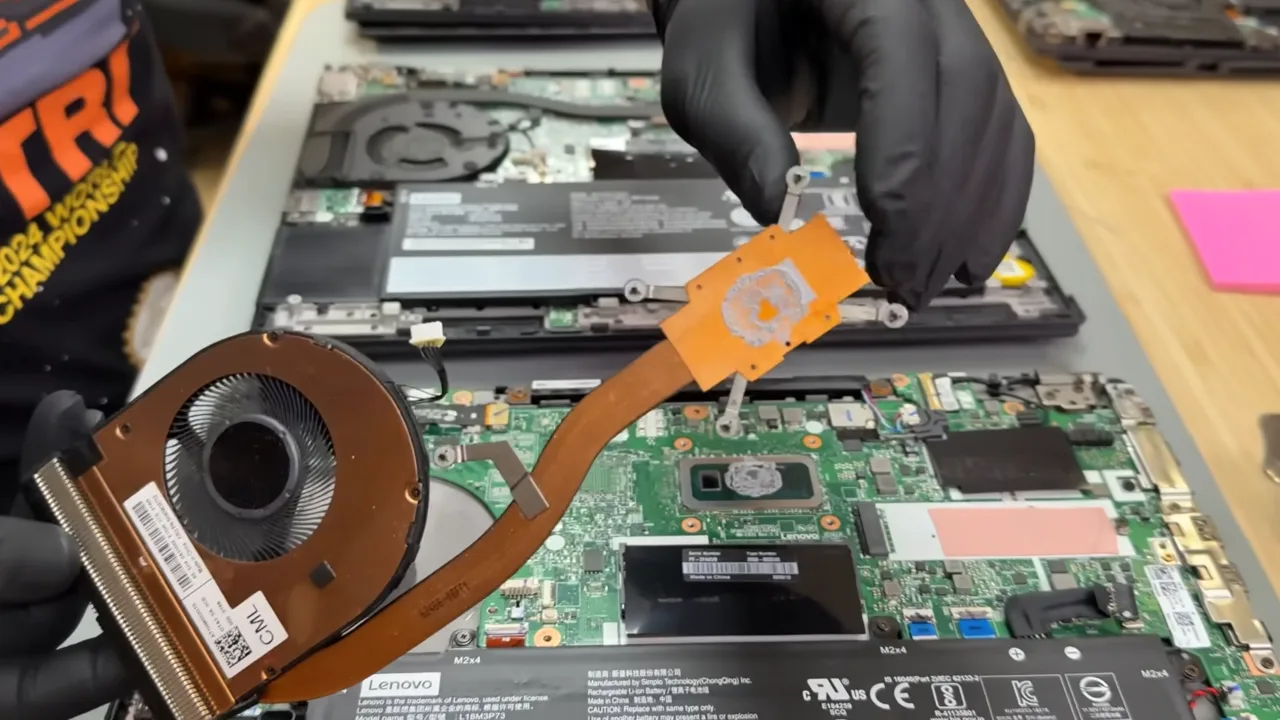
Here’s how to do it right:
- Remove the cooler (unscrew in a star pattern, twist gently to break the seal).
- Clean off the old paste with 90%+ isopropyl alcohol and coffee filters.
- Apply a fresh pea-sized dot of new thermal compound in the center of the CPU die.
- When reinstalling the cooler, tighten the screws in an X-pattern to ensure even mounting pressure. Uneven pressure is a common cause of localized core overheating.
Don’t overtighten the cooler brackets when reseating. Over-torquing can crack the PCB or create uneven contact pressure, which makes thermals worse, not better. Apply even, diagonal pressure to tighten the screws.
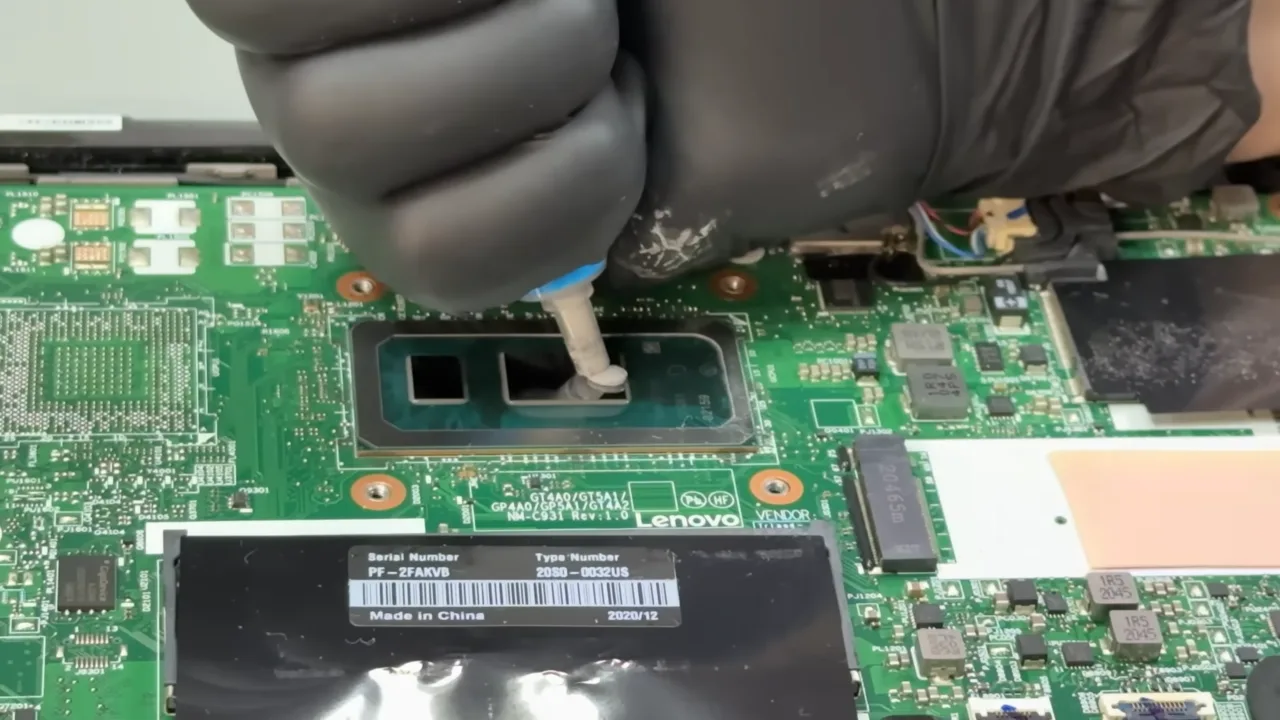
Spread methods are outdated as the heat sink’s mounting pressure spreads it evenly. Do not use too much; excess paste acts as an insulator. On old computers, a new thermal paste alone can drop CPU temperatures by 10–20°C.
AMD’s 7000-series and Intel’s 12th-gen+ CPUs have larger contact areas. Use a small line pattern of paste instead of a dot.
Fix 4: Improve Case Airflow
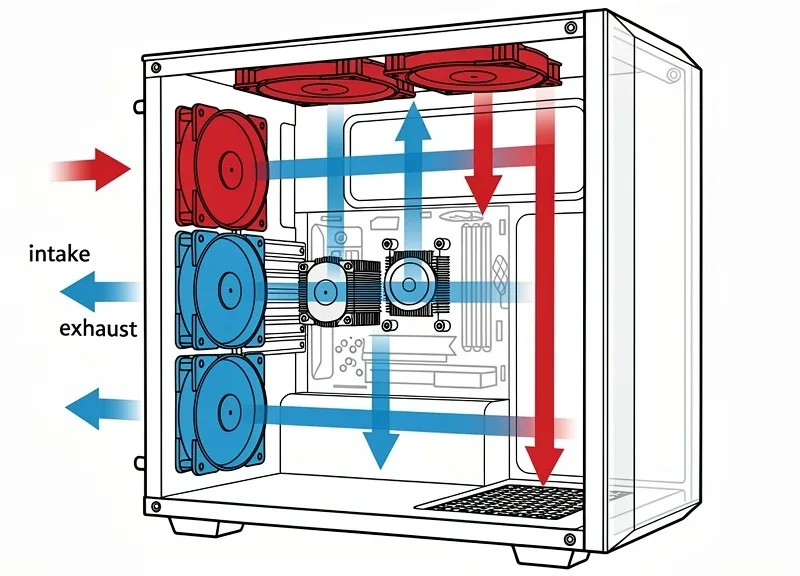
On desktops, build a front to back or bottom front to top back airflow path. Add front intake fans to pull cool air in, rear exhaust fans to draw air out, and top fans to vent hot air. Keep cables clear of the path between the front intake and the CPU cooler; even if you reposition existing fans, it can make a good difference. Furthermore, remove unused drive cages because they create dead zones where hot air pools.
Fix 5: Undervolt the CPU
Processors leave the factory with extra voltage applied to ensure stability across millions of chips, and that extra voltage generates useless heat. Undervolting minimizes the power supplied to the CPU at a given clock speed, reducing heat without hurting performance. In many cases, an undervolted CPU holds higher boost clocks for long because it reaches thermal limits at a slow pace.
- Intel: Use Intel XTU (Extreme Tuning Utility). Start with a conservative –50mV on Core Voltage Offset, stress test, and step further in –10mV increments until the system becomes unstable, then back off one step. Most Intel CPUs handle -80mV to -150mV undervolts. My 10700K is stable at -125mV, with a 12°C temperature drop.
- AMD: Use AMD Ryzen Master. Precision Boost Overdrive, or PBO, paired with a negative voltage offset, achieves the same result.
Undervolting is stable once you find the right value for your specific chip. Every CPU is different — what works at –100mV on one i7 may crash another. Work in small steps and run a 20-minute Prime95 test after each change before you can confirm it’s now stable.
Fix 6: Upgrade the CPU Cooler
If you have Intel’s stock box cooler on a 65W+ desktop CPU under gaming loads, take it as part of the problem. Stock coolers are engineered to one goal: keep the CPU from damaging itself. Performance? That’s your problem. A mid-range tower cooler, such as the Noctua NH-U12S or DeepCool AK620, provides the chip more thermal headroom and costs less than many new games. On laptops, aftermarket cooling pads with strong fans can be of help, though only up to a point.
Fix 7: Adjust Power Limits (Advanced)
If HWiNFO confirmed Power Limit Throttling rather than thermal throttling, then the fix is different. On Intel desktops, you can raise PL1 and PL2 in Intel XTU or the BIOS under CPU Power Management. On laptops, some manufacturers offer a “performance mode” in their system utility that increases the power limits. To find out about it, check a control center app like Lenovo Vantage, ASUS Armoury Crate, MSI Dragon Center, etc., for your specific hardware.
If you raise power limits past what cooling can handle, you basically trade a power throttling problem for a thermal throttling one. Only do it if the temps still have headroom. If thermals are already close to the limit, fix that first.
Fix 8: Kill Unnecessary Background Processes
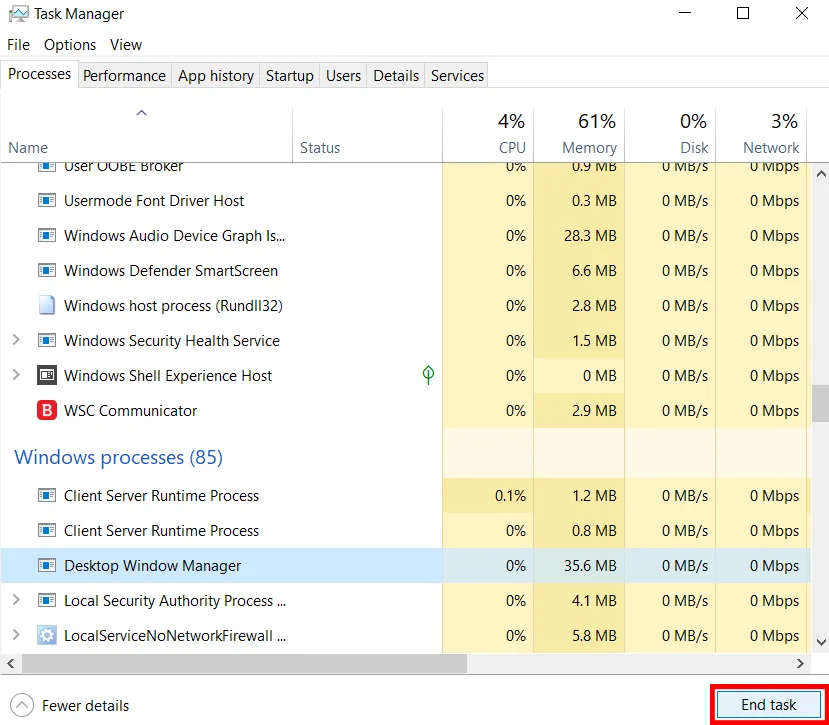
Press Ctrl+Shift+Esc to open Task Manager, sort by CPU usage, and check what is using resources before you launch a game. Common culprits include Windows Update, scheduled antivirus scans, browser tabs playing video, and game launchers with indexing enabled. Setting a game to High priority in Task Manager can also help the processor direct resources where they are needed.
Fix 9: Check BIOS Updates
Motherboard BIOS updates frequently include improved power delivery algorithms and changes to thermal management. If your system is more than a year old, go to the manufacturer’s support page for your exact model and read the changelog. Phrases such as “improved stability” or “power management optimization” mean fixes related to thermal behaviour.
Can You Completely Disable CPU Throttling?
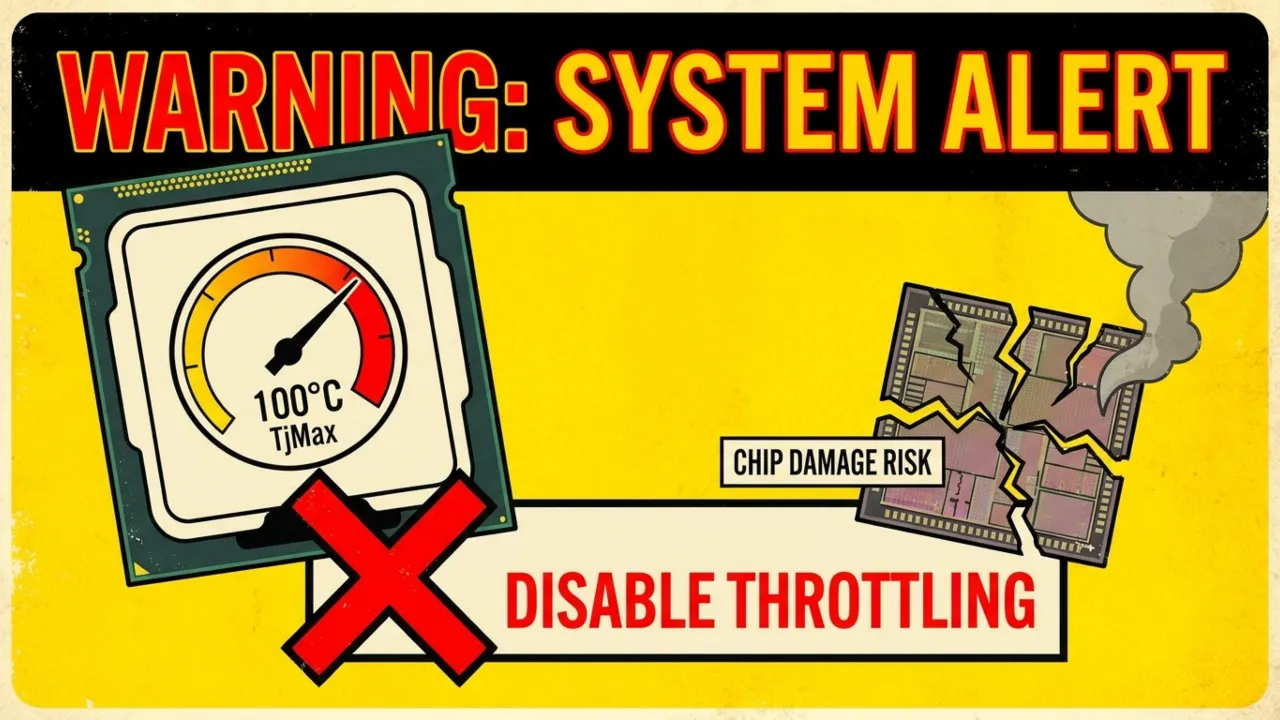
You can remove some software throttling limits through BIOS settings and power limits. But you cannot and should not disable the hardware thermal protection because it prevents permanent damage to the silicon. Running above TjMax without throttling protection can slowly harm the CPU.
Follow the right strategy. Fix what creates throttling so the processor never needs to throttle in the first place. A well-cooled, properly maintained system with a good power plan should rarely, if ever, hit the thermal throttle threshold under normal gaming or workstation tasks.